Exporting Test Executions
Generate validation documentation for compliance and regulatory purposes by exporting test executions in PDF, Word. Review and update execution results offline by exporting test executions in Excel or CSV. Share test case details with support or other teams by exporting the executions.
Note
Permissions and Configurations
Enable the Integration app.
Get Export permission for the Test Suite module.
Admins can manage role-based user access from Roles.
You can export test executions from:
The Test Execution tab in a Test Suite.
The Test Execution Screen.
Export to PDF or Word from Test Executions Tab
To export test executions in PDF or Word, do the following:
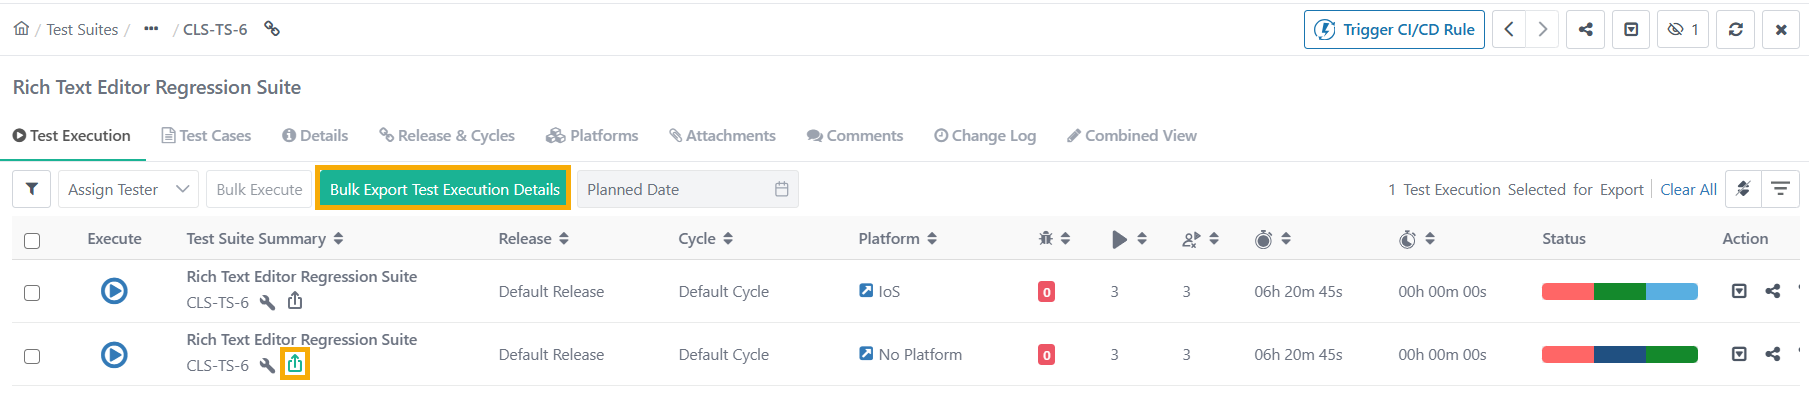 |
Go to the Test Suite Detail Page and select the Test Execution tab.
Select the test executions to export. You can select a maximum of five test executions at a time.
Click the Export icon under Test Suite Summary.
Click .
In the Export Test Execution Details dialog box, set the following parameters:
Set Export as to PDF or Word.
Set Orientation as Portrait or Landscape.
Select the options for the additional details you want to export. The default export contains Test Suite details, Test Execution details, Test Case details, and Test Case Run and Test Step Run execution status.
Test Execution Approval and Closure summary (only for eSignature-enabled projects).
Issues linked to test case and test steps execution.
Test case and test step execution details, such as Comments, Actual Outcome, Error Message and Trace, Test Run UDFs, Actual Setup and Attended Time, Execution Type, Duration, and Duration of automated test case and step execution. This option is selected by default. Clear this option to exclude these details, including Test Run UDFs.
Attachments linked to the test case and step execution. If you select this option, the system exports the PDF or Word file and the attachments in a zip file.
Requirements linked to the test case.
Relationship with dependent test cases.
Click Export.
Export Test Execution to Excel or CSV
Export test executions and linked test cases in Excel (XLSX) or CSV format. Select specific fields using Choose Fields. This allows the QA team to review and update test executions locally, then sync the changes back before continuing with execution.
Export Test Execution
To export test executions, do the following:
Go to the Test Suite Execute Screen.
Click the Cog (⚙️) icon and select Export.
In the Test Execution Export Configuration dialog box, under Select Export Format, select XLSX or CSV.
Select Export Options for Test Executions and Test Cases.
On the Test Executions tab, select one of the following options:
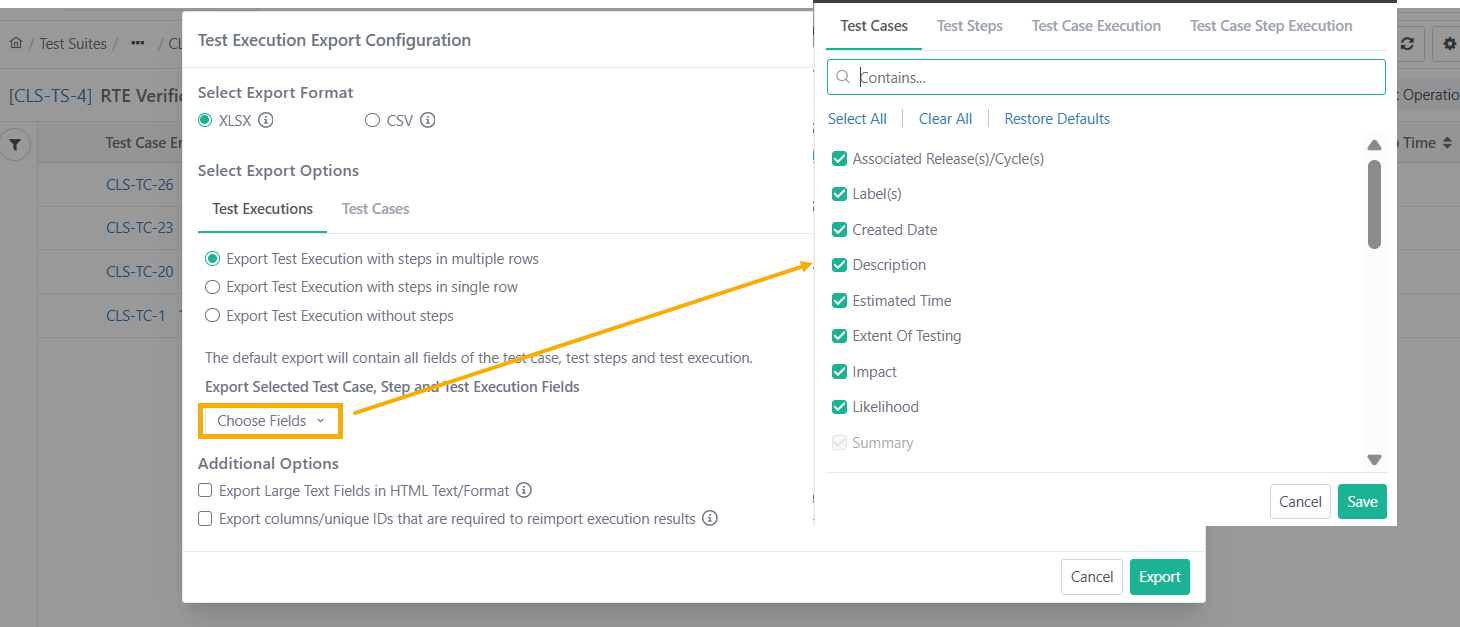
Select Test Execution with steps in multiple rows to export test cases with steps arranged in multiple rows of the Excel sheet.
Select Export Test Execution with steps in single row to export test cases with steps in a single cell.
Select Export Test Execution without steps to export test cases without steps.
(Optional) To export only specific fields, click Choose Fields. Select the fields on the Test Cases, Test Steps, Test Case Execution, and Test Case Step Execution tabs, and then click Save.
(Optional) Under Additional Options, select any of the following:
Select Export Large Text Fields in HTML Text/Format to export large text fields in HTML format. If you leave this option cleared, the system exports large text fields as plain text.
Select Export columns/unique IDs that are required to reimport execution results to export the executions in a format you can reimport. The export includes all required columns and unique IDs.
On the Test Cases tab, select one of the following options:
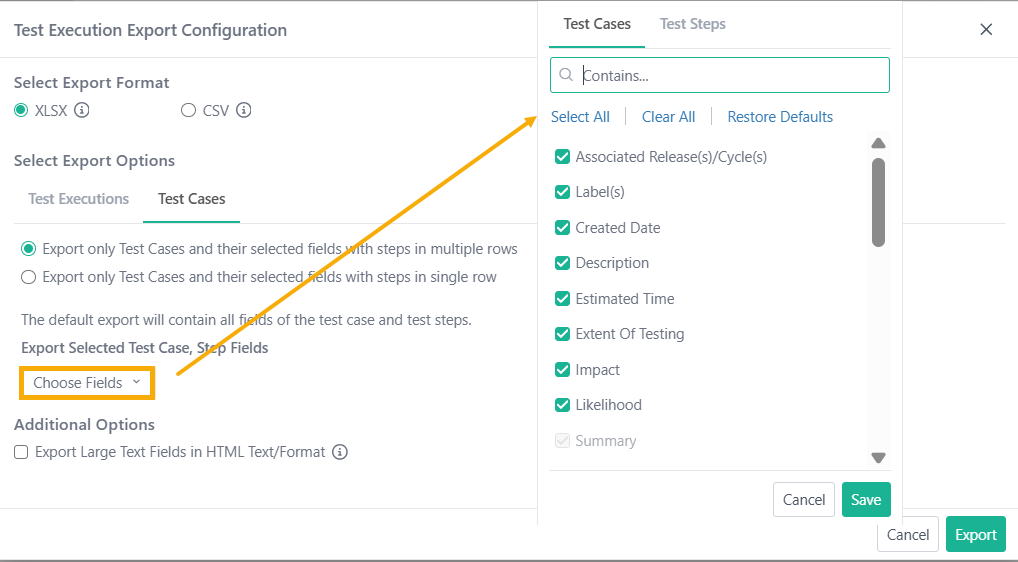
Export only Test Cases and their selected fields with steps in multiple rows.
Export only Test Cases and their selected fields with steps in single row.
To export only specific fields, click Choose Fields. Select the fields in the Test Cases, Test Steps tabs and then click Save.
Under additional option, select Export Large Text Fields in HTML Text/Format to export large text fields in HTML format. If you leave this option cleared, the system exports large text fields as plain text.
Click Export.
By default, the export contains all fields of the test case, test steps, and test execution, including the UDFs defined for test executions. To export only specific UDFs, select them on the Test Case Execution tab in Choose Fields.
Note
The file name follows the format Test Suite Key + Release + Cycle + Platform.
Update Execution Results and UDF Values by Re-importing
To update execution status and UDF values for test executions, do the following:
Export the test executions to Excel or CSV with Export columns/unique IDs that are required to reimport execution results selected.
In the exported file, update the execution status and the UDF values.
Save the file and import it. See Importing Test Suites (Executions) from Excel.
Note
Do not rename, add, delete, or modify column headers in the exported file. The import fails if the headers change.
Enter valid values for each mandatory Test Run UDFs. If a mandatory UDF is blank or has an invalid value, the import fails.
Track the export progress in Scheduled Tasks.