Why Parameterize Requests?
Data parameterization is an important part of load test design that helps you vary recorded traffic and emulate real-life application usage better. You perform parameterization by taking values of request parameters from a data source rather than using fixed recorded values. This way, you can have virtual users log in under different accounts, enter different data in forms, order different products in an online shop, search for different items in catalogs, and so on.
LoadComplete supports various types of data sources for request parameter values: databases, Excel and CSV files, incremental and random value generators and others. It lets you define variables that take values from data sources and use these variables in place of recorded parameter values.
LoadComplete also comes with a wizard that automates the entire parameterization process and guides you through it.
Step-By-Step Tutorial
1. Prerequisites
Before starting this tutorial, you will need the following:
-
LoadComplete with the installed Web Orders sample application.
The sample application allows authenticated users to manage a list of orders, for example, add, modify and delete orders. To make sure that you have the application installed and working, open the http://localhost/LoadComplete/ link in your web browser. For information on the application requirements, see the Requirements section in the LoadComplete Basic Test Sample topic.
-
The Basic Test project shipped with LoadComplete. We will use the project in this tutorial. The project contains several scenarios and tests for the sample Web Orders application.
By default, the project resides in the following folder:
<Users>\Public\Public Documents\LoadComplete 4 Samples
Make a copy of the project in a different location so you can modify it while keeping the original project intact.
-
Microsoft Excel 2007–2013.
-
2007 Office System Driver: Data Connectivity Components. You can get it the from the Microsoft website:
 http://www.microsoft.com/en-us/download/details.aspx?id=23734
2. Identifying Values to Be Parameterized
Before you start enhancing your user scenarios, you need to decide which requests and data you need to parameterize. A typical example is the user login and password.
Our sample application (http://localhost/LoadComplete/) uses forms authentication. It passes the login and password to the server in the request body.
In this tutorial, we will parameterize a login request, Request 0005, in the Login scenario. The request body contains several parameters, including the login and password.
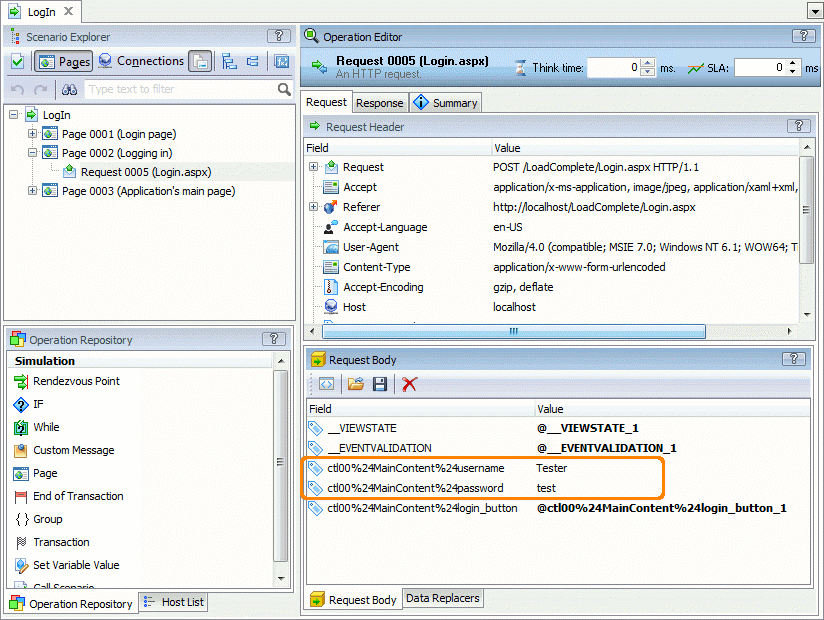
If we play back this scenario “as is”, all virtual users will use the same login and password. To achieve more realistic behavior, we are going to bind these parameters to a data source so that virtual users will use different logins and passwords.
3. Preparing Data Source
For this load testing tutorial, we will store logins and passwords in an Excel file. We will use LoadComplete’s parameterization functionality to bind the login and password parameters inside a request to the corresponding columns in the Excel file.
Create an Excel file with the following data (including the column headers) and save the file under the name of accounts.xlsx.
| Login | Password |
| Tester | test |
| Demo | demo |
| Guest | foobar |
| John | qwerty |
| Jane | 123456 |
4. Linking Data Source to Requests
Now you need to modify the login request to use data from the Excel file. To do that, you’ll need to create variables linked to the individual columns in the Excel file. Next you need to insert the variables in place of the hard-coded parameter values inside the request.
There are two ways to set up request parameterization:
-
Manually.
-
By using the Parameterization wizard.
We will use the Parameterization wizard because it provides an easy to use, step-by-step procedure for binding requests to data sources.
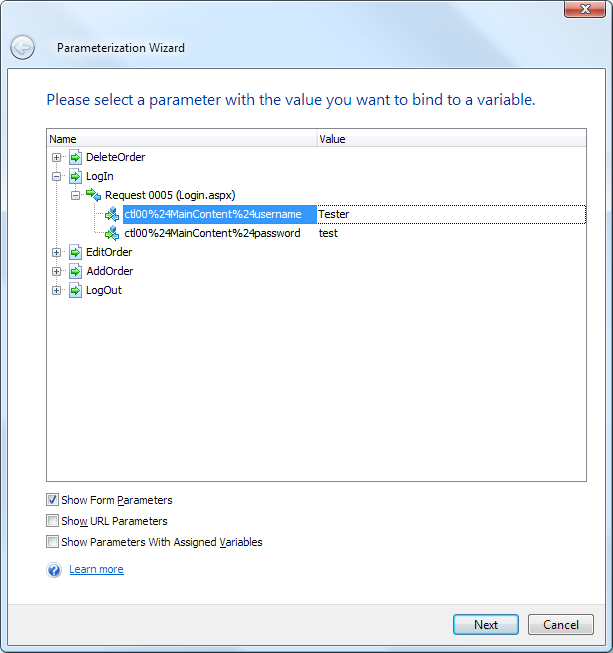
To open the Parameterization wizard, click the  Set Parameter Values toolbar button or select Test | Set Parameter Values from the menu. In the wizard:
-
Select the scenario, request and parameter you want to parameterize. In our example:
- The scenario is LogIn.
- The request is Request 0005 (Login.aspx).
- The request parameter is ctl00%24MainContent%24username.
-
Select New variable and specify Login as the variable name.
-
Select Excel workbook as the variable type, specify the path to the accounts.xslx file and check First line contains column names.
-
Select the Sheet1$ worksheet and, on the next page, the Login column.
-
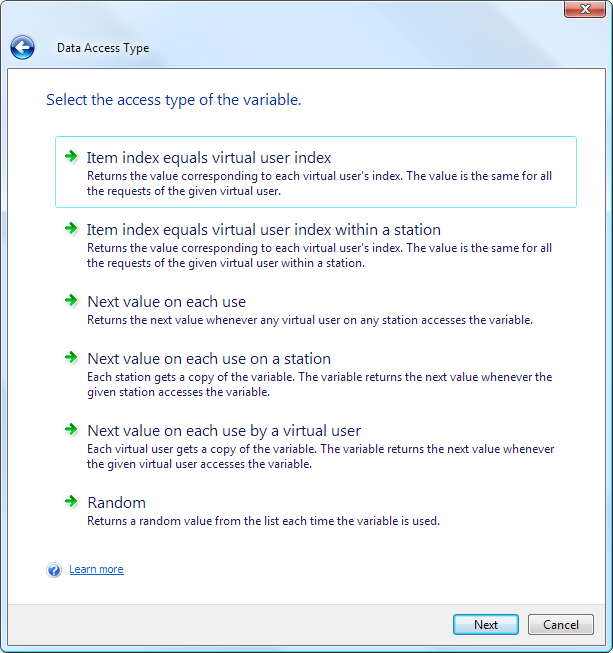
For the data access type, select Item index equals virtual user index (the first option). This way the first virtual user will use the first account from the Excel file, the second user – the second account and so on.
-
Click Edit one more parameter and repeat the steps above to set up data binding for passwords. All parameters are the same, except for the following:
- Request parameter name – ctl00%24MainContent%24password
- Variable name – Password
- Excel file column – Password
You can see the variables that were created in LoadComplete:

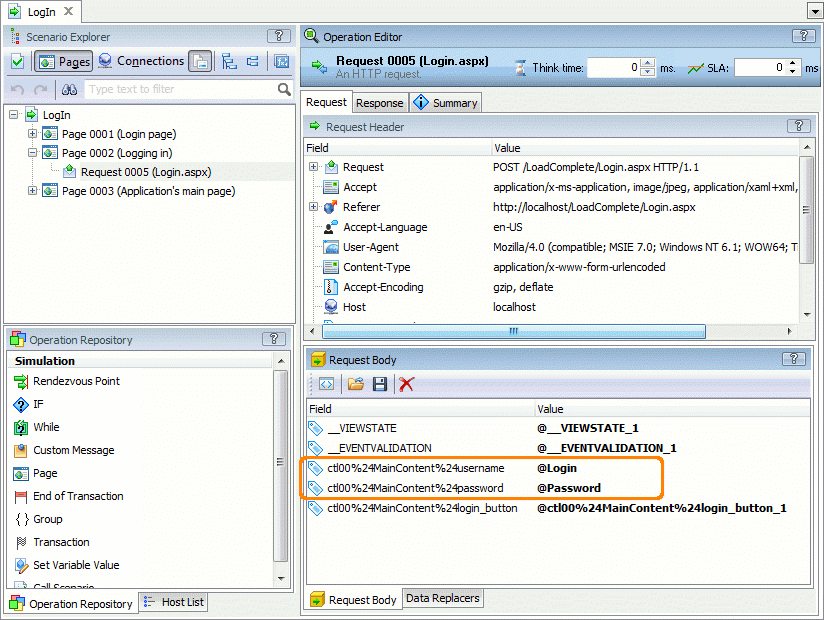
If you look at the body of the login request now, you will see that the hard-coded login and password were replaced with the variables we just created.
5. Configuring and Running the Test
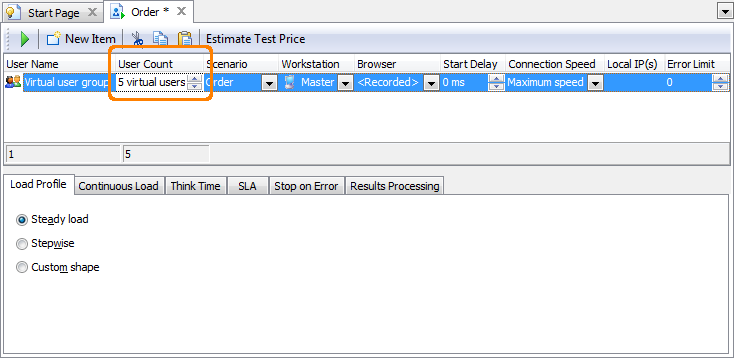
Now let’s configure the load test. Open the Order test and set the virtual user count to 5 (since we have five accounts in our data file).
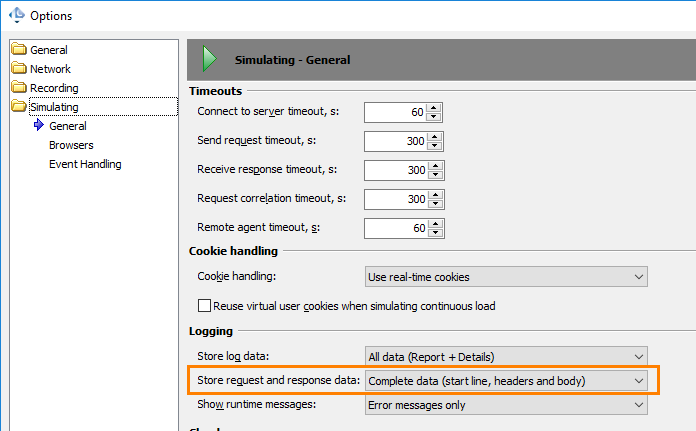
To log the request body contents to the test results and view the credentials used by various virtual users, set the Store request and response data option to Complete data:
-
Select Tools > Options from LoadComplete’s main menu.
-
Select Simulating > General in the Options dialog.
-
In the Logging group of options, set the Store log data option to All data (Report + Details).
-
Set the Store request and response data option to Complete data (start line, headers and body).
All set. Now you can run the test.
6. Viewing Test Results
OK. Let’s dig into test results to make sure that virtual users actually used different accounts from the data source.
-
Double-click the Details item in the Project Explorer.
-
In the left pane of the Details panel, select a virtual user.
-
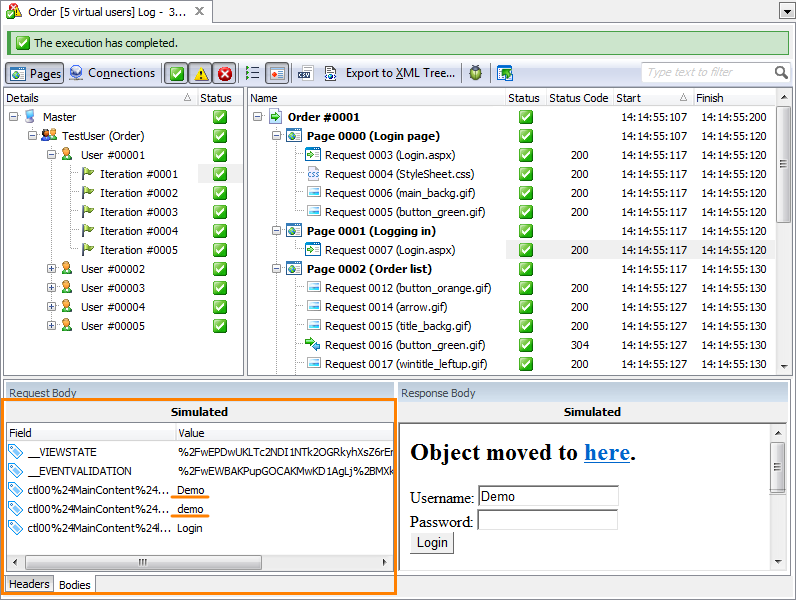
In the right pane of the Details panel, find the login request (Request 0005 (Login.aspx)).
-
Switch to the Bodies tabbed page and examine the simulated request body. You will see that LoadComplete used the values it had extracted from the Excel file.
Congratulations! You have finished the tutorial. Now you can start parameterizing your own scenarios. Be sure to try other data source options – CSV files, databases, random value generators and so on – whichever fits your needs best.
