This page is related to key-based licenses — a regular license type. For information on the new ID-based license type, see SmartBear ID-based Licenses.
General Procedure
You activate your TestLeft license with a TestLeft license key.
The activation procedure is similar for both the Node-Locked and Floating User licenses. The only difference is the computer where you activate your license:
-
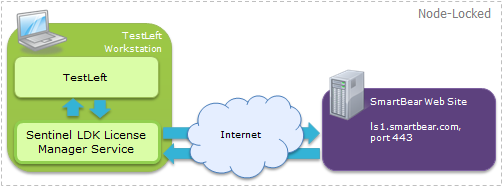
If you have a Node-Locked license, activate the license on a computer where you will use TestLeft.
-
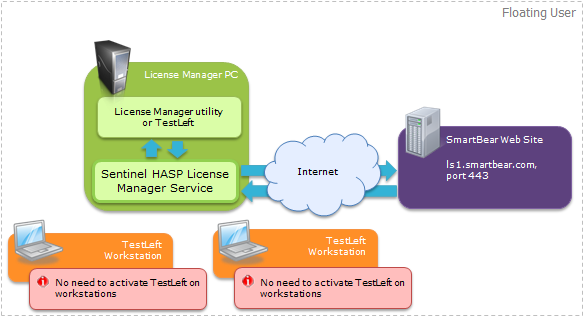
If you have a Floating User license, you can activate the license on a computer where you install TestLeft or on a server computer in your network (recommended) and use the License Manager stand-alone utility to manage licenses.
During license activation, the licensing subsystem sends your license key and hardware-specific data to the SmartBear license server (https://ls1.smartbear.com or https://ls2.smartbear.com, port 443). The server responds with the activation data and TestLeft applies this data to your computer:


You can activate the license in automatic or manual mode:
-
Automatic activation means that the licensing modules exchanges data with the SmartBear license server automatically. All you need to do is to specify the activation data in the wizard.
-
Manual activation implies that you exchange data with the SmartBear license server manually. Choose this mode if your computer is not connected to the Internet.
The activation consumes the license key. You will not be able to use this key later.
To move the license to another computer, you will have to deactivate the license on your current License Manager PC. To learn more, see Deactivating and Moving Licenses.
Requirements
Common
-
If you have a Node-Locked license:
The computer, on which you are going to install and activate TestLeft, must match the software and hardware requirements.
If you have a Floating User license:
To manage licenses, you can use either the stand-alone License Manager utility (recommended), or the licensing modules included into TestLeft.
Activate the license on a computer that has a local network connection and always will be available for your TestLeft workstations in your network.
The licensing modules use the TCP and UDP protocols and port 1947. Make sure that firewalls and proxies in you network do not block these protocols and the port.
-
Activate your license on a physical computer. Do not activate it on a virtual machine or cloud computer.
This does not prevent you, however, from running tests on virtual machines and in the cloud. See Using TestLeft on Virtual Machines for details. -
There must be no other TestLeft licenses activated on the computer where you are going to activate your license.
-
We recommend that your computer has an Internet connection. It will use the connection for license activation. After activating the license, it will no longer need the connection.
In addition, it must have access to the SmartBear web server (URLs
https://ls1.smartbear.comandhttp://ls2.smartbear.com, port 443). Make sure the proxies and firewalls working in your network allow the activation requests.If your License Manager PC does not have an Internet connection, you will need an intermediate computer that has an Internet connection and that you will use to exchange data with the SmartBear web server. The intermediate computer must have access to the SmartBear web server (URLs
https://ls1.smartbear.comandhttp://ls2.smartbear.com, port 443).
Activation Steps
If you have an Internet connection on the computer where you activate your license, it will exchange the activation data with the SmartBear web server automatically. Otherwise, you will need an intermediate computer with a working Internet connection that you will use to exchange data between your computer and the SmartBear web server manually:
Automatic Activation (Recommended)
1. Start Activation
If you have a Node-Locked License:
-
Install TestLeft on your computer.
-
Launch TestExecute that is included into the TestLeft installation. It will search for an active license on your computer and in the network.
-
If no active license is found, it will show a message box informing you about this.
Click Activate a license in the message box.
If you have a Floating User License:
-
Install the License Manager utility on your computer.
-
Click the operating system’s Start button (or the Windows button) and select All Programs | SmartBear | License Manager | Activate or Deactivate License.
— or —
-
Install TestLeft on your computer.
-
Launch TestExecute that is included into the TestLeft installation. It will search for an active license in the network.
-
If no license is found, a message box informing you about this will be shown.
-
Click Activate in the message box.
This will open the License Management wizard.
2. Provide the Activation Information
-
On the first page of the License Management wizard, choose Activate a new license on this computer and click Next.
If you have an Internet connection to the SmartBear licensing web sites, the wizard will choose the automatic activation mode.
-
On the next page of the wizard, specify the information needed for activation: the user name, company name, email, and license key.
You can find the license key on the TestLeft product page of the My SmartBear section of our web site (https://my.smartbear.com) or in the email message that we sent you after you had requested the license.
As for other values, you can enter either your user name, company name, and email, or those of the license holder. We recommend that you enter your data.
After you have specified the activation data, click Next to continue.
-
If your computer connects to the Internet through a proxy server, on the next page of the wizard, specify proxy authentication settings. Ask your system administrator for assistance, if needed.
-
Click Activate. The wizard will activate your license.
3. Finalizing the Activation
If the activation succeeds, you will see the final page of the License Management wizard informing you that the activation is over.
If the activation fails, the wizard will display an error message explaining the problem.
Manual Activation
1. Start Activation
If you have a Node-Locked license:
-
Install TestLeft on your computer.
-
Launch TestExecute that is part of the TestLeft installation. The TestLeft licensing subsystem will search for an active license. If an active license is not found, TestLeft will display a message box informing you about this. To open the License Management wizard, click Activate in this message box.
If you have a Floating User license:
-
Install the License Manager utility on your computer.
-
Click the operating system’s Start button (or the Windows button) and select All Programs | SmartBear | License Manager | Activate or Deactivate License.
— or —
-
Install TestLeft on your computer.
-
Launch TestExecute that is included into the TestLeft installation. It will search for an active license in the network.
-
If no license is found, a message box informing you about this will appear.
-
Click Activate in the message box.
This will open the License Management wizard.
If your computer is not connected to the Web or does not have access to the SmartBear licensing web sites, the wizard will display an error message and will suggest using the offline (manual) activation. Choose using the offline (manual) activation.
2. Collect Information About Your Computer
To generate activation data, we need some information about your computer’s hardware. The wizard collects this information automatically and saves it to a .c2v file on your computer. You will see the file name in the wizard.
If you are activating the trial license, the wizard will also display the trial license key. Remember it or write it down.
3. Exchange Data With the SmartBear Web Site
-
Transfer the .c2v file generated on the previous step to the intermediate computer.
-
On the intermediate computer, launch any web browser and open the following URL in it (this URL is also mentioned in the License Management wizard running on the License Manager PC):
-
On the opened web page, specify your license key and the name of your .c2v file. Click Send File. This will upload the file to the SmartBear web site. Transferring the file may take some time.
-
The web site will process the file and generate activation data for your License Manager PC.
After the web site generates the activation data, it will display a download link for the file that stores this data (this file has the .v2c extension). Download the .v2c file to the intermediate computer.
-
Transfer the .v2c file with activation data from the intermediate computer to your License Manager PC.
4. Apply the Activation Data
-
Click Next in the License Management wizard.
-
Specify the name of the activation data file (.v2c) in the edit box and click Activate. This will save the activation data on your computer.
5. Finalizing the Activation
If the activation succeeds, the wizard will display a page notifying you that the license has been successfully activated. You can close the wizard then.
In case of an error, the wizard will display a message notifying you about the problems. Try to solve the problems and activate the license again. For information on how to solve possible problems, see the Troubleshooting and How To sections.
See Also
About Key-Based Licensing System
Deactivating and Moving Licenses
About Key-Based Licensing System
 General Procedure