
To select a window or control that you want to map to a supported control class, use the Add New Object Class dialog.
To call the dialog, click Add From Screen on the Properties > Object Mapping page of a project or in the Default Project Properties > Project > Object Mapping dialog.
Note for mobile testing: To add a class of an object in a mobile application, select the object on the Mobile Screen (make sure the Mobile Screen window is not hidden before selecting the object). Also note that the application under test and the mobile device, where the application is running, must be prepared for testing in order for TestComplete to be able to access the application’s objects.
Connecting to Mobile Device Clouds and Opening Testing Sessions
Preparing for Android Testing (Legacy Mobile Support)
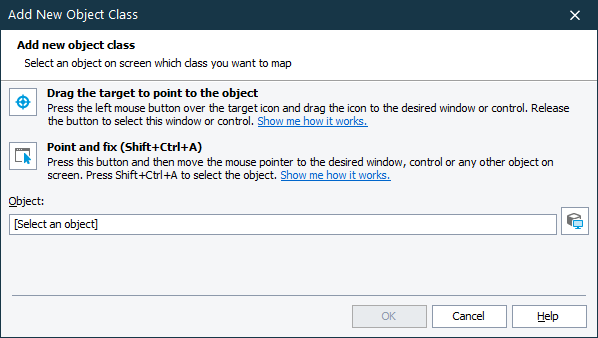
You can select the target object in one of the following ways:
-
Drag the target to point to the object
-
Drag the target glyph (
 ) to the desired onscreen object.
To select an object in a mobile application, drag the target glyph to the desired object on the Mobile Screen (see Select an Object on the Mobile Screen).
-
Wait until the red frame appears around the object and release the mouse button.
TestComplete will display the selected object’s class name in the Object box.
-
-
Point and press a shortcut
-
Click the
 button.
 -
Activate the desired object in the application and position the mouse pointer over it.
To select an object in a mobile application, move the mouse pointer over the desired object on the Mobile Screen (see Select an Object on the Mobile Screen).
-
When the red frame appears around the object, press the Select object shortcut, Shift+Ctrl+A (this shortcut can be changed in the Global Shortcuts options).
TestComplete will display the selected object’s class name in the Object box.
-
-
Enter the object name manually
Enter the full name, full mapped name or alias of the desired object into the Object box and press Enter. TestComplete will retrieve the class name of that object and display it in the Object box instead of the object name.
Tips for selecting objects:
-
Using the second approach may be more convenient if you need to manipulate the application before selecting an object. For example, you can open and point to popup windows, tooltips, and other objects that are hidden when being inactive.
-
Instead of selecting the object, you can copy its name from the Object Browser, Object Spy, keyword test, or script code beforehand and paste it into the Object box.
To make sure you have selected the correct object, click Highlight. TestComplete will highlight the appropriate object on the desktop screen or in the Mobile Screen window.
To add the specified class name to the Object Mapping settings, click OK. To close the dialog without performing any actions, click Cancel.
See Also
Object Mapping
Project Properties - Object Mapping Options
Default Project Properties - Object Mapping Options
Mobile Screen Window
Selecting an Object on the Mobile Screen (Android Testing)
Select an Object on the Mobile Screen (iOS Testing)
Preparing Android Applications (Legacy)
Preparing iOS Applications (Legacy)
Testing Mobile Applications