
About tested application list
A TestComplete project can include a list of tested applications. You can see them in the Project Explorer under the TestedApps node:
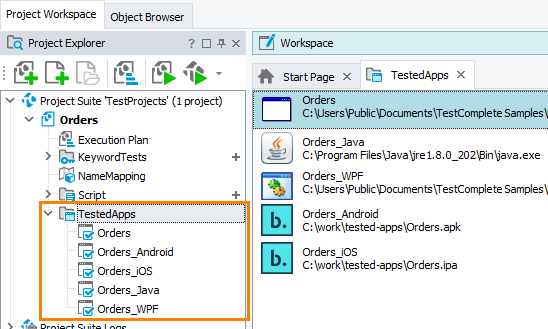
This list helps you manage and work with tested applications easier. For instance, you can specify the command-line arguments for the application, you can easily run them from your tests or from the TestComplete UI, TestComplete can start these applications automatically during the test recording, and so on. See About Tested Applications for details.
Open the page
In the New Project wizard, you can add Java tested applications to your project. To do this, you choose the Tested application check box on the first page of the wizard, and on the subsequent page, you select Desktop and enter the path to a .jar file. The wizard will display additional parameters to configure. Here is a sample view of the page:

Click the image to enlarge it.
Note that you can skip this step and add Java tested applications to your project at any time later. See Adding Tested Applications.
If you are going to start test recording right after creating the project, then you can also skip this step: by default, TestComplete will automatically add the applications, which you start during the recording, to the list of tested applications. This is controlled by TestComplete’s Recording > Add applications automatically to the Tested Application list option.
Supported applications
You use these parameters to configure 32- and 64-bit Java and JavaFX tested applications.
The wizard displays the parameters only if the application file has the .jar extension.
Requirements
To test Java desktop applications with TestComplete, you need a license for the Desktop module.
Parameters
-
Start application on recording – Select this check box to command TestComplete to start the selected application automatically every time you start test recording. You can disable this later, if needed.
-
Java virtual Machine to use – Specifies the Java Virtual Machine (JVM) launcher that will be used to run the Java application. You can select the launcher from the drop-down list, or click the ellipsis button and choose the launcher file in the subsequent dialog.
The drop-down list contains “with console” and “without console” launchers. They match the java.exe and javaw.exe executables correspondingly. These launchers are very similar. The only difference is that java.exe shows a console window, whereas javaw.exe does not show it. Consequently, if the application launch fails for some reason, java.exe writes error information to the console, whereas javaw.exe displays a message box.
-
Specify application's entry point – Use this option if your .jar file that does not have a startup class defined in the manifest. In the edit box, specify the name of the application class to be invoked.
When using this option, you must also click Configure class paths and specify the list of folders, .jar files or .zip files, in which TestComplete will search for the application’s classes.
-
Command-line arguments – The command-line parameters to be passed to the tested application on start. These values will be passed to the application’s
mainmethod. Don’t confuse them with parameters of the JVM. These are set in the Environment options text box. -
Environment options – The command-line arguments to be passed to the Java Virtual Machine launcher. For information on options that can be set here, see documentation on the JVM command line.
-
Working folder – The folder that will be set as the current folder for the application on start.
-
Configure class paths – Invokes the Class Paths dialog, where you can specify folder paths, .jar files or .zip files to search for developer-defined and third-party Java classes used in the tested Java application. If you selected the Specify application's entry point check box, you need to add the location of the application’s main class to this list.
The settings you make in the dialog override the
CLASSPATHenvironment variable.
After you configured the parameters, click Finish. TestComplete will create the project and will add the specified Java application to the project’s TestedApps collection.
Note that you can keep the edit fields blank and change parameters of your Java tested application at any time later.
See Also
Create New Project Wizard
About Tested Applications
Creating Projects and Project Suites
Java Application Parameters (Tested Applications)