BitBucket is a web-based source control repository hosting service by Atlassian. To manage repositories, it can use Mercurial or Git source control systems.
 Using Mercurial to manage BitBucket repositories is obsolete. Mercurial support is to be removed from BitBucket in 2020. To learn more, see bitbucket.org/blog/sunsetting-mercurial-support-in-bitbucket. This section will describe how to work with BitBucket repositories that use Git.
TestComplete provides support for BitBucket the same way it provides support for any other repository hosting service using any of source control systems that TestComplete supports. This means that you can work with BitBucket repositories directly from the TestComplete UI: add TestComplete projects and project suites to your repositories, commit changes, pull changes, and push them to your repositories and so on.
Requirements
-
The computer on which your TestComplete projects reside must have access to your BitBucket repository.
-
Your computer and TestComplete must be prepared as described in:
Working With BitBucket Repositories
The instructions below describe how to work with BitBucket repositories that use Git.
Storing TestComplete projects in BitBucket
To create a new BitBucket repository to store your TestComplete project:
-
Connect to BitBucket, for example, in your web browser.
-
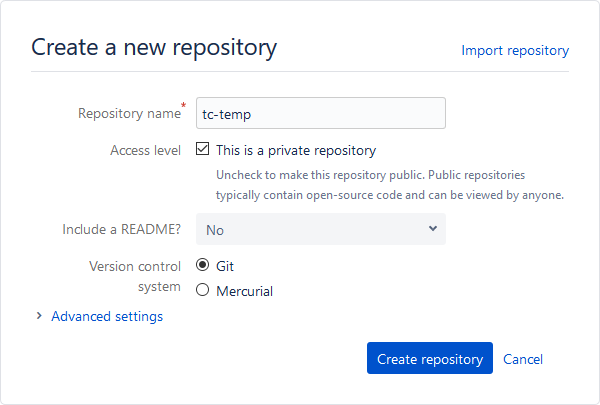
In BitBucket, create a new repository. When creating a new repository, make sure to select Git as a source control system to manage it. This plugin is installed in TestComplete by default:
-
On your local computer, launch TestComplete.
-
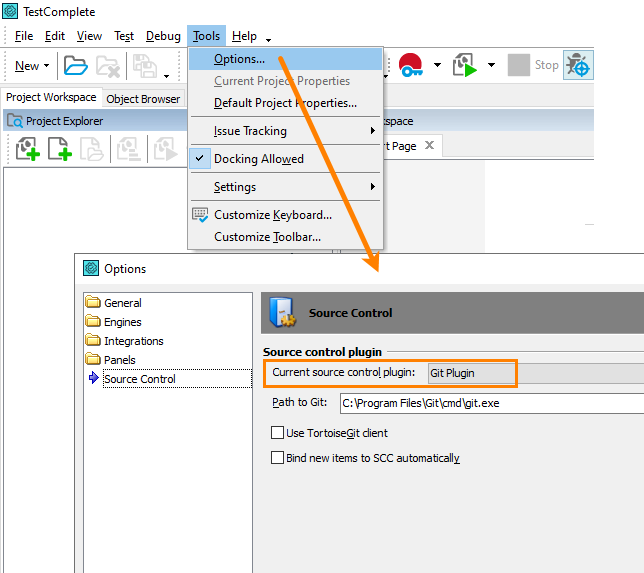
Open the Tools > Options > Source Control dialog and configure TestComplete to use to the Git Plugin as a current source control plugin:
-
Open your TestComplete project you want to store in your BitBucket repository.
-
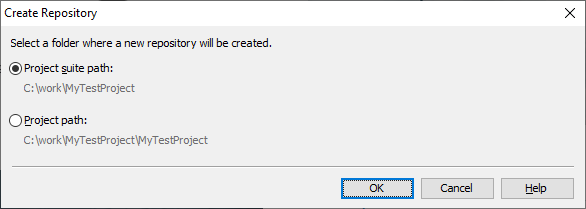
Create a local Git repository to store the project. To do it, right-click the project or project suite in the Project Explorer and then click Create Repository.
-
In the resulting dialog, select whether to create a repository for an individual project or for the entire project suite:

-
Select File > Source Control > Commit from the TestComplete main menu. In the resulting dialog, enter the commit message and commit your project or project suite files to the created local repository:
-
Add your local repository files to your BitBucket repository. You can do it by using the following command line:
<your_local_repository_folder>git remote add <remote_name> <remote_url>Where:
your_local_repository_folderis the name of the folder on your local computer where the local Git repository resides and to which TestComplete project has been committed.remote_nameis the name of your remote in your BitBucket.remote_urlis the URL of your BitBucket repository. You can find the URL on the Source page of your BitBucket repository.For example:
C:\tests\MyProject git remote add origin https://[email protected]/tc-bitbucket-temp/tc-bitbucket-temp.git -
In TestComplete, select File > Source Control > Push to upload your local project files to your remote BitBucket repository:
Your TestComplete project files will be added to your ButBucket remote repository. Now, you can work with them as with any files managed with BitBucket. See below.
If you already have a BitBucket repository that stores a TestComplete project:
-
Launch TestComplete.
-
Open the Tools > Options > Source Control dialog and configure TestComplete to use the Git Plugin as the current source control plugin. This plugin is installed in TestComplete by default:
-
Select File > Source Control > Clone Repository from the TestComplete main menu.
-
In the resulting dialog, enter the URL of your BitBucket remote repository that stores your TestComplete project or project suite, specify the local path to which the remote repository will be cloned, and click Clone:

-
TestComplete will clone your BitBucket repository to your local computer and open the project.
Working with TestComplete projects and project suites stored in a BitBucket repository
If you have your TestComplete project (or project suite) added to a BitBucket repository, you can work with it the same way you work with any project or project suite added to a repository managed with Git. To learn how to do it, please see the following section:

 Integration with Git > Requirements and Prerequisites


