
Now we can create the description file that contains information about our script extension. This file will be used to install the extension into TestComplete.
-
The description file has the XML format. To create it, you can use any text or XML editor.
Launch your editor and enter the following text in it:
XML
<?xml version="1.0" encoding="UTF-8"?>
<ScriptExtensionGroup Name = "My Extensions">
<Category Name = "Checkpoints">
<ScriptExtension Name = "Clipboard Checkpoint" Author = "SmartBear Software" Version = "1.0 test" HomePage = "smartbear.com">
<Script Name = "clcCode.js">
</Script>
<Description>
Provides support for clipboard checkpoints.
</Description>
</ScriptExtension>
</Category>
</ScriptExtensionGroup> -
Save the file under the description.xml name to the C:\My Extension Files\ActionsExtension folder.

The file name must be description.xml. When you install script extensions into TestComplete, it searches for the file with this name and retrieves information from it.
The description.xml file is not ready yet. We will add information about an action to the file when creating the action. Before creating an action, let’s describe the file contents.
-
The root element is ScriptExtensionGroup. It corresponds to a collection of script extensions. It has the Name attribute that describes the collection.
-
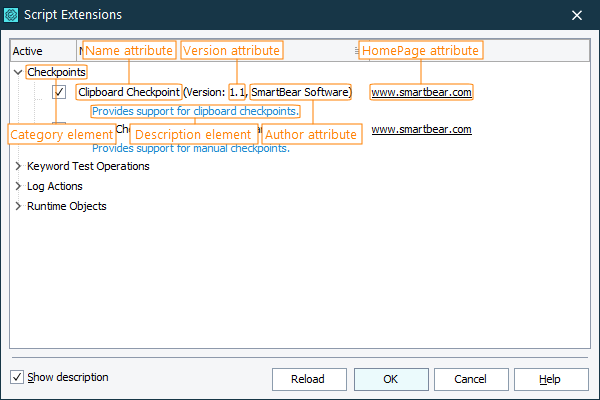
The ScriptExtensionGroup element can have one or more children Category elements that define the categories to which the extensions belong. The category names are shown in the Script Extensions dialog and are used to group extensions into the appropriate categories (see the image below). In this tutorial, we specify that our custom actions belong to the Checkpoints category.
-
Each script extension is represented by the ScriptExtension element. Its attributes provide information about the extension. This info is shown in the Script Extensions dialog (see the image below).
-
The extension’s description is specified by the child Description element:
-
A combination of the Name, Author and Version attributes are used as the extension’s identifier. If the extensions list already contains an extension with the same Name, Author and Version value, a new extension will not be installed into the list. In this tutorial, we used the 1.0 test value for the Version attribute. We did so to avoid conflicts with the pre-installed Clipboard Checkpoint extension.
-
The ScriptExtension element contains a child Script element. It corresponds to the script unit that will be included into the extension. The Name attribute of this element specifies the name of the script file. In our case it is clcCode.js.
-
The Script element also has the InitRoutine and FinalRoutine attributes that specify the script functions that perform the initialization and finalization actions. We will not use these attributes in our tutorial. For information on them, see description of the Script element.
 Prev
Prev
See Also
Script Extensions
Script Extension Files
Structure of the Description File