 Information in this topic applies to cross-platform web and mobile tests only.
About
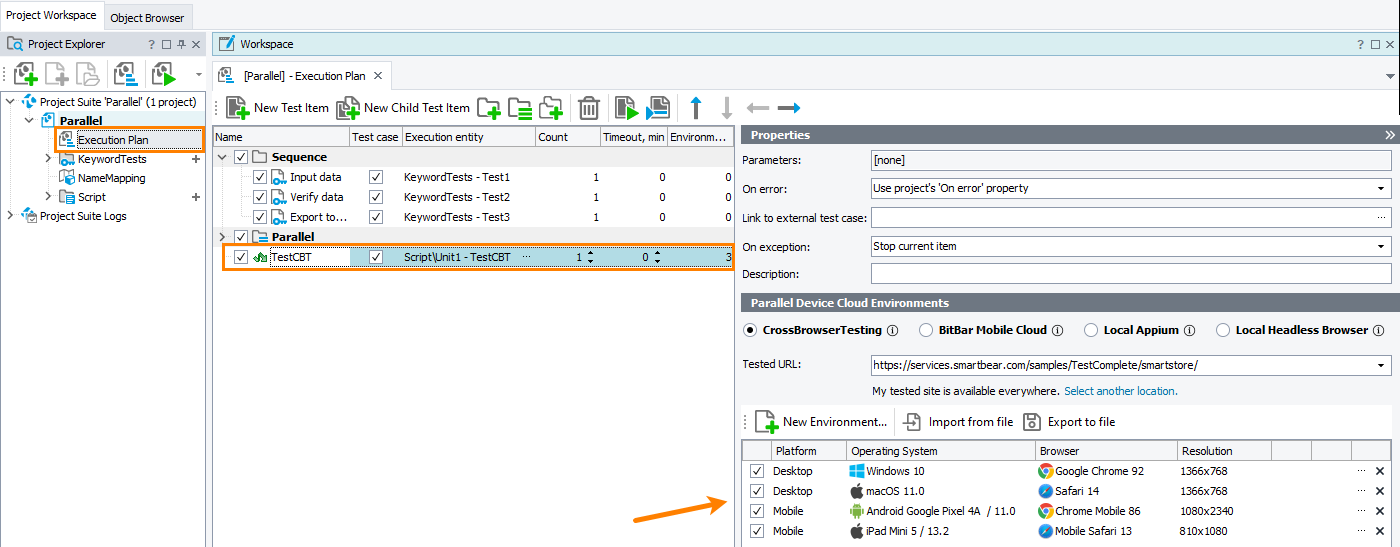
In the Parallel Device Cloud Environments panel of the execution plan, you can configure a list of cloud remote environments where the cross-platform web or mobile tests will be run in parallel.
Note: If the panel is hidden, to make it visible, click the  button in the right-top corner of the Execution Plan editor.
 You can control parallel test runs only on computers running under a 64-bit operating system.
You can run tests with one of the following environment providers:
| Web | Mobile |
|---|---|
| CrossBrowserTesting | BitBar Mobile Cloud |
| Local Headless browsers | Local Appium |
Important notes:
-
Only one environment provider can be used at a time.
-
Running web tests in the BitBar Web cloud is not supported yet.
CrossBrowserTesting
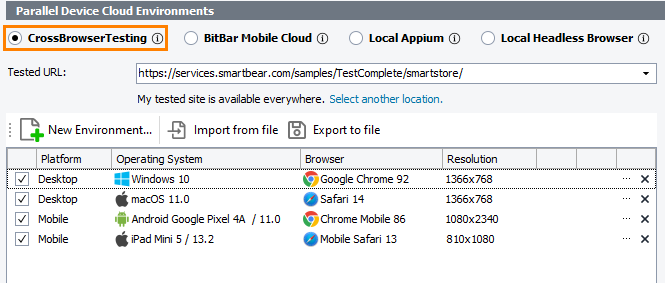
You can run cross-platform web tests on various environments in the SmartBear cloud provided by CrossBrowserTesting.com.
Requirements
-
An active license for the TestComplete Web Module.
-
The Web Testing plugin and the Cross-Platform Web Testing plugin must be enabled in TestComplete (they are installed and enabled by default).
-
An active CrossBrowserTesting account.
Note: If you do not have an account, you can sign up for a free trial directly from TestComplete — TestComplete will suggest that you do this automatically if it does not find the appropriate account data when you open the dialog.
-
TestComplete must have access to the device cloud. If there are any firewalls or proxies in your network, make sure that they allow traffic from the TestComplete workstation to the device cloud. If needed, configure the firewall to allow connecting to the cloud. See TestComplete and Windows Firewall.
To add a new CrossBrowserTesting environment
-
Create a cross-platform web test and add it to the execution plan.
- In the Device Cloud Parallel Environments panel, click CrossBrowserTesting.
-
In the Tested URL edit box, specify the URL of the tested web page that the specified web browser on the remote platform will open upon launching. You can specify the tested URL by using project and project suite variables.
 We recommend that you specify the complete URL of your target web page, including the protocol name. For example, http://services.smartbear.com/samples/TestComplete15/smartstore/. Otherwise, TestComplete will use the
 HTTPSprotocol to navigate to the target web page and post a warning to the test log.If your tested web application is behind a firewall in your local network or on your local computer, or if you want to route traffic to your tested application through a proxy server, you can configure a secure tunnel.
If the tunnel has not been configured yet, click Select another location and then, in the resulting Choose Your Web Application Location dialog, specify the application location.
The configured tunnel will be added in the project settings.
-
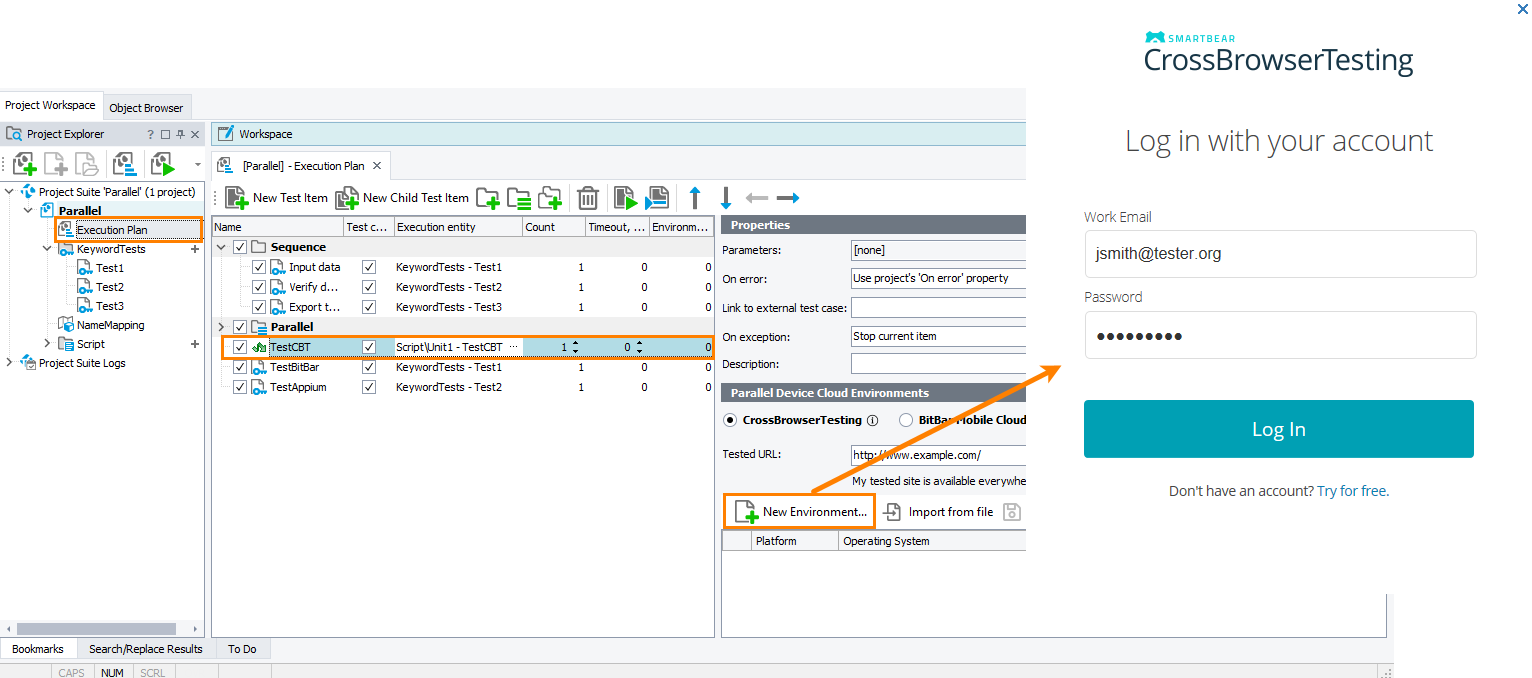
Click New Environment and specify the account credentials in the form that appeared:
Click Log In on the form.
The added credentials will be saved in the project settings. You will not input them each time.
-
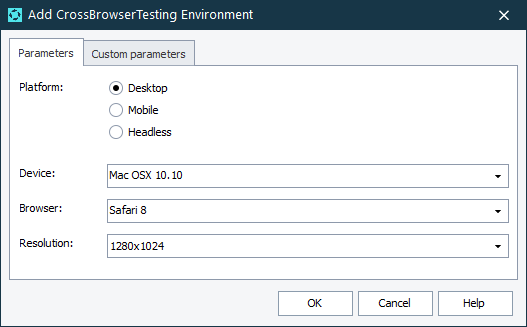
On the Parameters tab of the opened dialog, specify the following parameters of the added environments:
Column Description Platform The browser platform on which the test will be executed. The Mobile, Desktop, and Headless platforms are available.
Device The operating system on which the test will be executed.
Browser The browser version in which the test will be executed.
Resolution The screen resolution that will be set on the target platform for the test run.
-
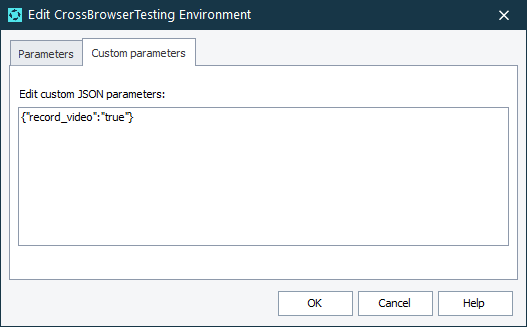
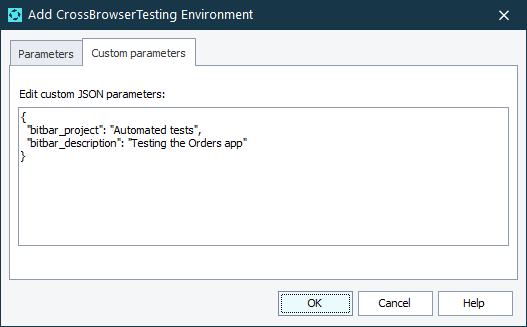
If needed, on the Custom parameters tab, you can specify additional capabilities to be used for the testing session. Specify the capabilities in the JSON format:
-
Click OK. TestComplete will add the configured environment to the list.
Note: The number of added environments is also displayed in the Environments column of the Test Item list for the particular test item.
BitBar Mobile Cloud
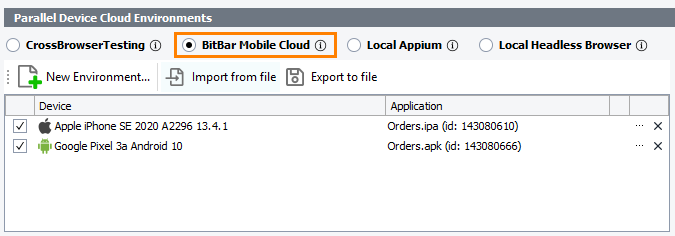
You can run mobile tests on real devices in the SmartBear cloud.
Requirements
-
TestComplete version 14.81 and later.
-
An active license for the TestComplete Mobile module.
-
The Appium Support plugin must be enabled in TestComplete. The plugin is installed and enabled by default. You can check the plugin state in the File > Install Extensions dialog of TestComplete.
-
Mobile devices managed by Appium. A mobile device cloud provided as a service by BitBar.
For details, please see Testing Mobile Applications - Requirements.
-
The TestComplete workstation must have access to the server that controls the mobile devices.
-
The TestComplete project must be configured to support Appium mobile devices.
By default, all new projects are configured this way. To make sure that your project is configured correctly, check its Mobile support type property on the Properties > Mobile Devices page. It must be set to Mobile device cloud (BitBar and local Appium).
-
Mobile tests you want to run in parallel must be Appium-compatible. Running legacy mobile tests in parallel is not supported.
-
Mobile tests you want to run in parallel must belong to the same TestComplete project from which you will control the test runs. Running tests that belong to external projects is not supported.
To add a new BitBar environment
-
Create a mobile test and add it to the execution plan.
- In the Parallel Device Cloud Environments panel, switch to the BitBar Mobile Cloud tab.
-
Click New Environment and specify the API key assigned to your BitBar account.
Note: If you still do not have a BitBar account, you can sign up for a free trial. Click OK.
-
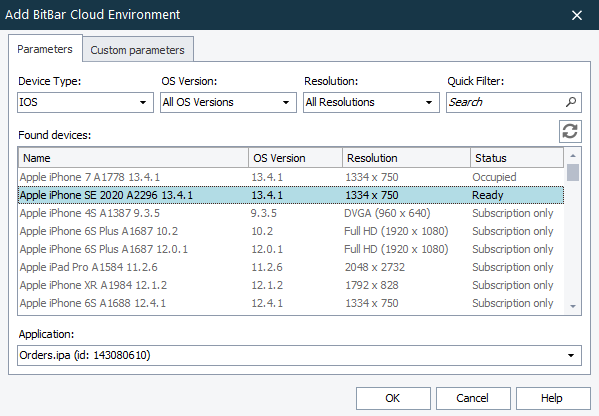
On the Parameters tab of the opened dialog, specify the following parameters of the added environments:
Column Description Found devices All the devices that are available for you in BitBar and that match the search criteria. If needed, you can filter the list by using the Device Type, OS Version, Resolution and Quick Search filters. Select the device to which you want to connect.
Application A mobile application for which you want to open a testing session. The application file must be either stored in the BitBar Files Library or added to the Tested Applications of the current TestComplete project. In the latter case, click Upload to BitBar to upload the application file to the BitBar Files Library and then select it in the list.
-
If needed, on the Custom parameters tab, you can specify additional capabilities to be used for the testing session. Specify the capabilities in the JSON format:
-
Click OK. TestComplete will add the configured environment to the list.
Note: The number of added environments is also displayed in the Environments column of the Test Item list for the particular test item.
Local Appium
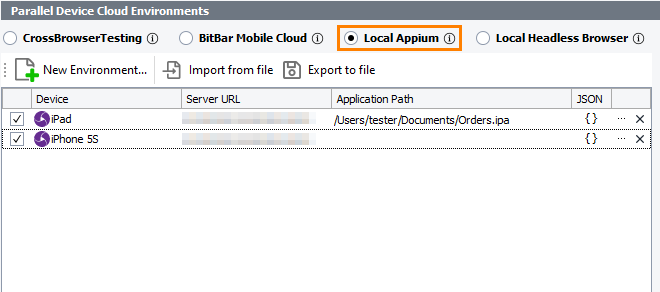
In this mode, you can run mobile tests on an Appium server in your local network.
Requirements
-
TestComplete version 14.81 and later.
-
An active license for the TestComplete Mobile module.
-
The Appium Support plugin must be enabled in TestComplete. The plugin is installed and enabled by default. You can check the plugin state in the File > Install Extensions dialog of TestComplete.
-
Mobile devices managed by Appium. A private server managed by the Appium framework. It can run on your current computer or on a remote computer in your local network. The supported Appium version is 1.18.2. To learn how to install and configure one, please see Set up Appium Server.
-
The TestComplete workstation must have access to the server that controls the mobile devices.
-
The TestComplete project must be configured to support Appium mobile devices.
By default, all new projects are configured this way. To make sure that your project is configured correctly, check its Mobile support type property on the Properties > Mobile Devices > General page. It must be set to Mobile device cloud (BitBar and local Appium).
-
Mobile tests you want to run in parallel must be Appium-compatible. Running legacy mobile tests in parallel is not supported.
-
Mobile tests you want to run in parallel must belong to the same TestComplete project from which you will control the test runs. Running tests that belong to external projects is not supported.
To add a new Appium environment
-
Create a mobile test and add it to the execution plan.
- In the Parallel Device Cloud Environments panel, switch to the Local Appium tab.
-
Click New Environment.
-
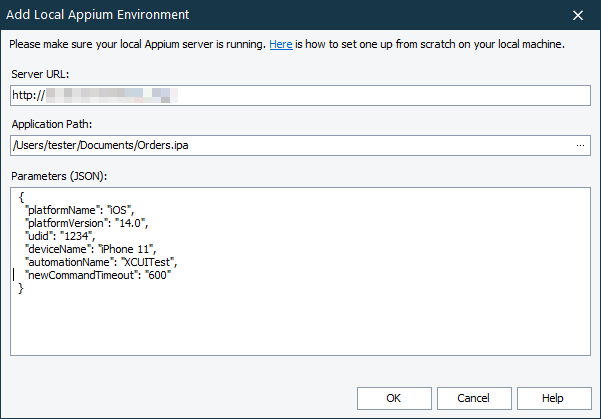
On the Parameters tab of the opened dialog, specify the following parameters of the added environments:
Column Description Server URL The URL address of your Appium server
Application Path The full path to the application that you want to install on the target mobile device and from which you want to open a testing session. You can type the path manually, or you can click the ellipsis button and browse for the needed application file.
Parameters The capabilities that describe a testing session you want to open, in the JSON format. The dialog will validate the JSON code as you are typing.
-
Click OK. TestComplete will add the configured environment to the list.
Note: The number of added environments is also displayed in the Environments column of the Test Item list for the particular test item.
Local headless browsers
You can run cross-platform web tests in headless browsers on your local computer:
Requirements
-
TestComplete 15.20.
-
An active license for:
- TestComplete Web Module
- TestComplete Intelligent Quality add-on
-
The following plugins must be enabled in TestComplete (they are installed and enabled by default):
- Web Testing
- Cross-Platform Web Testing
- Headless Web Browsers support
-
The driver appropriate for the web browser you are going to use must be installed on your local computer:
- ChromeDriver - To run tests in headless Chrome.
- GeckoDriver - To run tests in headless Firefox.
- MSEdgeDriver - To run tests in headless Edge.
If you have the Headless Web Browser support enabled, TestComplete will install the necessary drivers automatically during the test run.
If it fails to install the drivers for some reason, for example, if your computer does not have access to the internet, install them manually. To do this, place the driver executable file in the following folder:
<ProgramData>\SmartBear\WebDrivers\<browser> (Usually, the ProgramData folder resides at C:\ProgramData.)
To assign a local headless browser to a test
-
Create a cross-platform web test and add it to the execution plan.
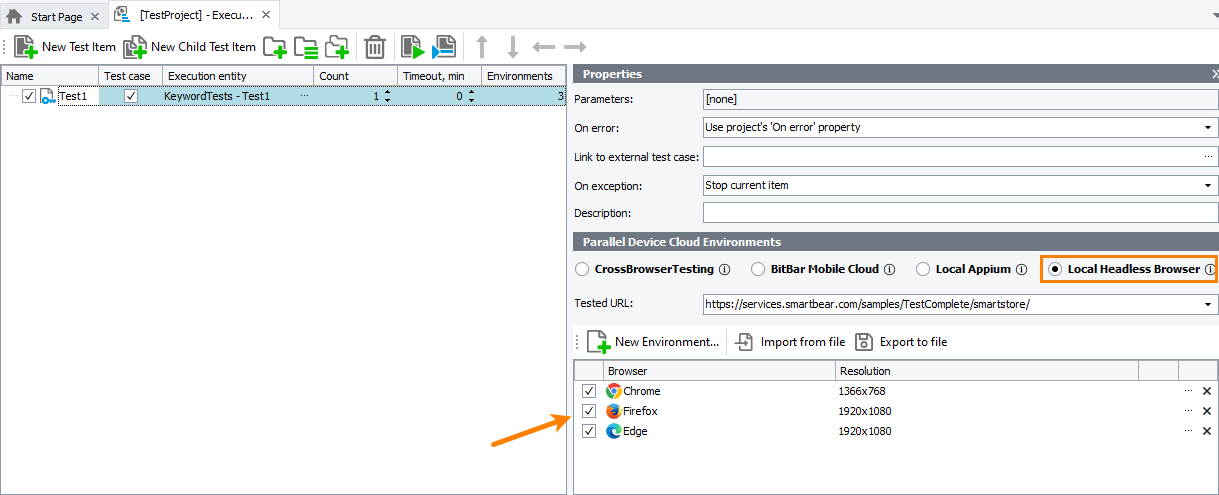
- In the Device Cloud Parallel Environments panel, switch to the Local Headless Browser tab.
-
In the Tested URL edit box, specify the URL of the tested web page. You can specify the tested URL by using project and project suite variables.
 We recommend that you specify the complete URL of your target web page, including the protocol name. For example, http://services.smartbear.com/samples/TestComplete15/smartstore/. Otherwise, TestComplete will use the
 HTTPSprotocol to navigate to the target web page and post a warning to the test log. -
Click New Environment.
-
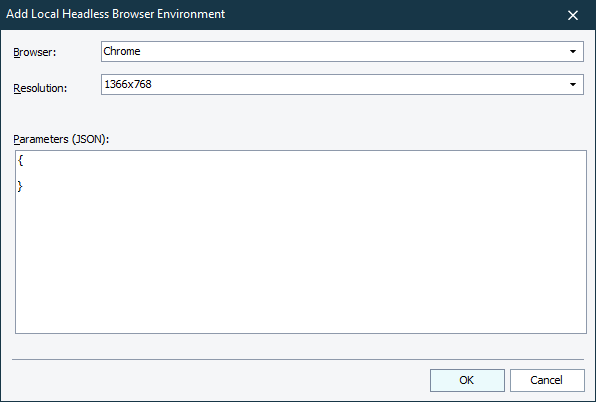
In the Add Local Headless Browser Environment dialog, select a browser and a screen resolution for the headless testing session.
In the Parameters editor, you can specify additional capabilities to be used for the testing session. Specify the capabilities in the JSON format.
-
Click OK. TestComplete will add the configured browser to the list.
Working with the list of environments
Edit the list of environments
To edit the environment, click the  button in the right corner of the environment.
To remove the environment from the list, click  in the right corner of the environment.
Save the list of environments to an external file
-
Click Export to file in the Parallel Device Cloud Environments panel.
-
In the subsequent dialog, specify the name and location of the .xml file that will store the list of environments.
-
Click Save.
Load the list of environments from an external file
-
Click Load from file in the Parallel Device Cloud Environments panel.
-
In the subsequent dialog, specify the .xml file containing the list of environments.
-
Click Open. TestComplete will load the list of environments from the specified file.
See Also
Tests, Test Items, and Test Cases
Running Cross-Platform Web Tests in Parallel
Running Mobile Tests in Parallel
Running Tests
About Cross-Platform Web Tests

 View instructions