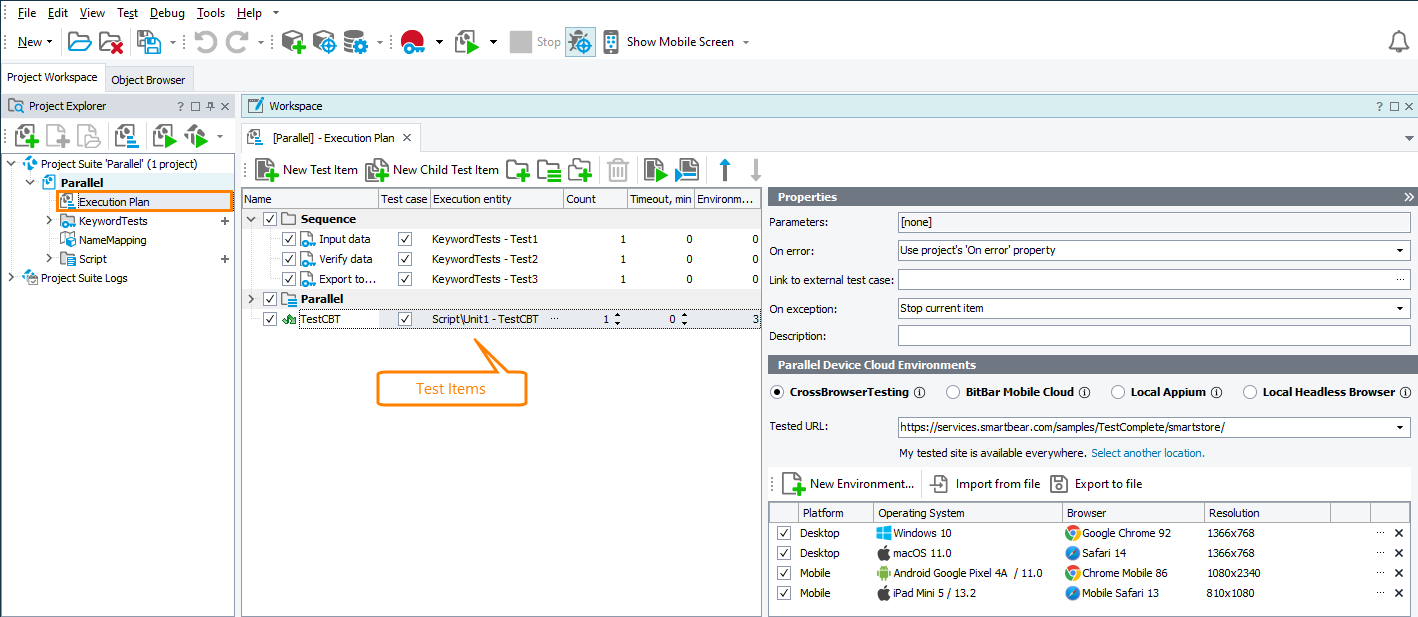
The Test Items panel of the Execution Plan editor shows the project’s test items in the order they will be run.

Click the image to enlarge it.
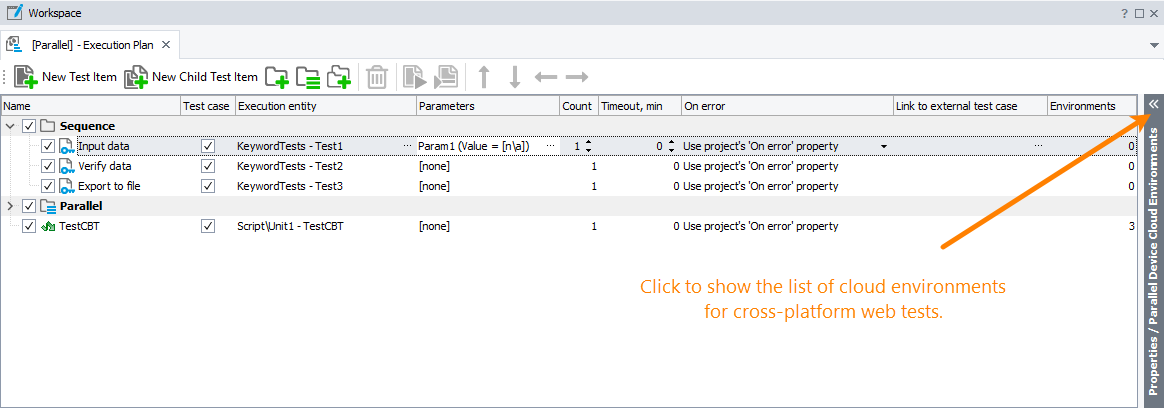
The editor looks like that by default. If you run your tests in sequence and prefer the main view of the editor (without the Parallel Device Cloud Environments panel), use the  button in the right-top corner of the editor to hide information about parallel environments.

Click the image to enlarge it.
If a column with the desired test item’s property is hidden, to make it visible, right-click anywhere on the editor, click Field Chooser, and then drag the needed column from the resulting list to the page.
You can customize the column layout. For example, you can reorder or hide some columns. For more information, see Arranging Columns, Lines, and Panels.
A test item can be:
- A keyword test
- A script routine
- A low-level procedure
- A network suite, or its job or task
- A BDD scenario or several scenarios
- A unit test or a Selenium test
- A ReadyAPI functional or security test
- A specifying one or several tests (keyword tests, script routines, and BDD scenarios) to run
You can organize test items into a plain list, grouped list, or a tree-like structure (where child items are run after the parent item has finished running) and change their properties. For example, you can exclude test items from or include them in the test run using the check box next to the test item name.
The following table contains descriptions of test item properties.
 Test item properties are not applied to tests that are not launched as test items (for example, they are launched from the Project Explorer or are called from another test).
If a column is hidden, to make it visible, right-click anywhere in the editor, click Field Chooser, and then drag the needed column from the resulting list to the editor.
You can customize the column layout. For example, you can reorder or hide some columns. For more information, see Arranging Columns, Lines and Panels.
 Add a new test item
 Add a new test item
 Add a new test item
To add a new top-level test item, do any of the following:
-
Click  New Test Item on the toolbar.
-
Right-click somewhere within the Test Item List panel and choose  New Test Item from the context menu.
-
Drag the desired test (for instance, a keyword test, a unit test and so on) from the Project Explorer panel to the Execution Plan editor.
Notes:
-
If you drag and drop a script unit, TestComplete will add test items corresponding to all of the script routines contained in that unit.
-
TestComplete will name the created test items based on the source script routine and keyword test names.
-
Drag a script routine from the Code Explorer panel to the Execution Plan editor.
| Note: |
By default, all added test items are marked as test cases. |
To add a child test item to an existing test item, do any of the following:
-
Select the parent test item or group and click  New Child Test Item on the toolbar.
-
Right-click the parent test or group and choose  New Child Test Item from the context menu.
-
Drag the desired test from the Project Explorer or Code Explorer and drop it in the parent test item.
Notes:
- By default, the Code Explorer panel is hidden from TestComplete. To make the panel visible, select View > Select Panel from the TestComplete main menu, and then select Code Explorer in the resulting Select Panel dialog.
- By default, TestComplete considers child test items as test steps rather than test cases. The added child test items are not marked as test cases. Test items that are not marked as test cases will not be included in the Summary report.
Once you have added a new test item, you can modify its properties and relocate it in the list.
 Add a new group of test items that will be executed in sequence
 Add a new group of test items that will be executed in sequence
 Add a new group of test items that will be executed in sequence
To add a top-level group:
– or –
To add a subgroup:
– or –
Test items added to such groups will be executed in sequence.
 Add a new group of test items that will be executed in parallel (for cross-platform web and mobile tests)
 Add a new group of test items that will be executed in parallel (for cross-platform web and mobile tests)
 Add a new group of test items that will be executed in parallel (for cross-platform web and mobile tests)
– or –
 Parallel groups do not support subgroups and cannot be run on 32-bit operating systems.
You cannot assign environments to the entire parallel group. You can assign environments to individual tests in the group, in the Parallel Device Cloud Environments panel of the editor or directly in the test.
 Modify test item properties
 Modify test item properties
 Modify test item properties
Select the cell that contains the data you want to change, and press F2 or click twice (not double-click).
To change the test to be executed:
-
Click the ellipsis button of the Execution entity column.
-
In the resulting Select Test dialog, select the needed test or tag. To run tests that match several tags, select [Tag Expression].
 Rename a group
 Rename a group
 Rename a group
-
Select the group and press F2, or click the group twice (not double click).
-
Enter the new name for the group and press Enter to apply it.
 Copy an existing test item or group
 Copy an existing test item or group
 Copy an existing test item or group
-
Select the source test item or group and press Ctrl+C.
-
Press Ctrl+V.
– or –
-
Right-click the source test item or group and select Copy from the context menu.
-
Right-click somewhere within the Execution Plan editor and choose Paste from the context menu.
| Note: |
Currently, you can copy test items and groups within the same project. You cannot copy an item from one project to another. |
 Include or exclude test items from a test run
 Include or exclude test items from a test run
 Include or exclude test items from a test run
TestComplete allows you to easily specify which test items should participate in testing and which should be temporarily excluded.
To enable or disable a single test item or group:
To enable or disable several test items at once:
-
Select the desired test items in the panel using Ctrl- and Shift-clicks.
-
Right-click the selection and choose Enable\Disable >  Enable Selected or Enable\Disable >
  Disable Selected from the context menu.
To enable or disable all of the test items:
Right-click somewhere within the Test Item List panel and select Enable\Disable >  Enable All and Enable\Disable >
  Disable All from the context menu.
To toggle the enabled property of all test items:
Right-click somewhere within the Test Item List panel and choose Enable\Disable >  Toggle All from the context menu.
 Mark a test item as a test case
 Mark a test item as a test case
 Mark a test item as a test case
In TestComplete, you can mark test items in your project as test cases to collect information on their results to a Summary report.
To mark a test item as a test case, select or clear the Test Case check box of the test item.
To mark (or unmark) several test items at once:
-
Select the needed test items. You can use Ctrl- and Shift-clicks for multiselection.
-
Right-click the selection, click Mark/Unmark Test Case, and then click Mark Selected or Unmark Selected.
To mark (or unmark) all test items as test cases:
-
Right-click anywhere within the Test Item List panel.
-
Click Mark/Unmark Test case and then click Mark All or Unmark All.
To toggle all test cases and test items:
-
Right-click anywhere within the Test Item List panel.
-
Click Mark/Unmark Test case and then click Toggle All.
 Run a test item or group
 Run a test item or group
 Run a test item or group
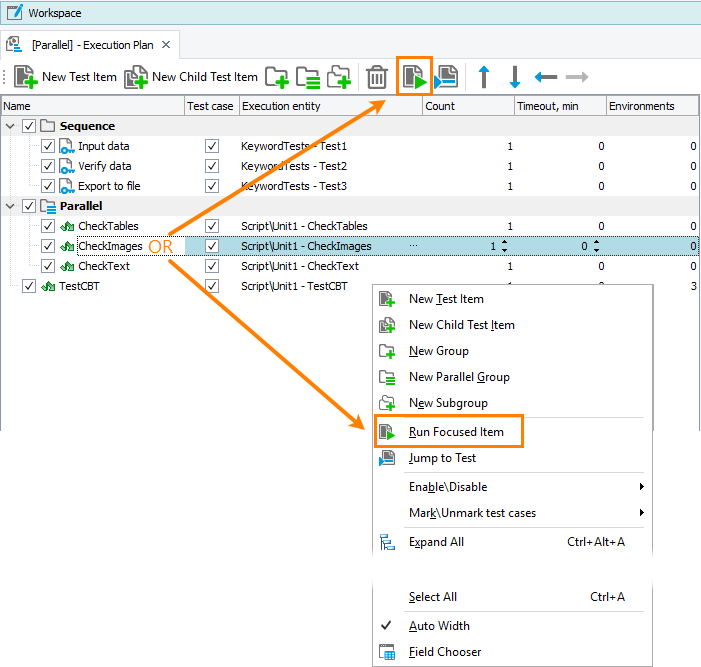
When you execute your test project, TestComplete automatically runs all the enabled test items that can be managed in the Execution Plan editor. Besides, you can run the desired test items manually in one of the following ways:
– or –
TestComplete will run the selected test item or group along with all child items.
| Note: |
Only enabled test items can be run. |
You can run test items not only from TestComplete UI. For information about all possible ways of running test items (from the command line, from Jenkins and so one), see information in the Running Test Items section.
 Change the run order of test items
 Change the run order of test items
 Change the run order of test items
– or –
 Navigate to the test source
 Navigate to the test source
 Navigate to the test source
– or –
TestComplete will open the corresponding editor in the Workspace panel. If the test item relates to a certain scripting routine, TestComplete will navigate to the beginning of the routine in the Code Editor.
 Expand or collapse test items
 Delete a test item or group
 Save or cancel changes
 Save or cancel changes
 Save or cancel changes
To save changes made to the project’s test items, select File > Save from the TestComplete main menu.
To cancel any changes, close the editor and answer No when TestComplete asks you whether to save the changes.
 button in the right-top corner of the editor to hide information about parallel environments.
 Test item properties are not applied to tests that are not launched as test items (for example, they are launched from the Project Explorer or are called from another test).
 Add a new group of test items that will be executed in sequence
 Copy an existing test item or group
 Include or exclude test items from a test run
 Mark a test item as a test case
 Change the run order of test items


 Script tags