Region checkpoints let you verify that a tested application’s object is displayed correctly. To perform a region checkpoint in a keyword test, use the Region Checkpoint operation. In scripts, region checkpoints can be done via the Regions.RegionCheckpointName.Check scripting method.
You can create region checkpoints both during test recording and design time. To help you add and configure region checkpoints, TestComplete includes the Checkpoint Wizard. The rest of this topic provides step-by-step instructions on using the wizard.
In This Topic
 2. Specifying the Image to Check
 3. Specifying a Comparison Mask
Note for Mobile Testing: To create a region checkpoint for an object in a mobile application, you can select the object on the Mobile Screen. Make sure that the Mobile Screen window is not hidden when you launch the checkpoint wizard.
In addition, note that the application under test and the mobile device, where it is running, must be prepared for testing in order for TestComplete to be able to access the application’s objects.
1. Launching the Wizard
The way you open the wizard depends on the test creation mode:
-
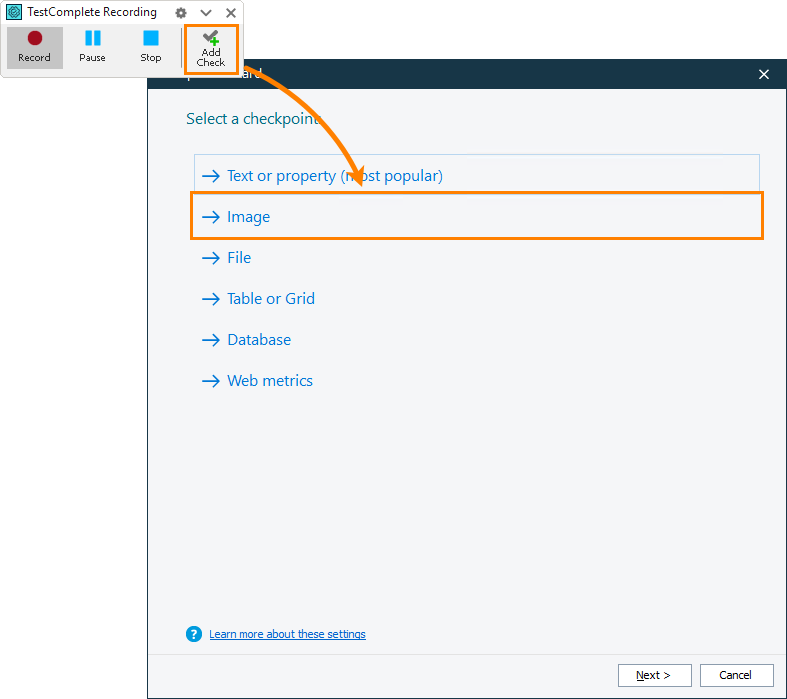
If you are recording a test, on the Recording toolbar, click Add Check. In the resulting Checkpoint Wizard, click the Image property, and then click Next:
-
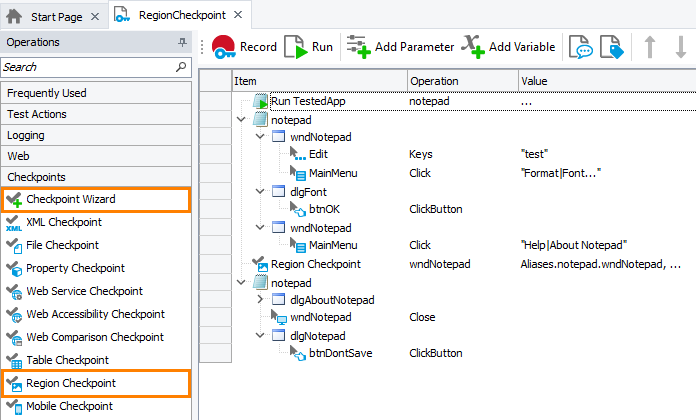
If you are editing a keyword test, drag the Checkpoint Wizard or Region Checkpoint operation to your test. You can find them in the Checkpoints category in the Operations panel of the Keyword Test editor. If you add the Checkpoint Wizard option, in the ensuing Checkpoint Wizard dialog, click Image:

-
If you are editing a script, click
 on the Code Editor toolbar. In the Checkpoint Wizard, select Image, and then click Next:
2. Specifying the Image to Check
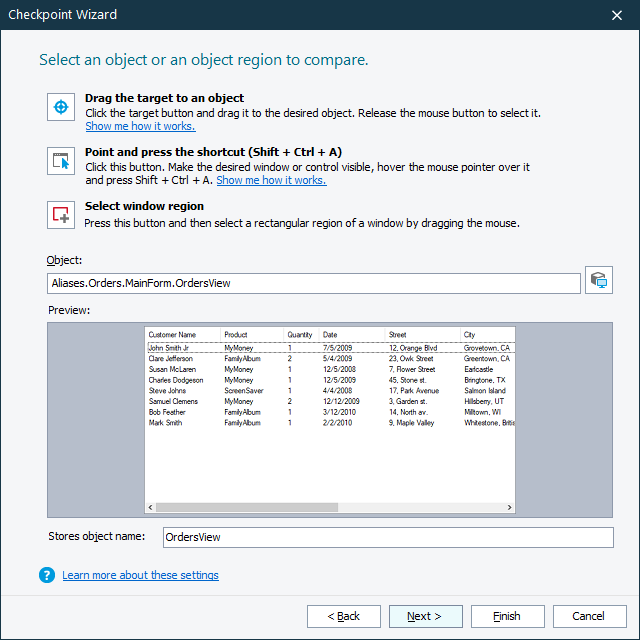
You can specify the image in one of the following ways:
-
Pick the object with the target icon (
 )
)Watch video: Selecting Objects: 'Drag the Target...' Mode
-
Select the object and press a shortcut (
 )
)Watch video: Selecting Objects: 'Point and Fix' Mode
-
Select an arbitrary region (
 )
)TestComplete will display the name of the object, to which this area belongs, in the Object box.
-
Enter the object name manually
Enter the full name (or full mapped name, or alias) of the desired object into the Object box.
For web objects: If your project is configured to use XPath expressions and CSS selectors to locate web objects, the dialog will show the list of available locators (if any) for the specified web object. You can select the needed locator from the drop-down list.
Tips for selecting objects:
-
You may find the second technique more convenient than using the target icon, because you can manipulate applications before actually selecting an object. For example, you can open the tested application window containing the desired control and so on. Unlike using the target icon, with this technique, you can point to popup windows, tooltips, and other objects that are hidden in the application when being inactive.
-
Instead of selecting the object, you can copy its name from the Object Browser, Object Spy, keyword test, or script code beforehand and paste it into the Object box.
-
Despite the way you specify the object name, you can change or correct it directly in the Object box.
If the Map object names automatically option is selected, TestComplete automatically adds the specified object to the Name Mapping repository (if it is not there already). Your tests will take the object alias from the repository.
In the Stores object name text box, enter the image name. The default name generated by TestComplete is based on the name of the captured object.
Once you have selected the object or object area to verify, click Next to proceed.
3. Specifying a Comparison Mask
On the next page of the wizard, you can select an image comparison mask. It will specify the parts of the region to include in and exclude from verification:
| Option | Description |
|---|---|
|
Don’t use comparison mask |
Use if you don’t want to apply a comparison mask. |
|
Use existing comparison mask |
Use to load an existing mask from a file. |
Create new comparison mask |
Use to add a new mask for your validation. |
Click Next to proceed.
4. Specifying Comparison Parameters
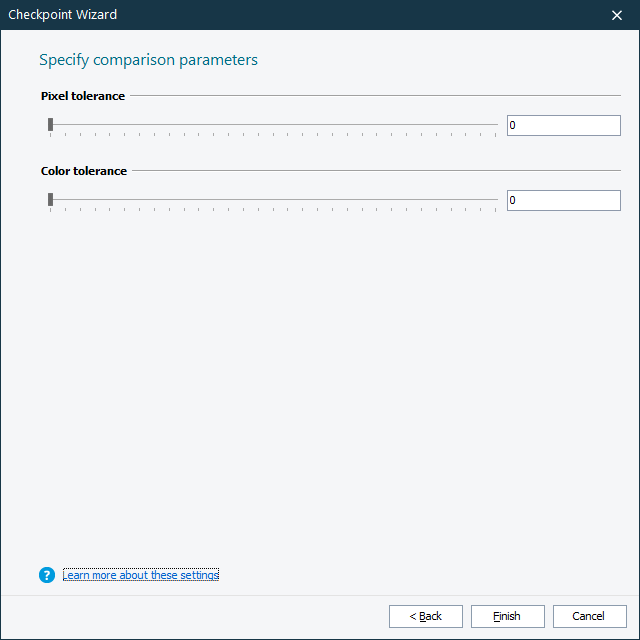
On the next page of the wizard, specify the comparison parameters of the checkpoint:

Pixel Tolerance
This parameter specifies the number of allowed different pixels. The default value is 0. It means that the comparison procedure will ignore slight differences between the images during the comparison. If the number of different pixels is less than or equal to the Pixel Tolerance value, TestComplete considers the images identical.
You can specify the value of the Pixel Tolerance parameter either by typing the desired value in the edit box or by dragging the slider on the right of the edit box.
Color Tolerance
If you specify a non-zero value in this edit box, the color dissimilarity between images will be ignored. The allowed difference is specified as an integer value within the range 0…255 that represents an acceptable difference for each color component (red, green, and blue) of the compared pixels. Two pixels are considered identical if the difference between intensities of each of their color components does not exceed the specified value. When ColorTolerance is 0, the compared pixels are considered identical only if they have exactly the same color. When ColorTolerance is 255, pixels of any color are considered identical.
You can specify the value of the Color Tolerance parameter either by typing the desired value in the edit box or by dragging the slider on the right of the edit box.
5. Closing the Wizard
Click Finish to exit the wizard. TestComplete will add the checkpoint statement for the specified image to your test.
If you are creating a region checkpoint while editing a test script, then the generated checkpoint code will be displayed in the Copy Text to Clipboard dialog. You will be able to copy this code to the clipboard and then paste it to the desired place in your script.
See Also
Region Checkpoints
About Region Checkpoints
Checkpoint Wizard
About Mobile Screen Window
Selecting an Object on the Mobile Screen (Android Testing)
Select an Object on the Mobile Screen (iOS Testing)


 See instructions

 and then click the desired pixel in the image, or click and drag the mouse pointer to mark a number of pixels to be ignored.
 and then click the desired pixel in the image, or click and drag the mouse pointer to add pixels to the comparison.
 or
or  .
. .
. .
. ,
,  and
and  .
. and
and  .
. .
.