
It is quite possible that due to changes made to a tested application, the images that were captured by Test Visualizer will not correspond to the application windows or controls. In this case, the test engine will report differences between the "recorded" and "playback" images. To avoid these reports you need to update the Test Visualizer data.
You can update Visualizer frames automatically during a test run or manually from the Test Visualizer panel when editing a test, or from the test log after the test execution is finished. Automatic updating is very easy, but in this case, all the images captured for the test are replaced. Manual updating is also easy, but you can change only one frame at a time.
 Updating Images Automatically During a Test Run
Updating Images Manually From the Test Visualizer (Desktop and Web Applications)
Updating Images Automatically During a Test Run
Test Visualizer can capture images during test recording and playback. It also allows updating the images captured during test recording. For this purpose, you can either command TestComplete to update all the captured images or you can manually select the images to be updated. For more information on the mentioned approaches, see below.
To update all the images that were captured during recording, you can use the Auto-update frames during the run project option. If the option is enabled, TestComplete automatically updates the captured images during the test run. You can also use this property to capture new images for user actions that have no Visualizer frames. To get to this option:
-
Right-click your test project in the Project Explorer and select Edit | Properties from the context menu. This will open the project editor and activate its Properties page.
-
Select Visualizer from the tree of property groups on the left of the Properties page. This will show the Visualizer settings on the right. Make sure that the needed option (Capture images (default) or Capture tested objects properties) is enabled in the Collect Test Visualizer data during test run group.
-
Select the Auto-update frames during the run check box (by default, this check box is clear). Now you can specify the update mode for the Visualizer.
-
If you want TestComplete to update the existing Visualizer frames and to capture frames for user actions that have no frames, select the Update existing frames and capture new frames, if needed mode. If you want TestComplete to update the existing frames only and not to capture new images, select the Update existing frames only mode.
-
Run your test project or project suite. Since the Use Test Visualizer during test run and Auto-update frames during the run settings are enabled, TestComplete will update the Visualizer frames while the test is running.
Note: We recommend that you run the entire test project or project suite, since the test commands that are executed before your test may affect the tested application’s state and data. If the Auto-update frames during the run option is disabled, but Test Visualizer is enabled, TestComplete captures images for the test log only (these images are shown in the Picture panel).
 |
Updating Visualizer frames may slow down the test playback. If you experience issues with test performance, we recommend that you disable updating Visualizer frames. |
To update certain images captured during recording, you can use the Update check box in the top left corner of the frame’s area. To update an image, do the following:
-
Switch to the Test Visualizer panel.
-
Find the image you want to update.
-
Select the Update check box shown under the desired image.
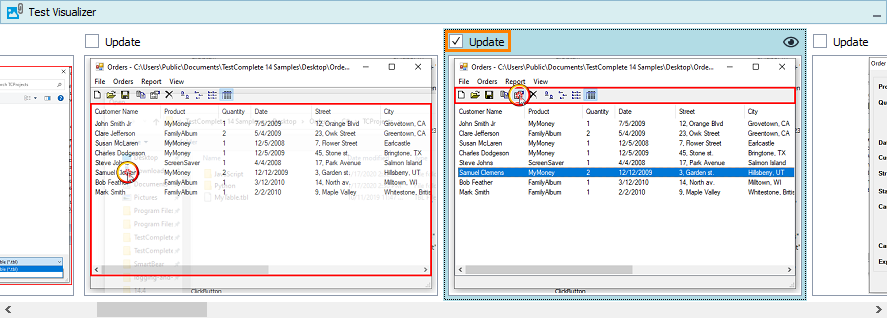
All the selected images will be updated during the next test run.
Updating Images Manually From the Test Visualizer (Desktop and Web Applications)
You can use this approach only to update the frames that contain object data for desktop and web applications. For more information, see Test Visualizer - Overview. To update a frame during test editing:
-
Open your test for editing. To do this, simply double-click the keyword test or script unit in the Project Explorer panel (by default this panel is on the left of the TestComplete main window. To switch to the panel, select View | Project Explorer from the TestComplete main menu).
If there are images captured for test commands, TestComplete will display these images in the Test Visualizer panel that is shown under the editor.
-
Launch your tested application.
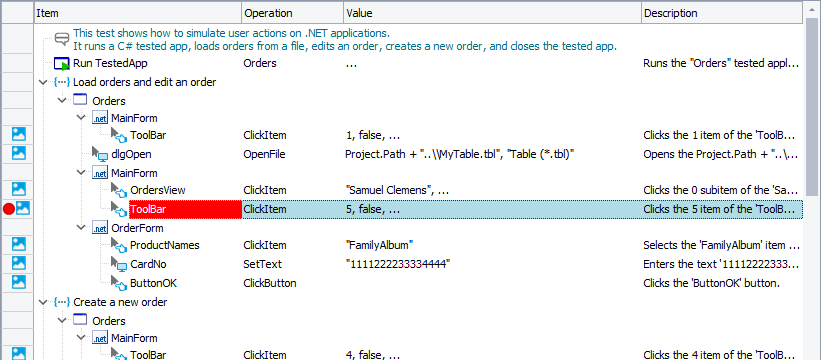
Make sure the application displays the desired window or control and that this window or control contains the data that corresponds to the test command. This may be tricky for large test projects. In this case, you can set a breakpoint for the desired test command:
-
In the test editor, find the test command for which you are going to update the image.
-
To set a breakpoint on the command:
- Click the editor’s gutter for the desired command.
-- or --
- Right-click the desired command in the editor and select Toggle Breakpoint from the editor’s context menu (in the Keyword Test editor) or Debug | Toggle Breakpoint (in the Code Editor).
After the breakpoint is set, the command is highlighted with red:
-
-
Run your test project. TestComplete will automatically pause the test run when it reaches the breakpoint you set. When this happens, stop the test execution (to do this, select Test | Stop from the TestComplete main menu or click
 Stop on the Test Engine toolbar).
 -
Now the tested application displays the needed window or control, but sometimes it may be in a state that differs from the state in which it was during test recording.
To update the image displayed in the Visualizer panel and information about the window’s (or control’s) methods and properties, right-click it in the Test Visualizer panel and select the
 Update From Screen item from the context menu.
The Visualizer Frame window also contains the Update From Screen toolbar item. It works like the item of the Test Visualizer context menu and lets you update images when you are viewing them in the Visualizer Frame window.
This functionality is available: -
only in desktop and classic web tests,
–and –
-
if the Visualizer images contain object information, that is, they were captured in the Capture tested object properties mode.
After you select the Update From Screen item, TestComplete will automatically update the specified Visualizer frame, information about the controls located within the frame and the controls’ methods and properties. Note that the updated frame does not contain markers that specify clicks made on the frame’s controls.
The Test Visualizer window also contains the Update check boxes that let you select the images to be updated during the next test run. For more information on updating images during the playback, see above. -
Updating Images Manually From the Test Log
To update a Visualizer frame from the test log:
-
Open the test log.
-
Select the log entry that contains the updated image illustrating a test operation (images associated with log entries are displayed in the Picture panel).
-
Switch to the Picture panel. You will see two images: the Expected Image that is currently associated with the test operation and the Actual Image captured during the test run.
-
Right-click the Actual Image and select Update Visualizer Data from the context menu.
|
Unlike Test Visualizer frames, images in the test log do not include information about the objects shown in the image and about their methods and properties. So, when you update a Visualizer frame with an image from the test log, the resulting frame will not contain information about the objects shown in the image.
To update Visualizer frames preserving information about the objects, use any of the two approaches described above. |
See Also
About Test Visualizer
About Test Visualizer
About Test Visualizer Panel
Visualizer Frame Window