
Test Visualizer takes screenshots of user actions during test recording and playback. These images (or frames) help you better understand what test commands do and find the differences between the expected and observed behavior and state of the tested application.
What is Test Visualizer
Suppose that you recorded a long test that contains many mouse clicks, keystrokes and other user actions. When viewing the recorded commands, it may be difficult to understand which control received a click or keyword input. It would be easier to identify this, if the recorded commands were accompanied by screenshots. This is what the TestComplete Test Visualizer does: it captures screenshots during test recording or playback for each user action: mouse click, keyboard input, menu item selection and so on. The screenshots help you better understand what actions the test commands perform.
Test Visualizer captures images for keyword tests and scripts. Images for low-level procedures are not recorded. Test Visualizer captures images only for those test commands that correspond to user actions. Other commands do not have screenshots.
A possible alternative to Test Visualizer is the VideoRecorder script extension that enables you to record video files for your automated test runs.
Supported applications
TestComplete captures Visualizer images for the following applications:
-
Desktop: any 32- or 64-bit desktop application.
-
Web: any web application. User actions on web pages in non-supported web browsers are recorded as actions on a black-box desktop application.
Note: If you use Internet Explorer, make sure that its protected mode is disabled (see below).
-
Mobile:
-
Cloud-compatible mobile testing:
Any tested Android or iOS application.
-
Legacy mobile testing:
Any Android application.
Any iOS application that was prepared for testing.
Note: Visualizer does not capture object data for mobile applications. For these applications, it captures only images.
-
Regardless of the application type, Test Visualizer is disabled if you run tests from a Connected Application.
Requirements
During test recording and playback, Test Visualizer stores the captured images to a temporary folder. After the recording or test run is over, it copies the images to the appropriate folders on your hard drive.
When testing any application running in the Internet Explorer web browser, make sure that the protected mode is disabled in Internet Explorer. Otherwise, Internet Explorer blocks access to the temporary folder and Test Visualizer will be unable to save the captured images to the disk. For instructions on how to do this, see Preparing Internet Explorer for Web Testing.
Images captured during recording
Images captured during test recording are shown in the Test Visualizer panel below the keyword test or script editor:
Desktop

Click the image to enlarge it.
Web (Classic)

Click the image to enlarge it.
Mobile

Click the image to enlarge it.
The entire panel looks like a series of slides, or a movie. Individual screenshots in it are called frames.
Test Visualizer marks the test commands, for which an image was captured, with the ![]() icon. When you select an image in the Test Visualizer panel, Test Visualizer automatically highlights a test command to which the image relates.
icon. When you select an image in the Test Visualizer panel, Test Visualizer automatically highlights a test command to which the image relates.
The object, with which a command works, is marked with the red frame on the image. For instance, on the image above the selected command works with the ProductNames combo box.
The captured images illustrate test commands and make analyzing the recorded test much simpler.
In addition, you can configure Test Visualizer to collect test object data along with images. To do this, enable the Capture tested object properties (may slow down recording) mode. This way you can use the captured Test Visualizer frames to insert test commands that work with objects shown in images to tests. For more information on this, see Creating Test Commands From Visualizer Frames.
Images captured during test run
Besides capturing images during recording, Test Visualizer also captures images during the test run . It captures images for each test command that simulates user action and posts these images to the test log.
If a test command has an image captured during the recording, Test Visualizer will post both the “recording” and “playback” images. This helps you see what has happened in your test and find the difference between the actual and expected application states and behavior easily:
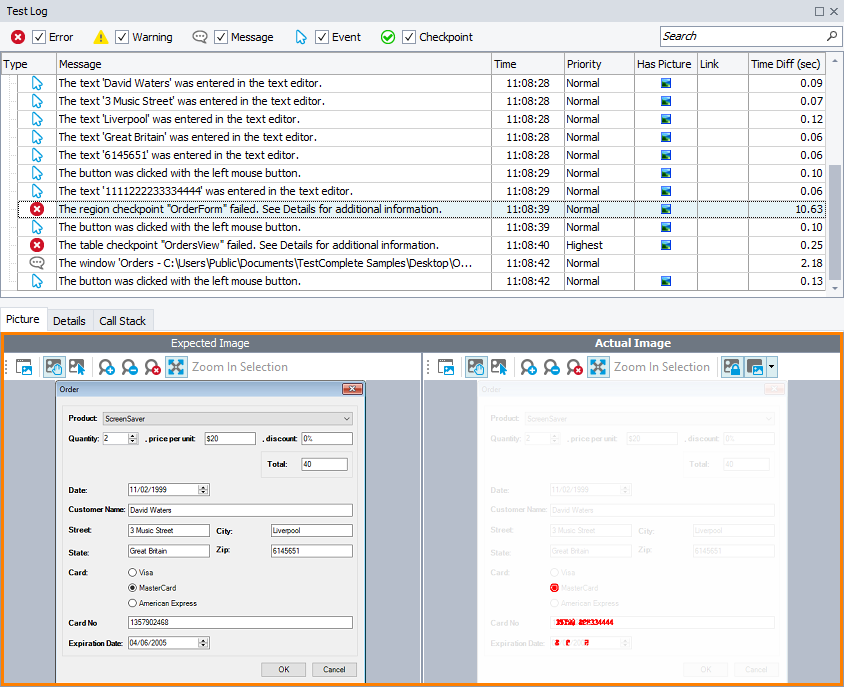
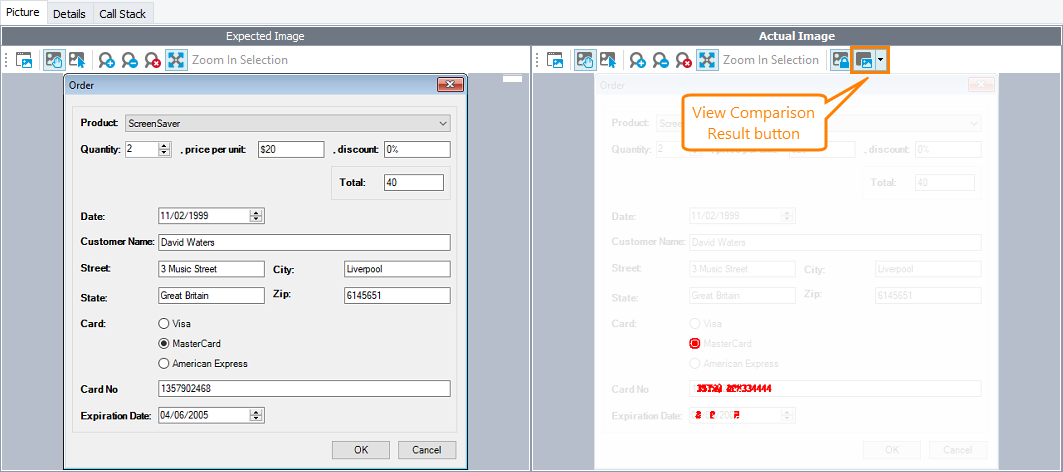
The “recorded” images are used as baseline copies for the “playback” images. Click View Comparison Result on the Actual Image panel toolbar to see the difference between the images:
For more information, see Comparing Recorded and Playback Images.
The frames that were captured during a test run contain only images by default. To make Test Visualizer collect test object data along with images, enable the Capture tested objects properties (may slow down playback) project option.
Test Visualizer does not capture images during parallel test runs. To capture the images, enable the Capture images during parallel test run project option. Please note that this may slow down the test performance.
If the recorded test does not contain Visualizer images, you can capture them during the test run. See the Updating Images Automatically During a Test Run section of the Updating Visualizer Frames topic.
Capture styles
By default, Test Visualizer captures images of top-level windows of the tested desktop application. For example, if you click a button in an application or enter a value to a text box, Test Visualizer will capture the image of the top-level window that contains that button or text box.
| Note: | For tested mobile applications, Test Visualizer always captures the whole screen of your mobile device. |
You can change the scope of captured images by using the Capture style property of your project:
-
Top-level parent - Default capturing area. Means Test Visualizer will capture the application window, with which you are working.
-
Desktop - Test Visualizer captures the entire desktop. This is the most space-hungry mode, but it provides the widest view over the tested application.
 |
Use the same capture style during the test recording and playback. Otherwise, TestComplete will report that the “recorded” and “playback” images differ. |
When to use Test Visualizer
-
Use Test Visualizer for debugging purposes and while searching for errors. Images and data that Test Visualizer collects help you understand what your recorded test does, or what has happened in your tested application during the test run.
Keep in mind that collecting the data may reduce the test performance. In addition, the collected data occupies the hard disk space.
-
Disable Visualizer or limit its functionality when your tests run smoothly. It will save the disk space and makes the tests run a bit faster.
Note that disabling Visualizer makes it difficult to understand what goes wrong in case of an error.
Configuring Visualizer for better performance
Disabling Test Visualizer can make it difficult to understand what happens in your application if an error occurs. To save the disk space and improve the testing performance, but still, have some extra information on your tests:
-
Enable Visualizer and configure it to capture only images without object data.
-
Configure Visualizer to capture images of top-level windows that contain objects you interact with during the test recording or playback (default behavior), rather than images of the entire desktop. Images of top-level windows are smaller and take less disk space than desktop images.
Note: For mobile applications, Test Visualizer always captures the entire screen of the device. -
Updating Test Visualizer frames during a test run may slow down the test run. Disable frame updating if you do not need it.
How Visualizer stores captured images
Test Visualizer uses the PNG format for captured images.
To store the images associated with test commands, TestComplete creates a special Visualizer subfolder in each folder that contains test files. The Visualizer subfolder contains one or more subfolders whose names correspond to the test name and type. These subfolders contain the following files:
-
.png images,
-
.tcVis files that store links to the captured images,
-
.xml files that contain information about the images (packed in .7z archives).
TestComplete adds these .tcVis file references to the test project file (.pjs).
When you rename a test, TestComplete also renames the appropriate subfolder.
How TestComplete associates captured images with test commands
Test Visualizer automatically associates captured images with the test command for which these images were recorded. The association will remain even if you rename the test.
To associate images with keyword test operations, TestComplete uses operations’ internal identifiers. The association remains valid even if you add, change or delete operations from the test.
To associate images with script lines, TestComplete uses script line numbers.
The association remains valid if you add, modify or remove script lines in TestComplete. However, it will be broken, if you change the script unit outside of TestComplete with a third-party script editor.
|
Image associations are not shared among several projects that share the appropriate tests. That is, if you include your keyword test or script unit in another test project, this project will not display images for the keyword test operations and script lines. |
