
It is a typical situation when you need to update baseline data used by a checkpoint in order for the checkpoint to pass.
You can update baseline data of table checkpoints at design time from the Table Element editor, at runtime and from the test log after the test run is over.
This topic describes the mentioned approaches in detail.
 At Runtime
At Runtime
You can update table checkpoint data stored by Table elements during the test run. That can be useful if you need to update multiple table checkpoints with actual data.
The table checkpoint data update is supported by:
-
The Table Checkpoint operation.
-
The
Tables.TableName.Checkscripting method. -
The
Tables.TableName.Comparescripting method. -
The
Tables.TableName.CompareWithObjectscripting method.
To enable the checkpoint data update, turn on the global update option:
-
Select Tools > Options from the TestComplete main menu. This will open the Options dialog.
-
Select the Engines > Stores category.
-
Select Update Table elements.
-
Click OK to close the dialog.
Now, when you run the test, table checkpoints will not perform table data verification. Instead, TestComplete will replace the stored data with the actual data retrieved from controls in your application under test.
From the Test Log
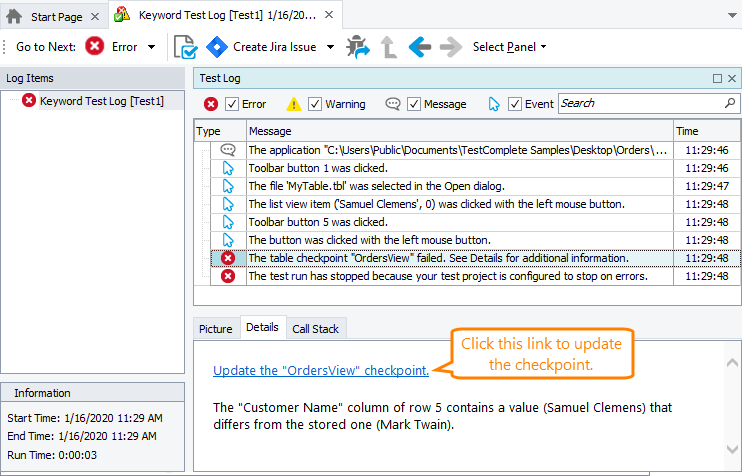
When a table checkpoint fails, you can easily update its data from the Test Log panel:
-
Select the message informing about the checkpoint failure in the test log.
-
Switch to the Details panel.
-
Click the Update the <Checkpoint_name> checkpoint link at the top of the panel.
-
TestComplete will display a message asking whether you want to update the checkpoint. Click Yes in this message to close it and to update the baseline data used for the failed checkpoint. After that, TestComplete will replace the stored element with the data retrieved from the control specified by the Table element’s properties. If you click No, TestComplete will close the message without updating the checkpoint.
Manually From the Table Element Editor
-
Make sure that the object whose data the checkpoint verifies currently exists in the system.
-
Open the Table element that stores baseline data used by the checkpoint:
-
In the Project Explorer, expand the Stores > Tables node and locate the Table element that stores the data you want to update.
-
Double-click the desired Table element or right-click the element and select Edit from the context menu.
– or –
-
If you call the checkpoint from a keyword test, right-click the corresponding Table Checkpoint operation in the test and choose Edit Checkpoint Data from the context menu.
-
-
TestComplete will open the element in the Table Element editor. The editor displays the baseline data that will be used for verification.
-
To update the data, click Update at the top of the editor.
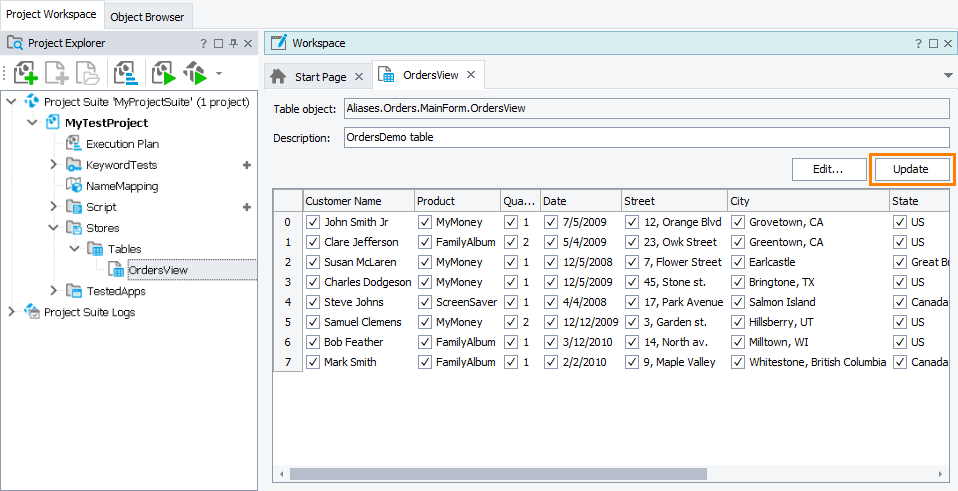
TestComplete will retrieve the actual data from the control and store it to the Table element.
See Also
Table Checkpoints
About Table Checkpoints
About Tables Collection
Modifying Table Elements