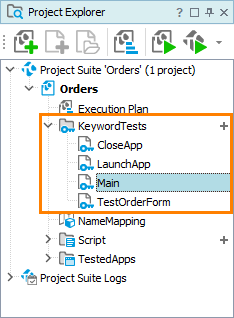
To create keyword tests in your TestComplete project, you must have the Keyword Testing project item in the project (usually, the item is added by default when you create a new project):

You can create keyword tests in any of the following ways:
-
You can create a keyword test when creating a new project.
-
You can add a new keyword test to an existing project.
-
You can add an existing keyword test to your project.
-
You can record a keyword test.
Recording keyword tests
The easiest way to create a keyword test is to record it.
To start recording, you can do any of the following:
-
Select
 Record Keyword Test from the TestComplete Test Engine toolbar.
 -
Choose Test > Record > Record Keyword Test from the TestComplete main menu.
-
Click
 Record on the Keyword Test editor toolbar.
 -
When recording a script, click Test Type > Keyword Test on the Recording toolbar. In this case, the recorded script will include the commands that will run the recorded keyword test. That is, the keyword test becomes a part of a bigger test (script routine).
You can also add operations to an existing test by clicking  Record on the editor toolbar. TestComplete will show a message where you can specify where you want to append recorded operations: to the end of the current test or after the selected operation of the current test. You can also command TestComplete to record a new test.
During the recording
TestComplete switches to the Recording mode and shows the Recording toolbar. You can use the toolbar to control the recording process (pause or stop the recording, command TestComplete to record tests of other types (scripts or low-level procedures), add a verification operation, and so on.
Perform desired actions on your tested application. TestComplete will detect all the actions you are performing and add them to the test.
To stop recording
Click  Stop on the Recording toolbar.
Adding an empty keyword test to a project
-
In the Project Explorer, click the
 button next to the Keyword Tests project item.
– or –
Right-click the Keyword Tests item and then click Add > New Item.
-
In the resulting Create Project Item dialog, enter the test name.
If needed, specify the location of the file that will store the test.
-
Click OK.
TestComplete will create the test with the specified name and location and add it to the Keyword Tests collection of your project. The created test will be empty. You can add operations to it manually or by recording them.
Adding an existing keyword test
-
Right-click the KeywordTests node in the Project Explorer panel and choose Add > Existing Item from the context menu. This will invoke the standard Open File dialog.
-
In the dialog, choose the file of the desired test and click Open.
TestComplete will add the test file reference to your project and will display the test in the Project Explorer panel as a child of the KeywordTests node. You can then modify the test in the Keyword Test editor.
See Also
Keyword Tests
Keyword Tests
About Keyword Test Editor
Recording Automated Tests
Testing Android Applications (Legacy)
Testing iOS Applications (Legacy)
Adding and Removing Project Items and Their Child Elements
