
 |
The information below concerns legacy mobile tests that work with mobile devices connected to the local computer. For new mobile tests, we recommend using the newer cloud-compatible approach. |
To create object-based Android tests, your tested application must be instrumented. TestComplete does it automatically when running Android applications from the Tested Applications collection.
This topic explains an alternative approach – how to instrument Android applications with the Eclipse IDE.
Do not submit instrumented applications to the Google Play. Instrumented applications use private APIs and will be rejected. Create a separate build configuration for test builds.
 Requirements
Requirements
The instructions below assume that the Eclipse IDE is installed on your computer.
Preparation steps
1. Include the PatchServices.jar library in your project
-
Open your Android project in the Eclipse IDE.
-
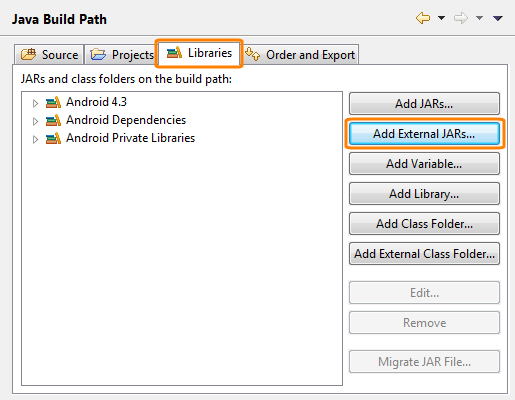
Click Project > Properties to open the project’s properties and go to the Java Build Path.
-
Open the Libraries tabbed page and click Add External JARs.
-
Select PatchServices.jar. This file is located in the <TestComplete>\Bin\Extensions\Android folder.
-
Important: Open the Order and Export tabbed page and select PatchServices.jar from the list:
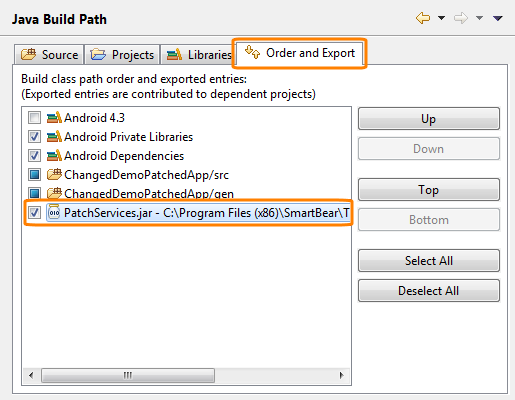
Click OK to save the changes.
2. Initialize the PatchServices library when application starts
The main goal of this step is to initialize TestComplete tools when the application starts. There are two ways to do that. If your application includes more than one activity, you need to place the initializing line in the constructor of your application.
Java
public class MyApplication extends Application
{
public MyApplication()
{
// The method that initializes TestComplete tools
com.smartbear.uibinder.Binder.Initialize(this);
…
}
}
If there is only one activity in the tested application, you can add the initializing line to the onCreate method of the activity.
3. (For Android 11) Configure the application manifest
If the application is built with Android SDK 30 for Android version 11, configure the application’s manifest to allow the TestComplete Test Agent to access the application. For this, add one of the following to the manifest file:
AndroidManifest.xml
<package android:name="com.smartbear.androidagent"/>
</queries>
– or –
AndroidManifest.xml
See Also
Testing Android Applications (Legacy)
About Testing Android Applications (Legacy)