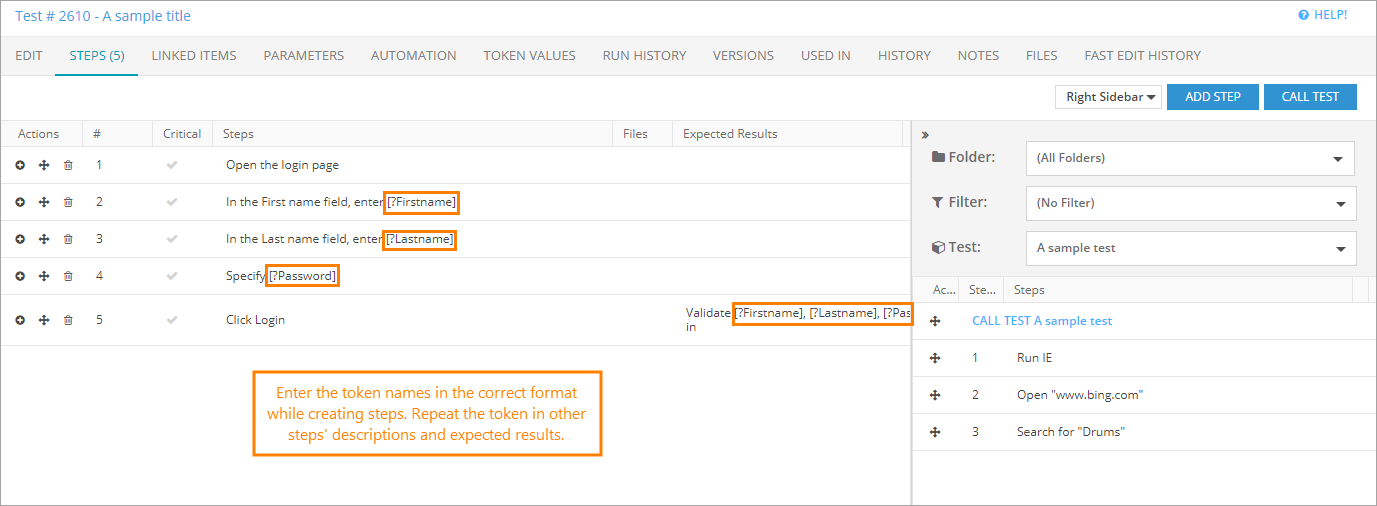
To repeat a manual test multiple times using different sets of input values, use tokens – distinctly formatted values in steps and expected results. By using the values from the attached CSV file of values, the Test Runner will build duplications of the test for each new set of values.
 |
QAComplete does not support tokens in automated tests. This feature should be used with manual tests only. |
QAComplete supports up to 30 tokens within a test. Each token will be replaced with a value from the attached CSV file. The CSV file must also be in a specific format, with token names in a header row and values in each column (see the example below).
Create a token test
To create a token test:
-
Go to Test Management > Test Library.
-
Click Add New.
-
Specify the information about a new test.
-
On the Steps tab, add the needed steps, then enclose the name of your token in square brackets within the description of the step and in the Expected Result field. For example, if you want to create a token that represents first names of your users, it might look like this:
[?FirstName]
In token names, use only the valid alphanumeric characters and underscore – that is, no symbols, spaces, extended, or special characters. -
Attach a plain text CSV file containing the values for your tokens to the test on the Token Values tab. These values will replace token names during the test run.
The CSV file must have a specific format:
- Plain text.
- All data enclosed in double quotes.
- Columns separated by commas.
- First row contains token names, without the square bracket and question mark.
- Second and subsequent rows contain the values that will replace the token names when running the test.

When uploading your CSV file, the upload verifies that there are no more than 30 token columns. If you try to upload a CSV file with more than 30 columns, you will receive an error. Also, your CSV file should contain no more than 200 lines. To download the file later, click its name that appears above the upload panel.
If you have mistakenly uploaded the wrong file, click Delete to remove it.
Note: You do not have to provide the token file. If there is no token value provided before the start of the test run, the Test Runner will simply display the token names, allowing you to specify values in action. -
Click Save and Close to apply changes.
Example
For example, you use a series of first names, last names, and user passwords in your token test. For that purpose, apply the following modifications to the test steps:
-
In the step where a tester has to enter a specific first name, use
[?FirstName]as a token. -
In the step where a tester has to enter a specific last name, use
[?LastName]as a token. -
In the step where a tester has to enter a specific password, use
[?Password]as a token.
Next, on the Token Values tab, attach the CSV file containing the values you want to use during the test run:
"Ann", "Smith", "12345"
"Bob", "Brown", "b0b3&"
"Carol", "Crump", "C$@ll"
"David", "Downer", "12345"
Each value is enclosed in double quotes followed by a comma, there is a value for each token in each row, and the token names are enclosed in double quotes in the first row of the file.
Once the CSV file is uploaded, values from it will appear on the Token Values tab of the Edit Test form:
This allows you to ensure you have covered all the tokens of the test.
| Tip: | Click Save and Close to apply the changes. |
Known Limitations
-
When exporting a token test, QAComplete does not include its tokens to a resulting record. QAComplete does not repeat the record about the token test for each row in the token file either.
The record will instead only contain the token placeholder, in the
[?TokenName]format.


