You can create a project plan in two ways:
To create a project plan, follow these steps:
-
Go to Project Management.
-
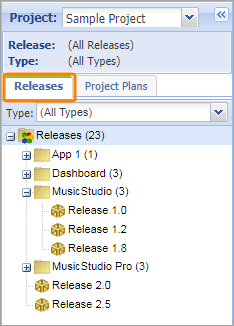
On the Releases tab, select a release to create the plan for.
-
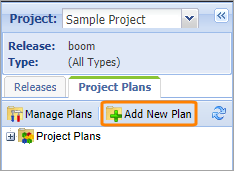
Switch to the Project Plans tab and click Add New Plan.
-
Configure the following settings:
-
Project Plan – Required. Enter a name of the plan.
-
Owner – Required. Select a user who owns the plan.
-
Assignee – Assign a plan to a user.
-
Status – Required. Select a plan status.
Possible values: Active, Closed, On Hold.
-
Latest Note – Enter some information about the plan. To create a new note, click Add New Note.
-
Burndown Start – Enter an estimated plan duration start date in the MM/DD/YYYY format manually or click  to pick up a date.
-
Burndown End – Enter an estimated plan duration finish date in the MM/DD/YYYY format manually or click  to pick up a date.
-
Auto Adjust Burndown – Select this check box to automatically set the Burndown Start and Burndown End dates.
-
Linked Items – Associate releases with the plan.
 Show instructions
 Show instructions
 Show instructions
-
Click Link to Items in the project creation form.
-
Clear the Do not show closed or inactive items check box to create a link to closed or inactive items. By default, only active items are shown.
-
In the Select Item Type drop-down list, select the item type to be linked.
-
In the Select Folder drop-down list, select the folder which stores the needed item.
-
In the Select Item Title drop-down list, select the item to be linked. You can select several items at a time.
-
(Optional) In the Link As drop-down list, select a type of the link.
-
Click Submit.
-
Use Project Plan Wizard – Select Create a new Project Plan from scratch to create a plan immediately with the data you entered in the form (you can add tasks to the plan later) or Create a new Project Plan via the Project Plan Wizard to use the wizard to create a project plan from a list of existing requirements, tests, and defects.
-
Click Continue.
-
If you selected Create a new Project Plan from scratch, continue with the following instructions:
 Show instructions
 Show instructions
 Show instructions
-
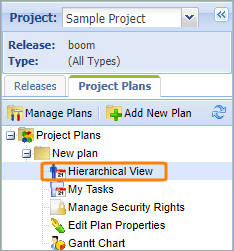
On the Project Plans tab, expand the tree with your plan and click Hierarchical View.
-
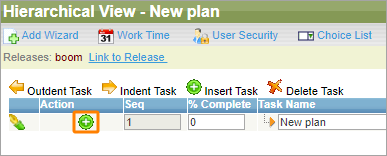
In the Action column, click  to add a task to the plan.
-
In the table, specify task details:
|
N/A
|
Click  to edit a task. to edit a task.
|
| Action |
Manage tasks with the following icons:
 makes a task a parent item makes a task a parent item
 makes a task a child item makes a task a child item
 adds a new task to the list adds a new task to the list
 removes a task from the list removes a task from the list
|
| Seq |
A task ordinal number. You can rearrange tasks in the table by clicking the  icon next to the task needed and drag up or down in the table. icon next to the task needed and drag up or down in the table.
|
| % Complete |
A task completeness percentage. You can assess task performance readiness and enter an approximate estimate in the edit box.
|
| Task Name |
A name of the task.
|
| Linked Item |
A related item linked to a task.
 To add a link To add a link
 To add a link To add a link To add a link To add a link
-
Click the Link to item link.
-
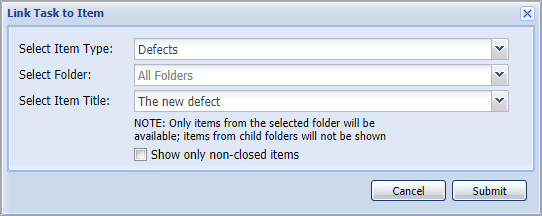
In the Link Task to Item dialog, specify the following:
-
Select Item Type – Select the item type to be linked (for example, Requirements or Defects).
-
Select Folder – Select the folder which stores the needed item.
-
Select Item Title – Select the item to be linked.
| Note: |
Clear the Do not show closed or inactive items check box to create a link to closed or inactive items. By default, only active items are shown. |
-
Click Submit.
 To remove a link To remove a link
|
| Est Hours |
An estimated number of hours required to complete the work on the task.
|
| Est Start Date |
An estimated date to start the work on the task. Click  to pick up a date or change it manually. to pick up a date or change it manually.
|
| Est Finish Date |
An estimated date to finish the work on the task.
|
| Predecessors |
A number of tasks to be completed prior this one.
|
| Assigned To |
A user the task is assigned to.
|
| Is Billable |
If selected, QAComplete automatically calculates the EstCostInt, EstCostExt, ActCostInt, and ActCostExt fields – the cost of works.
|
| Links |
Links to task related files and notes.
|
-
Click Calculate Dates & Costs to estimate a number of hours needed to complete the tasks and see if an assignee is has too many tasks. See Overallocation for more information.
-
Click Save to save tha changes and continue working with the table.
-
Click Save and Close to save the changes and exit the wizard.
-
If you selected Create a new Project Plan via the Project Plan Wizard, continue with the following instructions:
 Show instructions
 Show instructions
 Show instructions
-
(Optional) Add tasks from Requirements:
-
From the Requirements Release drop-down list, select the release a task relates to.
-
From the Requirements Folder drop-down list, select the folder a task locates in.
-
From the Requirements Filter drop-down list, select a filter to sort tasks out.
-
From the Sort By drop-down lists, select criteria to sort the found tasks by.
-
Click the links in the # Tasks from Criteria Above field to preview the tasks found.

Click the image to enlarge it.
-
(Optional) Add tasks from Defects.
-
From the Defects Release drop-down list, select the release a task relates to.
-
From the Defects Folder drop-down list, select the folder a task locates in.
-
From the Defects Filter drop-down list, select a filter to sort tasks out.
-
From the Sort By drop-down lists, select criteria to sort the found tasks by.
-
Click the links in the # Tasks from Criteria Above field to preview the tasks found.

Click the image to enlarge it.
-
Click Next Page.
-
On the Hierarchal View page, the tasks added to the plan are listed in the table. Organize them as needed.
|
N/A
|
Click  to edit a task. to edit a task.
|
| Action |
Manage tasks with the following icons:
 makes a task a parent item makes a task a parent item
 makes a task a child item makes a task a child item
 adds a new task to the list adds a new task to the list
 removes a task from the list removes a task from the list
|
| Seq |
A task ordinal number. You can rearrange tasks in the table by clicking the  icon next to the task needed and drag up or down in the table. icon next to the task needed and drag up or down in the table.
|
| % Complete |
A task completeness percentage. You can assess task performance readiness and enter an approximate estimate in the edit box.
|
| Task Name |
A name of the task.
|
| Linked Item |
A related item linked to a task.
 To add a link To add a link
 To add a link To add a link To add a link To add a link
-
Click the Link to item link.
-
In the Link Task to Item dialog, specify the following:
-
Select Item Type – Select the item type to be linked (for example, Requirements or Defects).
-
Select Folder – Select the folder which stores the needed item.
-
Select Item Title – Select the item to be linked.
| Note: |
Clear the Do not show closed or inactive items check box to create a link to closed or inactive items. By default, only active items are shown. |
-
Click Submit.
 To remove a link To remove a link
|
| Est Hours |
An estimated number of hours required to complete the work on the task.
|
| Est Start Date |
An estimated date to start the work on the task. Click  to pick up a date or change it manually. to pick up a date or change it manually.
|
| Est Finish Date |
An estimated date to finish the work on the task.
|
| Predecessors |
A number of tasks to be completed prior this one.
|
| Assigned To |
A user the task is assigned to.
|
| Is Billable |
If selected, QAComplete automatically calculates the EstCostInt, EstCostExt, ActCostInt, and ActCostExt fields – the cost of works.
|
| Links |
Links to task related files and notes.
|

Click the image to enlarge it.
-
Click Calculate Dates & Costs to estimate a number of hours needed to complete the tasks and see if an assignee is has too many tasks. See Overallocation for more information.
-
Click Save to save tha changes and continue working with the table.
-
Click Save and Close to save the changes and exit the wizard.
Once a project plan is 100% complete, it will drop off from the left navigation panel. You can view complete or inactive plans on by clicking Manage Plans to create new and maintain existing plans, add and remove team members.
Manage Plans provides access to Hierarchical View, My Tasks, and security rights for all projects.
Below is an example of a project plan Hierarchical View:
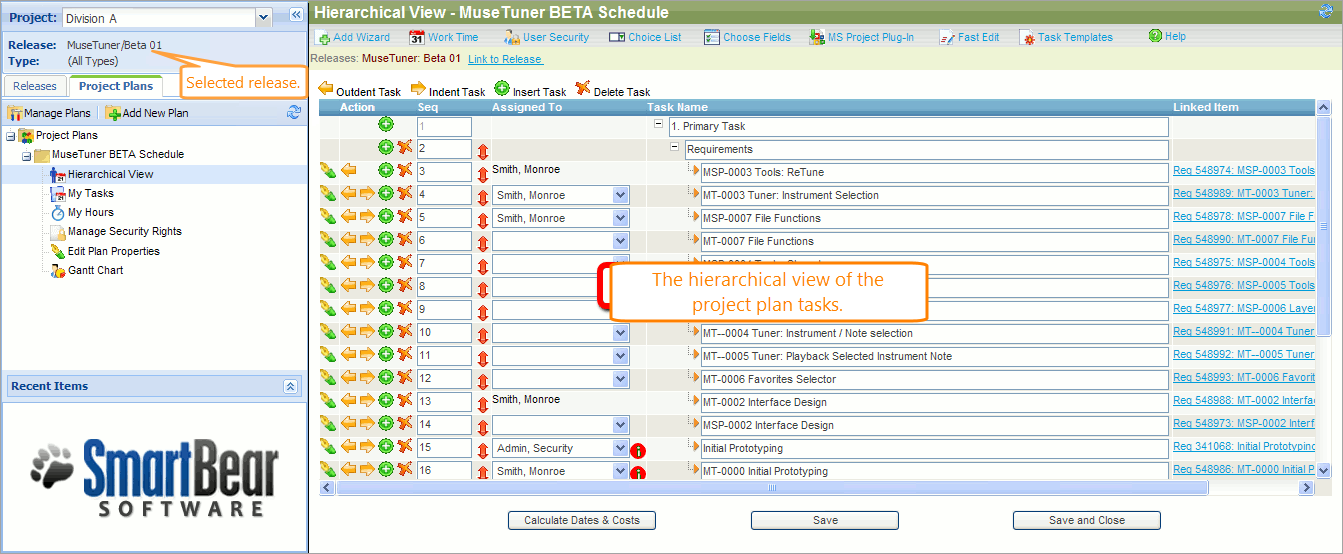
Click the image to enlarge it.
Use the navigation panel to the left to manage and navigate your project plans. Select Hierarchical View to see the example as pictured.
On Hierarchical View, click  to add new tasks under existing ones or
  to delete tasks. Click
  and
and  to indent or un-indent tasks. Once a task is entered with an associated estimated hours and assignee, the estimated finish date is automatically calculated based on dependencies, and resource availability.
My Tasks displays only your assignments.
Use Manage Security Rights to select the team members for the project plan.
Overallocation
If assigning an item will over-allocate a resource, you will see the  icon next to the assignment. This is calculated by team members work time, tasks assigned to the team member, estimated start date, and estimated hours on the tasks. Clicking the icon brings up the Resource Availability report, showing the assignments for your team members.
Move tasks between projects
To move items from this project plan to another, click Fast Edit on the Project Management toolbar.
To add additional requirements or defects to the project plan, click the Add Wizard button on the toolbar. You can also use this to create additional tasks based on task template.
 to pick up a date.
 to pick up a date.
![]() to add new tasks under existing ones or
to add new tasks under existing ones or ![]() to delete tasks. Click
to delete tasks. Click ![]() and
and ![]() to indent or un-indent tasks. Once a task is entered with an associated estimated hours and assignee, the estimated finish date is automatically calculated based on dependencies, and resource availability.
to indent or un-indent tasks. Once a task is entered with an associated estimated hours and assignee, the estimated finish date is automatically calculated based on dependencies, and resource availability.![]() icon next to the assignment. This is calculated by team members work time, tasks assigned to the team member, estimated start date, and estimated hours on the tasks. Clicking the icon brings up the Resource Availability report, showing the assignments for your team members.
icon next to the assignment. This is calculated by team members work time, tasks assigned to the team member, estimated start date, and estimated hours on the tasks. Clicking the icon brings up the Resource Availability report, showing the assignments for your team members. 
 Show instructions