Collaborator seamlessly integrates with the Git source control system. This section provides a general overview of integration preferences, ways to review files controlled by Git, and so on.
About Integration
Using the built-in Collaborator Git integration, you can quickly upload various files to the Collaborator server to create a review directly from the desktop client of your choice. The types of files you can upload include:
- Arbitrary Git diffs.
- Git branches as diff arguments.
- Local changes to files from the Git index.
Git integration uses Git client applications that are already installed on the client computer. That is, integration supports all protocols, authentication settings, proxies, and other configuration specifics.
Supported Versions
To enable the integration via GUI Client and Command-Line Client, you need a Git command line client (git.exe) to generate differences for review. We require Git v1.7.4 or later.
Note: If you plan to add unpushed commits, you must have an upstream tracking branch set. You can tell Git and Collaborator which upstream branch to compare against by running the following command:
Remote Repositories Support
If your Git repository is located on one of the popular source hosting services – such as GitHub or GitLab – you may want to automatically create and update reviews when changes occur in your remote repositories. For that purpose, you can use the built-in Collaborator integration with these services. To learn more about possible options for integration, see Integration With Repository Hosting Services.
Ways of Integration
You can enable the integration between Collaborator and Git for GUI Client, Command-Line Client or Collaborator server.
GUI Client
To enable the integration:
-
Start GUI Client.
-
Click Add to create a new SCM configuration.
-
In the subsequent SCM Configuration dialog, specify the local source code location. For Git, this is not optional.
-
Select Git in the SCM drop-down list.
-
Several options will become available. These are specifically tailored to configure Git integration.
Option Description Git Executable A full path referring the Git command line client (git.exe). Skip index Defines whether the changes you upload via the "Add Changes" command should be taken from the working tree (including not-yet-committed changes) instead of from the index. This is an analogue of the git commit -acommand.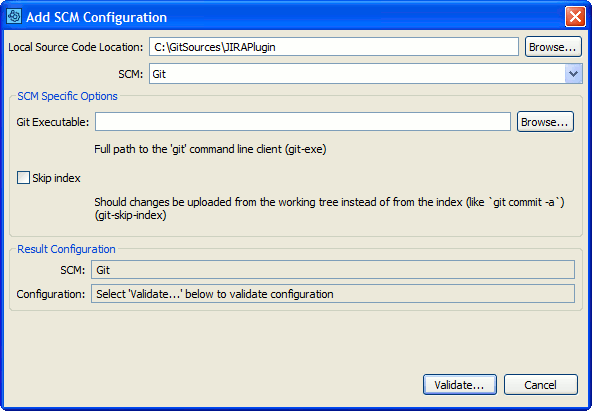
-
Once ready, click Validate to make sure the integration is operational.
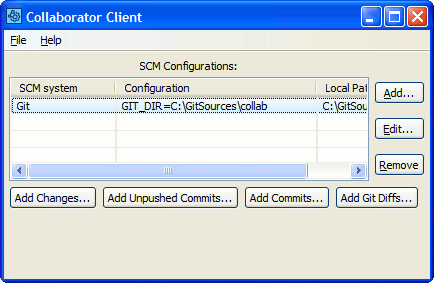
After that, a new configuration for Git will appear on the main screen of the GUI Client.
Select it, then click on the corresponding button depending on what you want to do next:
-
Add Changes – Upload the modifications that are currently in the index. This action is an analog of the
git commitcommand.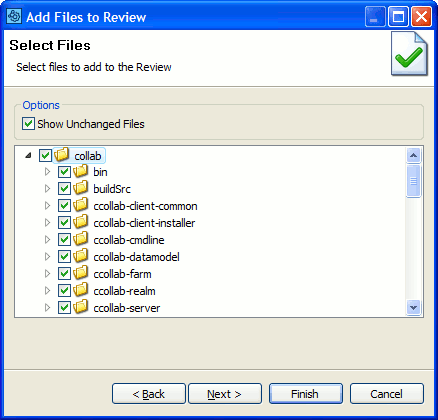
-
Add Unpushed Commits – Select all commits on your local branch that have not been pushed to the tracking branch.
Note: This option assumes you have configured branch tracking in Git. On any errors – for example, Error initializing local changelists– make sure your current branch has a tracking branch set. To create an initial setup for this, run thegit config branch.autosetupmerge alwayscommand. To use the existing branch for tracking, rungit branch --set-upstream my-branch my-upstream, replacingmy-branchandmy-upstreamwith your parameters.
-
Add Commits – Upload commits, whether these have been pushed or not. To add a specific commit, specify its ID and click Add in the dialog.

In the dialog, you can select whether you want it to display all available Commits, input IDs of specific Commits, Commits within a specific range or date interval.
Filter will return 100 newest Commits for ID and date range requests.
You can exclude and include the files from commit upload by specifying filename(eg : "sample.txt"), file extension("*.txt","*.log"), or both.
-
Add Git Diffs – Upload arbitrary Git diffs to the Collaborator server for review.
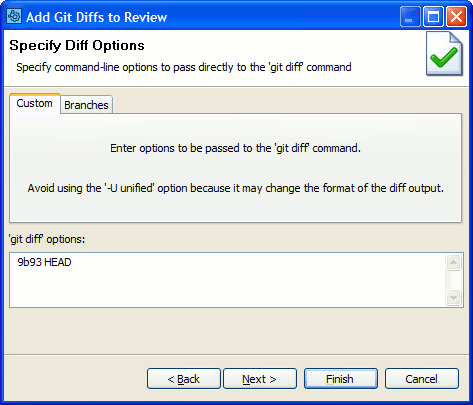
On the Branches tab of the dialog, you can also upload the differences between two branches to a review. Specify the branches in the Before and After drop-down lists.

Command-Line Client
In the Command-Line Client, you can create a review for arbitrary Git diffs and changes to files that are present in the Git index.
For example, to create a new review and add all changes in the current directory and below, plus the foo.txt file, you can use the following command:
ccollab addchanges new . foo.txt
Commands recommended for Git
-
ccollab addchanges– Attaches locally-modified files to a review. -
ccollab addchangelist– Attaches an atomic changelist to a review. -
ccollab addgitdiffs– Uploads differences generated by git diff command. -
ccollab gitaddbranch– Uploads all differences between the specified branch and the remote-tracking branch.
In most cases, the Command-Line Client can automatically detect your Git configuration. Try testing your configuration to verify the configuration is detected correctly.
If the Command-Line Client is unable to detect your Git configuration or you want to override the detected settings, you can manually specify Git settings using global options.
To manually configure the Command-Line Client to use Git, execute the following command:
Git-specific Options
|
Option |
Description |
|---|---|
|
--git-exe <value> |
Full path to the "git" command line client. |
|
--git-skip-index |
Defines whether the changes you upload via the |
Web Client
Collaborator administrator can configure the Collaborator server to communicate directly with Git repositories. Server-side integration allows users to upload committed atomic changelists (commits in terms of Git) from the Web Client without having to install and configure client-side tools.
To upload changelists:
-
Log in to Web Client.
-
Create a new review, or open an existing one.
-
Scroll to the Review Materials section of the Review Screen.
-
Click Upload button and then select the item corresponding to the desired repository.
Note: Item titles are specified by your Collaborator administrators and they will vary from those in the image below. 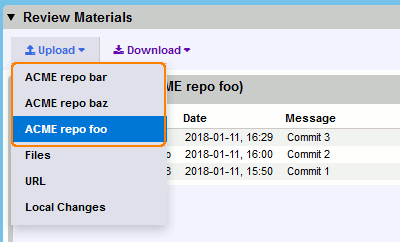
-
In the ensuing dialog, specify the IDs of desired changelists. Separate multiple IDs by space character.

-
Click Attach to upload the specified changelists to the review.
Configure Server-Side Integration
To enable the feature, your Collaborator administrator will need to perform the following actions:
-
Install and configure a Git client on the Collaborator server.
-
Log in to Collaborator server.
-
On the Collaborator main toolbar, click ADMIN, and then select Version Control from the tree on the left. Then switch to the Version Control Servers tab.
This tab lists available version control server configurations. They could be created manually, as described bellow, or could be created automatically when one of the client programs uploads files from a server that does not match any of the currently configured servers.
-
Select "Git" from the SCM System drop-down list and click Create.
-
Specify the values for the following properties:

-
Click Test Connection to verify that the connection between Collaborator server and your Git server is established successfully and is trusted. For example, you might need to generate and/or accept trust certificates and so forth.
-
The Client Configuration Mapping section defines correspondence between files uploaded by the various Collaborator clients and this server-side Git configuration.
Specify Java-style regular expressions to map changelists uploaded from our client tools to this Git server:

-
Press Save to create configuration and enable server-side integration with this Git repository.
Submodule Support
Currently, Collaborator clients ignore submodule changes when adding changelists or diffs from the super project. Unlike clients, the server-side repository hosting integrations can display changes in the submodules of tracked repositories. So, to add the submodule differences you must either use repository hosting integration, or navigate into the submodule itself and add the files from there.
Git Server Hooks
The ensure-review-started and ensure-reviewed hooks ensure that files cannot be committed unless certain conditions are met. If a user attempts to commit files that do not meet those conditions, an error message describing the unfulfilled conditions will be displayed and the files will not be committed. If the conditions are met, the commit will be allowed to continue normally. The ensure-review-started hook requires that the review exist. ensure-reviewed requires that the review must be completed.
If you are familiar with Gerrit (an open source Git-focused review package), you can implement a similar workflow for your engineering staff using Collaborator and Git triggers. To learn more, check the SmartBear blog: Gerrit-Style Code Review With Collaborator.
Link reviews with commits
To use the ensure-review-started and ensure-reviewed hooks, you must require developers to put the review ID somewhere in the Git commit message. The format of this text is completely up to you. You will need to supply a Java-style regular expression that identifies this text and specifically calls out the review ID inside that text. The regular expression is specified using the --review-id-regex hook command option.
Here are some common ways of specifying the review ID and the corresponding regular expressions. These regular expressions are case-insensitive and you must identify the review ID portion with parenthesis:
Text |
--review-id-regex |
Review: 4233 |
review:\s*(\d+) |
rID4233 |
rid(\d+) |
(review 4233) |
\(review (\d+)\) |
This text can appear in-line with other text or in a more formal form-style layout. Because you control the regular expression, you can control exactly what this looks like.
For more information about Git hooks in general, see the Git documentation.
Technical Details and Limitations
Adding Git commits from GUI Client, Command-Line Client, Eclipse Plug-in or Visual Studio Extension will also add part of Git log information to build properly ordered list of changes on Collaborator server side. This will ensure that in Review Screen and Diff Viewer Git commits are displayed in the same order as in the Git log. To use this functionality you will need to update both server and clients to version 11.5 and later.
Collaborator does not guarantee that Diff Viewer will display correct comparison results for the following cases:
-
If you have "gaps" while adding subsequent atomic changelists (commits in terms of Git) to the same review. For example, add changelists 1, 2, and 4, but forget to add changelist 3.
-
If you add changelists from different branches or repositories to the same review.
-
If you add several diffs (non atomic changelists) to the same review.
See Also
Integration With Repository Hosting Services
SCM Configuration
Source Control Integrations
