
You can include AQTime projects into Visual Studio test projects and run them remotely on computers where Visual Studio is not installed by using Visual Studio Test Agents.
To learn about Visual Studio Test agents, you can see the Setting Up Test Machines to Run Tests or Collect Data article in the MSDN Library.
 1. Add Your AQTime Project to Your Visual Studio Test Project
Requirements
Computers where you create test projects and where you run them must have the following software installed:
Computer Where you Create and Configure Test Projects
The computer where you create and configure your Visual Studio test project must have the following software installed:
-
One of the following Microsoft Visual Studio versions:
-
Microsoft Visual Studio 2015 (the Enterprise edition).
-
Microsoft Visual Studio 2010 - 2013 (the Ultimate or Premium edition).
-
-
AQTime with the appropriate Microsoft Visual Studio Integration package.
Test Controller
Test agents for Visual Studio 2015 do not support running functional tests remotely from Visual Studio. To run tests, use test controllers and test agents for Visual Studio 2013. You can find more information on it in the Install and Configure Test Agents article in the MSDN Library.
-
Microsoft Visual Studio Test Controller.
-
AQTime with the appropriate integration package.
Test Agents
-
Microsoft Visual Studio Test Agent.
-
AQTime with the appropriate integration package.
-
TestComplete or TestExecute if you use TestComplete tests to simulate user actions over your application during the profiling.
| Note: | There is no need to install Microsoft Visual Studio on the computer where the profiling will be run. |
1. Add Your AQTime Project to Your Visual Studio Test Project
-
Launch Visual Studio and open your Visual Studio test project or create a new one.
-
Add an AQTime Test item to your test project and configure it to run the needed AQTime project.
For detailed instructions on how to do it, see Adding AQTime Projects to Visual Studio Test Projects.
2. Configure Test Settings for Remote Execution
Open your test project extended with the AQTime project in Visual Studio and add new test settings to your solution (Visual Studio 2015, 2013 and 2012) or your Visual Studio test project (Visual Studio 2010) and modify the settings for the remote execution:
-
In your solution or test project, open the test setting file you want to configure or create a new test setting file.
-
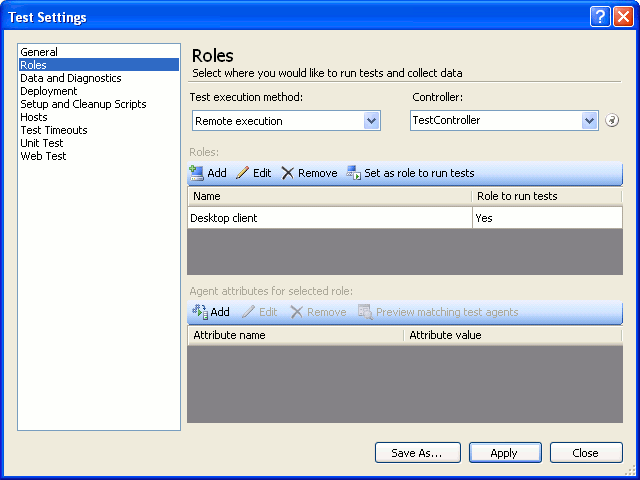
Open the Roles tabbed page of the Test Settings dialog:
-
In the Test execution method drop-down list, select Remote execution.
-
In the Controller drop-down list, select a controller for the test agents you want to use.
-
In the Roles table, create roles to be used in your test. Select the role, with which you want to run your tests, and click Set as role to run tests. If you have a single role defined, it will run the tests by default.
-
To specify test agents that will be used to run tests, in the Agent attributes for selected role table, create attributes for the role and then assign these attributes to your test agents.
-
-
Specify other test settings you need. For more information on test settings, see the Specifying Test Settings for Visual Studio Tests article in the MSDN Library.
-
Click Apply to save settings and close the dialog.
To apply the created test settings:
-
In Visual Studio 2012 - 2015, choose the needed settings from the Test > Test Settings menu.
-
In Visual Studio 2010, choose the needed test settings from the Test > Select Active Test Settings menu.
3. Run Your AQTime Test and View Test Results
In Visual Studio 2012 – 2015:
-
Choose Test > Windows > Test Explorer from the Visual Studio main menu to open the Test Explorer panel.
-
In the Test Explorer, right-click your AQTime Test item and select Run Selected Test from the context menu (you may need to build you project to fill the panel with available tests).
In Visual Studio 2010:
-
Open the Test List Editor.
-
In the Test List Editor, create a new test list.
-
Add your AQTime test to the new test list and check the check box to enable the test.
-
Right-click the test and choose Run Checked Tests from the context menu.
The test controller specified by the test settings will process the test project and run it on the appropriate test agent. The test agent will lunch AQTime and perform profiling. You can select your test controller in the Connect drop-down list of the Test Results panel and watch the test progress.
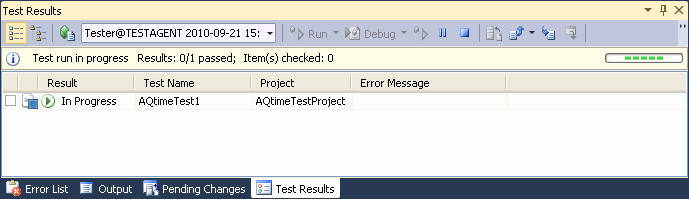
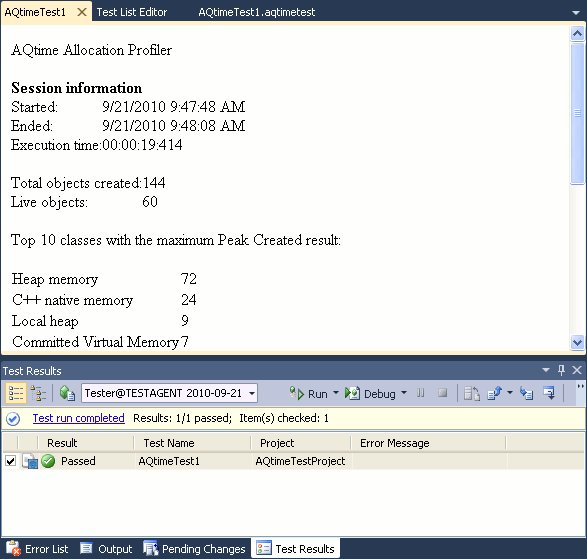
After the test run is over, the Test Results panel displays the test results.
See Also
Extending Visual Studio Test Projects With AQTime Projects
Integration With Microsoft Visual Studio
Adding AQTime Projects to Visual Studio Test Projects
Running AQTime Projects as Part of Build And Release Pipeline