TestLeft and Windows Firewall
Windows includes a built-in firewall controlling data transfers between your computer and other computers over the network or Internet. The firewall lets users specify trusted programs that are allowed to transfer information between the local computer and certain remote computers, while blocking requests that come from other programs and computers.
When a test is running, it exchanges data with the test engine through a port. By default, it is port 2377. Therefore, you need to configure the firewall to allow traffic through the port to run tests successfully.
In addition, if you are using a Floating User license, TestLeft uses the TCP and UPD protocols and port 1947 to communicate with the computer where your license is activated (License Manager PC). These protocols and the port must not be blocked.
Important Notes
-
Configure the firewall on all the computers where you will run tests.
-
If your computer is connected to a domain, the firewall settings may be controlled by a system administrator. In this case, ask your system administrator to allow TestLeft through the firewall.
-
When you run tests on remote computers, your computer will send a lot of requests to the test runner (TestLeft, TestComplete, or TestExecute) running on those computers and receive responses from it. Your company�s proxies and firewalls may report the computers where your tests run as a source of spam.
Make sure to inform your IT Department about TestLeft so that they can change the firewall settings, if needed.
-
If you use a Floating User license, configure the firewall both on your License Manager PC and on your TestLeft workstation.
Checking if Firewall Is Running
To find out whether Windows Firewall is running:
-
Open the Control Panel by clicking Start and then clicking Control Panel.
-
In the search box, type Firewall and then select the Windows Firewall applet. The Windows Firewall window will open.
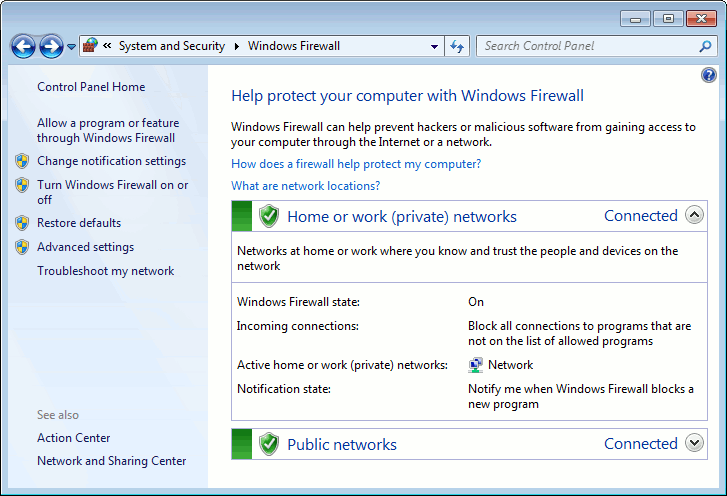
If the network location that includes your test computers or your License Manager PC (if you use a Floating User license) has a green check mark next to it, it means that Windows Firewall is running and controlling data transfers. In this case, you need to configure the firewall to allow TestLeft network activities.
Configuring Firewall Settings
If Windows Firewall is on for the network location that includes your test computers, you need to create a rule that will open the port TestLeft uses (2377 by default).
-
On the left of the Windows Firewall window, click Advanced settings. The Windows Firewall with Advanced Settings window will open.
-
In the tree on the left of the window, click Inbound Rules.
-
Create a new rule:
-
In the Actions panel of the window, click New Rule. The New Inbound Rule Wizard will appear.
-
On the Rule Type page of the wizard, select Port. Click Next.
-
On the Protocol and Ports page of the wizard, select Port. In the Specific local ports edit box, enter the needed port (2377 by default). Click Next.
-
On the Action page of the wizard, select Allow the connection and click Next.
-
On the Profile page of the wizard, select the network location for which you want to open a port and click Next.
-
On the Name page of the wizard, in the Name field, specify the rule name and press Finish.
-
-
In the tree on the left of the Windows Firewall with Advanced Security window, select Outbound Rules.
-
Repeat step 3 to open the same port for outbound connections.
If you use a Floating User license and Windows Firewall is on for the network location that includes your License Manager PC, make sure that TCP and UDP traffic through port 1947 is allowed:
-
In the left part of the Windows Firewall window, click Advanced settings.
-
In the resulting Windows Firewall and Advanced Security window, select Inbound Rules and then click New Rule.
-
In the resulting wizard, click Port and then click Next.
-
Click TCP. Then click Specific local ports and enter 1947. Click Next.
-
Click Allow the connection and then click Next.
-
Select the needed scope and click Next.
-
Enter a name for the rule and click Finish.
Repeat the steps for the UPD protocol. Then repeat the steps to create outbound rules that will allow TCP and UDP traffic through port 1947.
Close the Windows Firewall window.