If you use Zephyr Squad to organize and manage your tests, you can automate your Zephyr test cases by assigning TestComplete tests to them. Your TestComplete test results will be automatically sent to your Jira project and added to its releases and test cycles.
You assign TestComplete test cases as test automations to Zephyr test cases directly from TestComplete. This topic describes how you can do this.
Note: In Jira, assigning TestComplete tests to test cases is not currently supported.
To learn how to run test automations, see Run Test Automations for Zephyr Squad.
Requirements
Jira Cloud
– or –
Jira Server 7.2.x–7.13.x
– or –
Jira Data Center 7.2.x–7.13.x
-
Your Jira must have the Zephyr Squad plugin installed.
Keep the default Test issue type for Zephyr test cases in Jira. For TestComplete 14.20 and later: If you use a custom issue type name for Zephyr test cases, you will have to configure your TestComplete project to locate them manually. See Link TestComplete Projects to Custom Zephyr Test Case Issue Types.
-
TestComplete version 14.10 (or later)
-
Zephyr Squad Integration Plugin must be enabled in TestComplete. By default, the plugin is installed and enabled automatically when you install TestComplete. If you experience issues with Zephyr integration, make sure the plugin is enabled in the File > Install Extensions dialog (you can find the plugin in the Common group).
-
Your TestComplete workstation must have access to your Jira project.
Managing Test Automations
 To bind your TestComplete project to a Jira project
 To link TestComplete test items to Zephyr test cases
 To link script-defined test cases to Zephyr test cases
To bind your TestComplete project to a Jira project
If your TestComplete project is not bound to a Jira project yet, click Connect to Zephyr Squad on the TestComplete toolbar.
| Note: | The button is hidden by default. Right-click the TestComplete toolbar and select TMS to make it appear. |
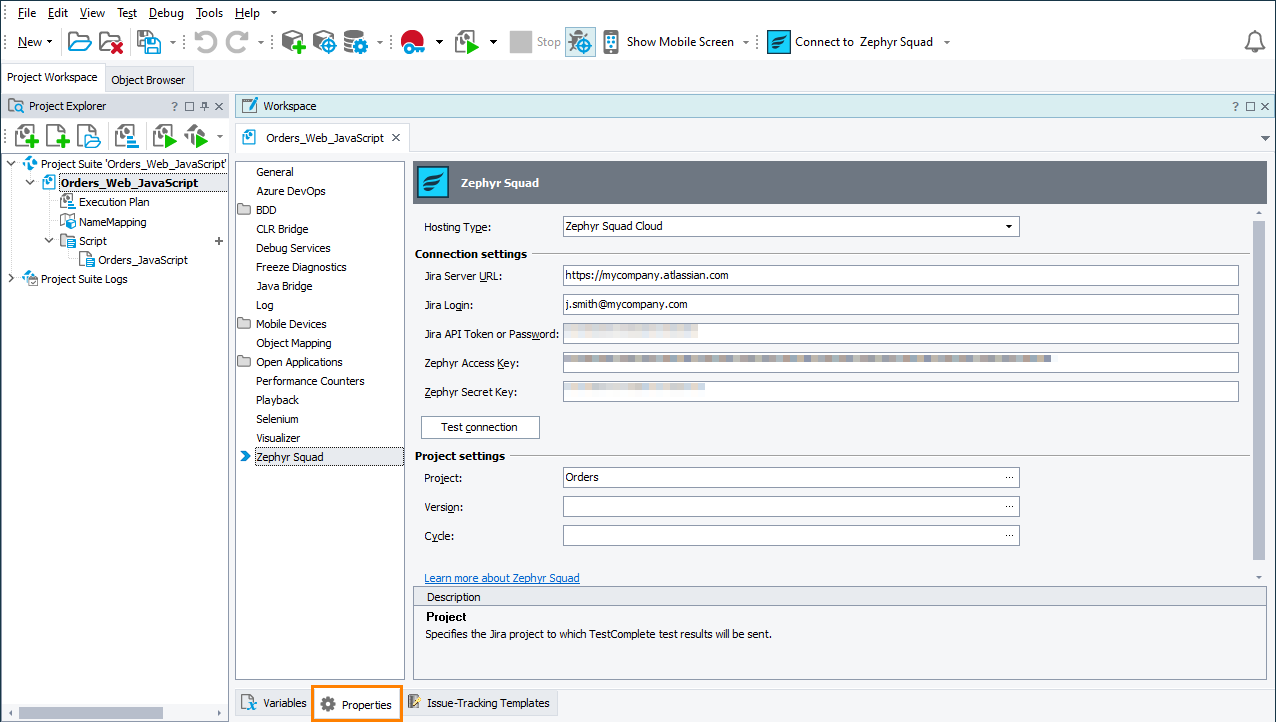
On the resulting Properties > Zephyr Squad page, specify the credentials you use to connect to your Jira project, Zephyr API keys (if needed) and your Jira project:
Tip: You can set the connection settings as your default project properties. All the projects you will create later will have these properties specified. You can then modify them on the Properties > Zephyr Squad page of those projects, if needed.
To link TestComplete test items to Zephyr test cases
-
Add automated tests (for example, script routines or keyword tests), to your project’s Execution Plan. To learn how to do this, see Execution Plan -Test Items - Common Tasks.
-
Mark the test items you want to use for automation as test cases in the Execution Plan editor.
-
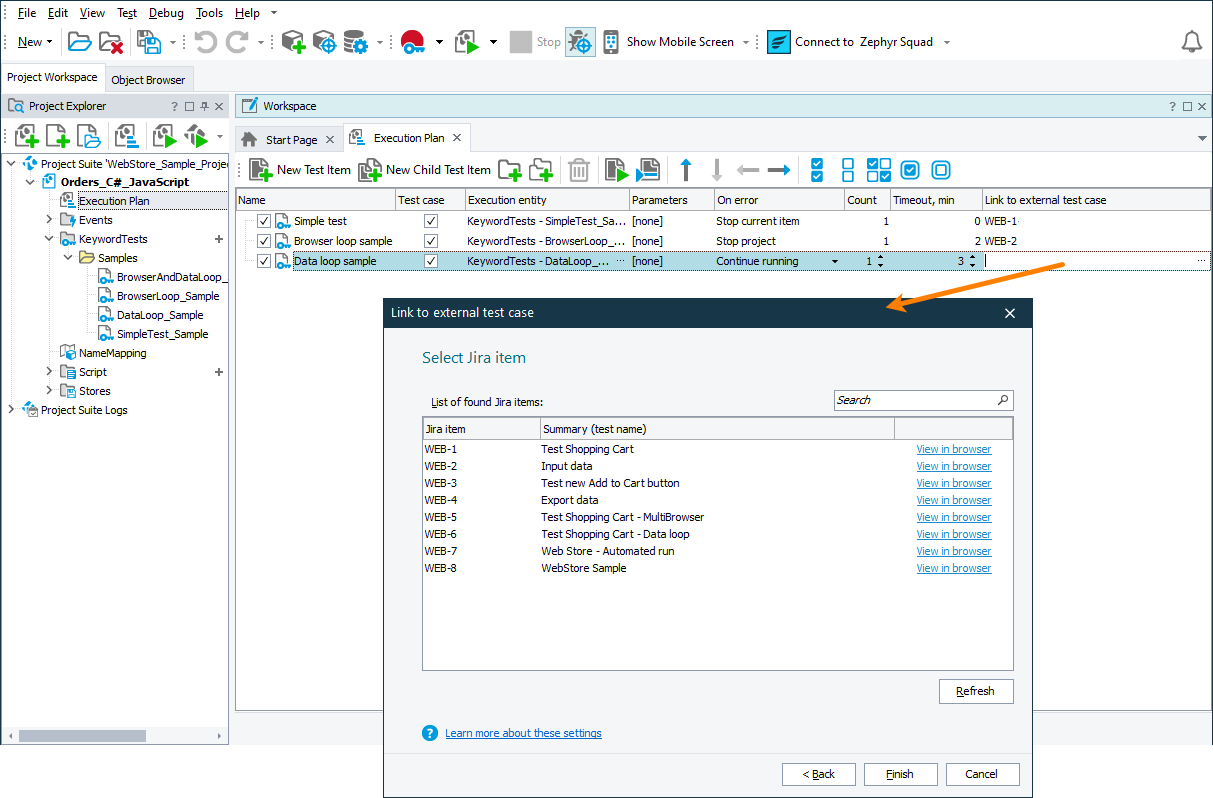
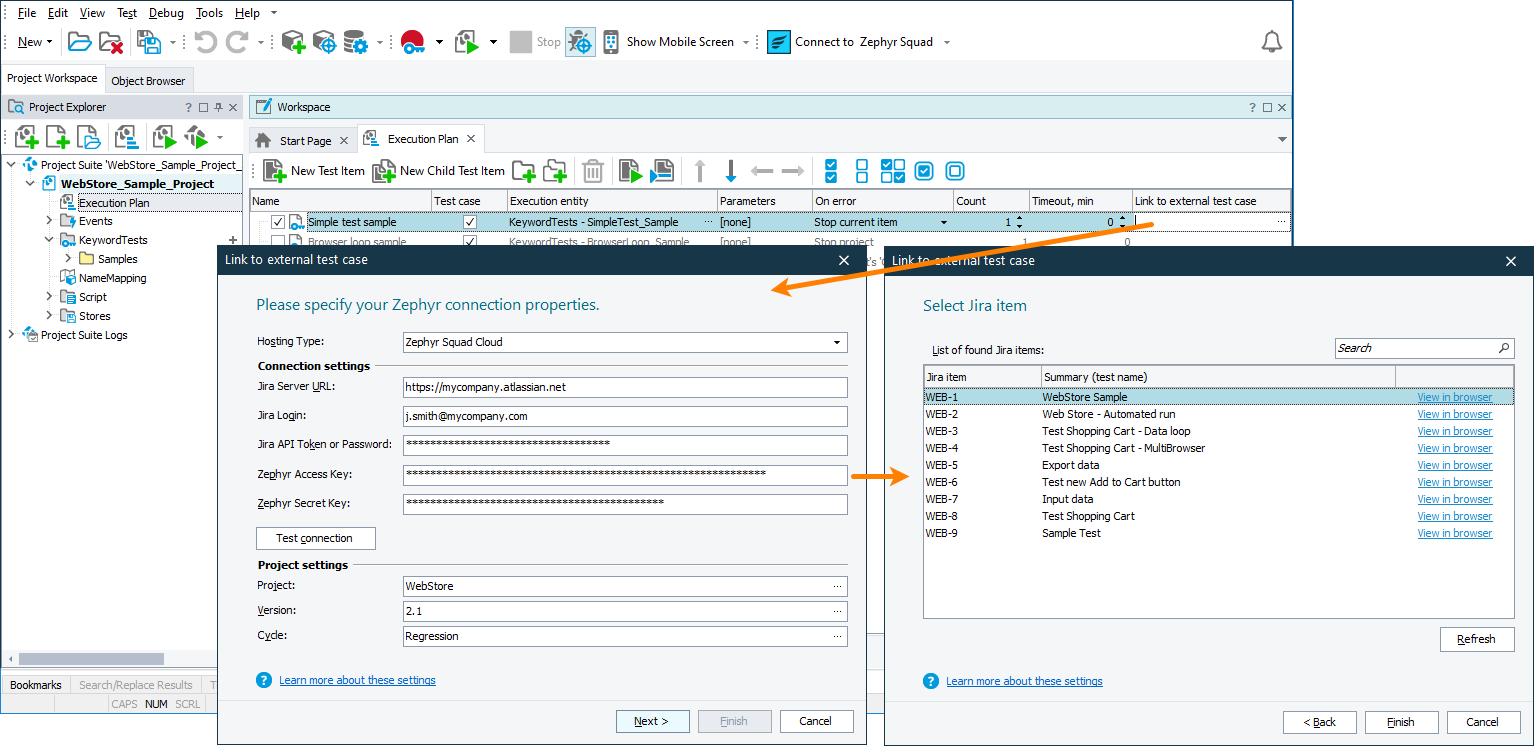
Click the ellipsis button in the Link to external test case column of the added test item.
If your project is already bound to Zephyr Squad, select the needed Zephyr test case in the resulting Link to external test case wizard:
Otherwise, in the Link to external test case wizard, first, specify the connection settings. If the specified connection settings are valid, TestComplete will retrieve a list of available Zephyr test cases. Select the needed test case:
– or –
Type the needed Zephyr test case key manually using the following format:
zfj://<your_test_case_key> Your TestComplete project must be bound to a Jira project. To learn how to do it, see above.
To link script-defined test cases to Zephyr test cases
If you use script tests, you can mark script routines or even arbitrary code fragments as test cases and send their results to your Jira project directly from the code:
 Your TestComplete test project must be bound to a Jira project as described above.
-
Open your script units, analyze your code and learn which routines and code fragments match your Zephyr test cases.
-
To mark the beginning of the code whose results you want to send to Jira, use the
aqTestCase.Beginmethod. Specify the name that will be used to post the results to the TestComplete test log and specify the Zephyr test case to which you want to assign the results, in thezfj://<test-case-key>format.aqTestCase.Begin("My test", "zfj://PROJ-1") -
To mark the end of the needed code, use the
aqTestCase.Endmethod.
For example, in the code snippet below, the aqTestCase.Begin and aqTestCase.End methods mark part of the Main script routine as a separate “Create an order” test case and send its test results to the OR-1 test case in a Jira project:
JavaScript, JScript
{
var page = Aliases.browser.page;
…
// Sets the beginning of the "Create an order" test
aqTestCase.Begin("Create an order", "zfj://OR-1");
page.Aspnetform.table.cell1.linkOrder.Click();
…
page.Wait();
// Sets the end of the "Create order" test
aqTestCase.End();
var table = page.Aspnetform.table.cell.panelContent.panel.table;
…
Aliases.browser.Close();
}
Python
def main():
  page = Aliases.browser.page

  #...

  # Sets the beginning of the "Create an order" test
  aqTestCase.Begin("Create an order", "zfj://OR-1");

  page.Aspnetform.table.cell1.linkOrder.Click()
  #...
  page.Wait()

  # Sets the end of the "Create order" test
  aqTestCase.End()

  table = page.Aspnetform.table.cell.panelContent.panel.table

  #...

  Aliases.browser.Close()
VBScript
Dim page, table, settings
Set page = Aliases.browser.page
…
' Sets the beginning of the "Create an order" test
aqTestCase.Begin("Create an order", "zfj://OR-1")
Dim cell
Call page.Aspnetform.table.cell1.linkOrder.Click
…
Call page.Wait
' Sets the end of the "Create order" test
aqTestCase.End
Set table = page.Aspnetform.table.cell.panelContent.panel.table
…
Call Aliases.browser.Close
End Sub
DelphiScript
var page, panel, table, cell;
begin
page := Aliases.browser.page;
…
// Sets the beginning of the "Create an order" test
aqTestCase.Begin('Create an order', 'zfj://OR-1');
page.Aspnetform.table.cell1.linkOrder.Click;
…
cell.panel.linkProcess.Click;
page.Wait;
// Sets the end of the "Create order" test
aqTestCase.End;
table := page.Aspnetform.table.cell.panelContent.panel.table;
…
Aliases.browser.Close();
end;
C++Script, C#Script
{
var page = Aliases["browser"]["page"];
…
// Sets the beginning of the "Create an order" test
aqTestCase["Begin"]("Create an order", "zfj://OR-1");
page["Aspnetform"]["table"]["cell1"]["linkOrder"]["Click"]();
…
page["Wait"]();
// Sets the end of the "Create order" test
aqTestCase["End"]();
var table = page["Aspnetform"]["table"]["cell"]["panelContent"]["panel"]["table"];
…
Aliases["browser"]["Close"]();
}
When you run the main routine, TestComplete will treat all the code between the aqTestCase.Begin and aqTestCase.End methods as a separate test, send its results to Jira, and assign it to the specified Zephyr test case.
To temporary disable sending test results
In TestComplete, click Reporting to Zephyr Squad on the TestComplete toolbar.
– or –
If you run your tests by using the command line, use the /DisableExternalReporting command-line argument.
To remove test associations
If the test is assigned to a Zephyr test case in the project’s Execution Plan editor, clear the test’s Link to external test case column.
If the test is assigned to a Zephyr from code using the aqTestCase.Begin and aqTestCase.End methods, remove the method calls from your code.
To unbind a TestComplete project from a Jira project
To temporary unbind a TestComplete project from a Jira project, click Reporting to Zephyr Squad on the TestComplete toolbar.
To unbind the project completely:
-
Open the Execution Plan editor of your project and remove test item associations (see above).
-
Open the Properties > Zephyr Squad page of your project and clear the connection settings.
-
Save the changes.
TestComplete will stop sending test results to your Jira project.
See Also
Integration With Zephyr Squad
Run Test Automations for Zephyr Squad
Project Properties - Zephyr Squad Options
Execution Plan Editor


