
You can create a local Git repository and add your current project or project suite to this repository.
 |
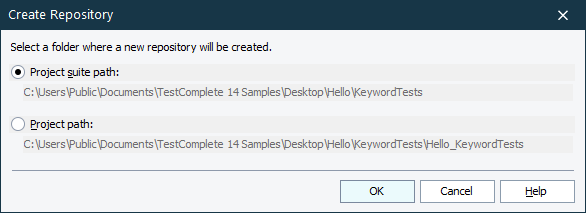
A repository created at a project suite level tracks changes in the project suite and all its child projects. Whereas, a repository created at a project level tracks changes in that project only. |
To create a local repository
-
Save all changes by selecting File > Save All from the TestComplete main menu.
-
Do any of the following:
- Select File > Source Control > Create Repository from the TestComplete main menu.
- Right-click within the Project Explorer and choose Source Control > Create Repository from the context menu.
- Click
 Create Repository on the Source Control toolbar (if the toolbar is hidden, right-click the main menu and select Source Control in the ensuing context menu to show the toolbar).
- In the ensuing Create Repository dialog, select where the repository will be located (the project suite path or project path) and click Ok.
TestComplete will create a Git repository in the specified location and add the project suite or project (depending on a choice you made) to the newly created repository. At that, all applicable project suite and project files will also be added to the repository. See List of Files Added to Source Code Control.
Related Tasks
 Cloning an Existing Repository
See Also
Integration With Git - Common Tasks
Integration With Git
List of Files Added to Source Code Control