
After having created the script code and the description.xml file, we can test whether our custom actions function properly. To test the extension, we need to change TestComplete settings to specify the extension folder and call the actions during the test recording and at design time. Below are the steps that demonstrate how to do this.
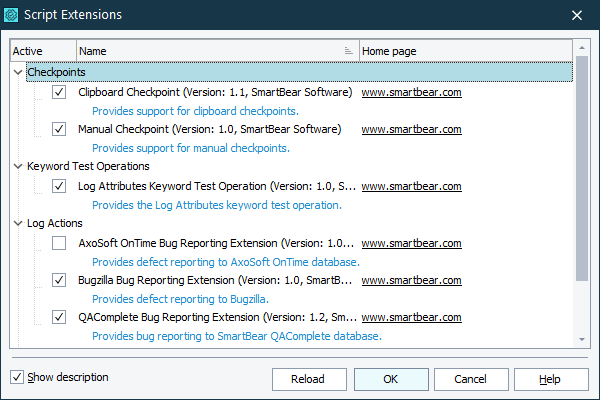
One note before we proceed: the name of our extension coincides with the name of one of the pre-installed extensions. Before installing our extension, you should disable the TestComplete extension:
-
Select File | Install Script Extensions from the main menu to invoke the Script Extensions dialog.
-
In the dialog, uncheck the Clipboard Checkpoint extension.
-
Press OK to close the dialog and to save the changes.
Now we can install our script extension into TestComplete:
-
Select the Tools | Options from the TestComplete main menu. This will invoke the Options dialog.
-
In the dialog, select the Engines | Script Extensions node from the tree on the left of the dialog. This will open the Script Extensions Options page. Here you can specify the folders that contain script extensions.
-
In the dialog, click Add Folder. This will invoke the standard Browse for Folder dialog.
-
In the dialog, choose the C:\My Extension Files folder and click OK. The folder will be added to the script extensions list:
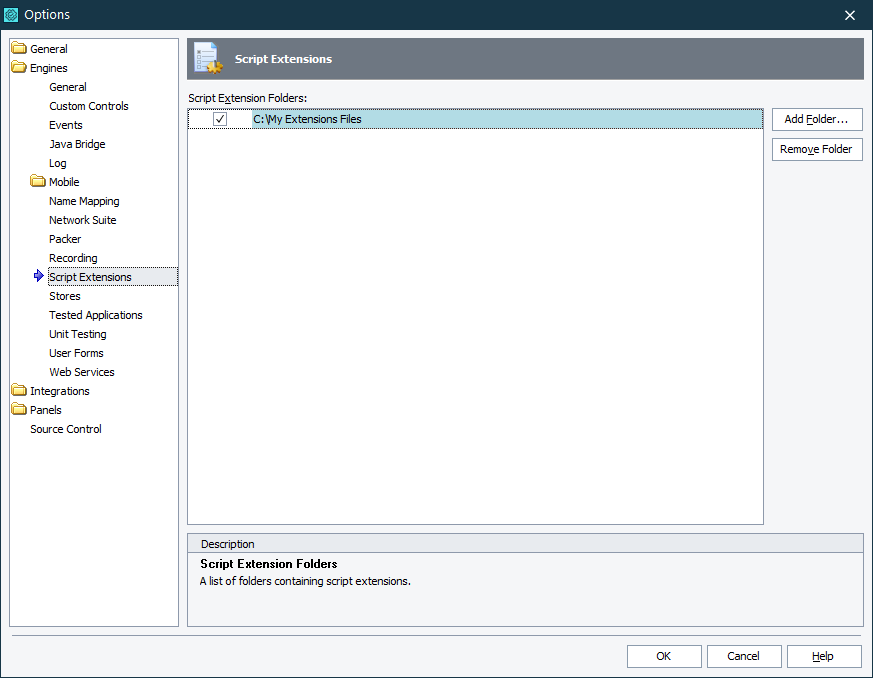

We would like to note that we specified C:\My Extension Files, rather than C:\My Extension Files\ActionsExtension. So far our script extension files are not packed in the .tcx package. When specifying the path to the unpacked extensions, you should not specify the folder that contains the description.xml file, but the folder that is one level up. This happens because TestComplete treats each item of the folders list like a folder that may contain several extensions, but not just one extension. So, unpacked files cannot reside in the root of these folders, they must be in subfolders. That is why we specified C:\My Extension Files, but not C:\My Extension Files\ActionsExtension. If we had the packed extension (the .tcx file) in the ActionsExtension folder, we would have specified C:\My Extension Files\ActionsExtension. -
Make sure that the check box of the C:\My Extension Files item is selected in the list.
-
Click OK to save the changes and to close the Options dialog.
After adding our extension’s path to the Script Extension Options dialog and saved the changes, TestComplete scans the folder and automatically installs the extension. To check whether the extension is installed successfully:
-
Open the Script Extensions dialog (select File | Install Script Extension from the main menu). The extension should be listed in the dialog:
-
The actions should appear in the Recording and Tools toolbars:

Clipboard Checkpoint on the Recording Toolbar
Clipboard Checkpoint on the Tools Toolbar
To test whether our design-time action functions properly, select the Clipboard Checkpoint item from the Tools toolbar and then click the buttons of the ensuing dialog and check whether they function properly. For instance, the Copy button should copy the text from the dialog to the clipboard and close the dialog.
To test whether our record-time action functions properly, start recording and select the Clipboard Checkpoint item from the Recording toolbar. Then stop recording and check whether the recorded script contains the code generated by our record-time action and whether this code is correct.
If there are any errors, make sure the script code and description.xml file are correct and that the script file has the ANSI or UTF-8 character encoding. Also, please check that you created the form as it was described in the tutorial. Below are the contents of the clcCode unit and the description.xml file.
clcCode.js
// Generate the checkpoint code
function CreateSyntax()
{
var clipboard;
// Obtain the clipboard contents
clipboard = Sys.Clipboard;
// Check the clipboard contents format
if (aqObject.GetVarType(clipboard) != 8)
{
MessageDlg("Unable to create the clipboard checkpoint, because the clipboard does not contain text.", mtError, mbOK)
return null;
}
// Generate the Sys.Clipboard call
var call;
call = Syntax.CreateInvoke();
call.ClassValue = Sys;
call.InvokeName = "Clipboard";
call.IsProperty = true;
// Generate a comparison operator
var condition;
condition = Syntax.CreateCondition();
condition.OperatorType = condition.otInequality;
condition.Left = call;
condition.Right = clipboard;
// Generate the Log.Error call
call = Syntax.CreateInvoke();
call.ClassValue = "Log";
call.InvokeName = "Error";
call.AddParameter("Clipboard checkpoint failed");
call.IsProperty = false;
// Generate the if statement
var ifSyntax;
ifSyntax = Syntax.CreateIf();
ifSyntax.Condition = condition;
ifSyntax.TrueSyntax = call;
// Return the result
return ifSyntax;
}
// Record an action
function RecordExecute()
{
var syntax;
// Generate comparison code
syntax = CreateSyntax();
if (syntax == null)
return;
// Insert the generated code into the recorded script
Recorder.AddSyntaxToScript(syntax);
}
// Design-time action
function DesignTimeExecute()
{
var syntax;
// Generate comparison code
syntax = CreateSyntax();
if (syntax == null)
return;
// Create the Copy Text to Clipboard form
var ctcForm;
ctcForm = UserForms.ctcForm;
ctcForm.ResetForm();
// Display the comparison code in the form
ctcForm.cmScriptText.Lines.Text = Syntax.GenerateSource(syntax);
// Show the form on screen
ctcForm.ShowModal();
}
// Copy the text to the clipboard
function ctcForm_cbCopy_OnClick(Sender)
{
Sys.Clipboard = UserForms.ctcForm.cmScriptText.Lines.Text;
}
// Add the name of the selected object to the Copy Text to Clipboard dialog
function ctcForm_ObjectPicker_OnObjectPicked(Sender)
{
var lines;
lines = UserForms.ctcForm.cmScriptText.Lines;
lines.Text += "\r\n";
lines.Text += UserForms.ctcForm.ObjectPicker.PickedObjectName;
}
// Show Help
function ctcForm_cbHelp_OnClick(Sender)
{
Help.ShowContext("ActionsExtension.chm", 6003);
}
description.xml
<?xml version="1.0" encoding="UTF-8"?>
<ScriptExtensionGroup Name = "My Extensions">
<Category Name = "Checkpoints">
<ScriptExtension Name = "Clipboard Checkpoint" Author = "SmartBear Software" Version = "1.0 test" HomePage = "smartbear.com">
<Script Name = "clcCode.js">
<RecordAction Name = "Clipboard Checkpoint" Icon = "clc-icon.bmp" Routine = "RecordExecute"/>
<DesignTimeAction Name = "Clipboard Checkpoint" Icon = "clc-icon.bmp" Routine = "DesignTimeExecute"/>
</Script>
<Description>
Provides support for clipboard checkpoints.
</Description>
</ScriptExtension>
</Category>
</ScriptExtensionGroup>
 Prev
Prev