 |
The information below concerns legacy mobile tests that work with mobile devices connected to the local computer. For new mobile tests, we recommend using the newer cloud-compatible approach. |
This topic explains how TestComplete forms the names of test objects of Android Open Applications (Open, or white-box). Objects of black-box Android applications are named in another manner.
The topic includes the following sections:
About Object Hierarchy
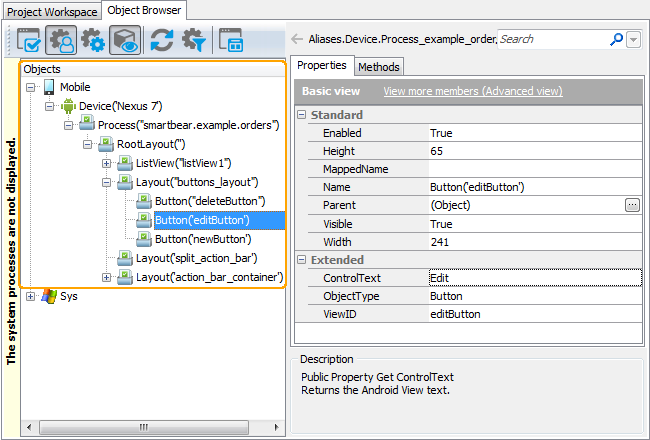
You can explore the object structure of the tested Android applications in the Object Browser. Below is a sample object hierarchy of an Android Open Application displayed in the Object Browser:

Here, the top-level object is Mobile. It is a root object in hierarchy of mobile test objects. Its Device branch corresponds to the device, emulator or virtual machine, where the tested Android application is running. The Process node corresponds to the tested Android Open Application. The items below the Process node corresponds to the application’s controls. The details of object naming are described below.
| Note: | If your application displays web pages in the WebView control, see the Addressing Objects in Hybrid Mobile Applications (Legacy) topic. |
How to Know the Object Name
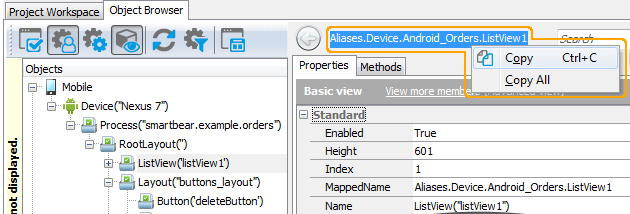
To find the name of a test object, launch your tested application on the device, switch to the Object Browser and choose the desired object in the object tree. The name will be above the Properties page.

It may be difficult to determine what item in the object tree corresponds to the desired control. In this case, to know the test object name you can use the Object Spy window:
-
Launch your Android Open Application and connect the device to TestComplete.
-
Click Show Mobile Screen on the TestComplete Test Engine toolbar. This will invoke the Mobile Screen window.
-
Now, on the Tools toolbar, click
 Display Object Spy. This will invoke the Object Spy window.
 - Select the desired onscreen object in the Mobile Screen window. You can either pick it with the target glyph (
 ), or use 'Point and Press a Shortcut' mode. See Working With Object Spy Window.
-
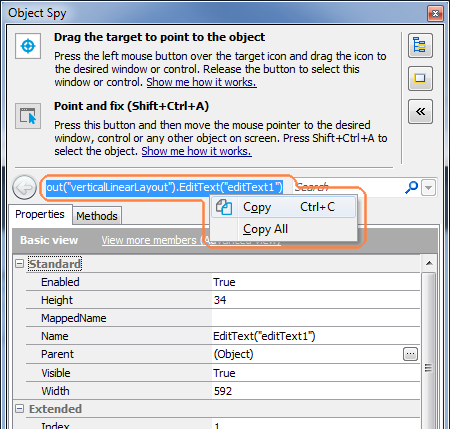
After you picked the control, TestComplete will display the name of the appropriate test object above the Properties tabbed page in the Object Spy window.

We would like to note that the name you copied in the Object Browser or Object Spy can be different from what you see in the object tree on the left of the Object Browser. This is because the name displayed at the top of the panel uses object aliases if they are defined, whereas the object tree uses the naming syntax that includes identification properties. The differences between the two object naming syntaxes are explained below.
You can also learn object names in different syntaxes by looking at the following object properties:
-
MappedName- the object’s fully-qualified alias (including aliases of all parent objects). This name is used by default for the object in your tests. Note that if the selected object is not in Name Mapping, this property is empty. -
Name- the object name that includes its identification properties. This is the same name you see in the Object Browser’s object tree. For an explanation of this syntax, see below. -
FullName- the object’s fully-qualified name in the syntax that includes the identification properties. This name consists of the object’sNameproperty value and theNames of all of its parent objects. See below.
Addressing Objects Without Name Mapping and Aliases
To identify objects of Android Open Applications, TestComplete uses specific object properties like class names and ids. The full name of an object includes the names of all the parent objects, for example:
Mobile.Device("Nexus 7").Process("smartbear.example.orders").RootLayout("").Layout("buttons_layout").Button("editButton")
Let’s have a closer look at this notation and its components:
-
Mobile- This is theMobileobject that is a root object in hierarchy of mobile test objects. It contains methods and properties for accessing and enumerating mobile devices to which TestComplete is connected. -
Device("Nexus 7")- This is the name of theDevicetest object that corresponds to your device. The device name is specified in parentheses as a parameter (in our example, it is Nexus 7. If there are several devices with the same name connected to your computer, TestComplete appends an index to the name:Device("Nexus 7", 2),Device("Nexus 7", 3)and so on.Important: You can skip the device name, that is, use
Mobile.Device().Process… In this case, theMobile.Device()method will correspond to the device that is defined as the current device for testing by theMobile.SetCurrentscript method or Select Device or Device Loop keyword-test operation. By usingDevice()with no parameters, you can create object names that do not depend on the device, and therefore, make the test easily portable between devices. See Running Tests on Multiple Devices (Legacy). -
Process("smartbear.example.orders")- This is the name of theProcesstest object that correspond to the application running in the Android operating system. -
RootLayout("")- This is the name of the test object that corresponds to the container of other on-screen elements.Typically, there is only one instance of
RootLayouttest object - it represents the main container for on-screen elements of the application’s activity. Some popup dialogs and picker controls may create additional containers for their on-screen elements. In this case, TestComplete also creates additional instances of theRootLayouttest object that correspond to the container of a dialog or a picker control.The
RootLayouttest objects are always immediate children of theProcesstest object. -
Layout("buttons_layout"),Button("editButton")- These are the names of the test objects that correspond to controls in the tested Android Open Application.TestComplete determines the control type (button, edit text, list view and others) and uses it to form the name. To determine the type, TestComplete analyzes the control’s class name (see below for details).
If the control has an id specified in the application sources, TestComplete uses this id as a parameter:
Button("button1"),EditText("editText1"),Layout("vertLinearLayout1"),ProgressBar("progressBar_id1")and so on.If a control has no id, TestComplete uses the string NO_ID in the name. Typically, this happens with layout controls:
Layout("NO_ID"). If there are several objects that have no ids (or if there are several objects having the same id), TestComplete includes indexes into the names:Layout("NO_ID"),Layout("NO_ID", 2),Layout("NO_ID", 3)and so on.
How TestComplete Determines the Object Type
To determine the control type, TestComplete analyzes the control’s class name and the names of the classes, which this class inherits. For example, it uses the name Layout for controls of the LinearLayout,FrameLayout and TableLayout classes. It also uses the name Layout for controls of the ActionBarContainer class as ActionBarContainer is a descendant of FrameLayout.
Using the control types masks control implementation details and makes the naming scheme simpler and more transparent.
 |
TestComplete versions prior to version 12.40 used the Layout name for controls of the com.android.internal.view.menu.ActionMenuView and android.widget.ActionMenuView classes. TestComplete version 12.40 and later use the Bar name for these classes. To fix tests created in earlier versions of TestComplete, change the names of the corresponding objects, when you address them or their child objects.
|
Addressing Objects Using Name Mapping and Aliases
The default object names can be long and it can be difficult to understand to what object on screen this or that object corresponds.
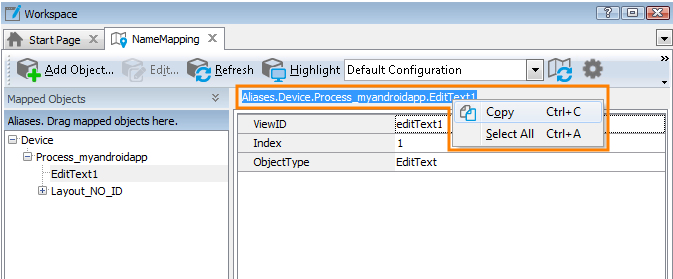
To work around these issues, you can assign custom names to objects. This is called name mapping. During name mapping, you can choose meaningful object names and also exclude non-significant intermediate objects (like Layouts) from the object hierarchy. You can view and modify aliases in the Name Mapping editor. For example, here is a sample hierarchy for the editButton object from the previous section. As you can see, the alias names are shorter, meaningful and the object tree does not contain intermediate Layout objects that are typically of no interest for tests:

The fully-qualified alias that can be used to refer to an object is displayed in the top right part of the Name Mapping editor (see the image above). It starts with Aliases and includes aliases of all of the object’s parent objects separated by dots (in VBScript, JScript, Python and DelphiScript projects) or square brackets (in C++Script and C#Script projects). For example, in the image above you can see that you can refer to the editButton object using the following name:
JavaScript, JScript
Aliases.Device.Process_example_orders.RootLayout.Layout.Button_Edit
Python
Aliases.Device.Process_example_orders.RootLayout.Layout.Button_Edit
VBScript
Aliases.Device.Process_example_orders.RootLayout.Layout.Button_Edit
DelphiScript
Aliases.Device.Process_example_orders.RootLayout.Layout.Button_Edit
C++Script, C#Script
Aliases["Device"]["Process_example_orders"]["RootLayout"]["Layout"]["Button_Edit"]
You can copy object aliases from the Name Mapping editor to the clipboard and use them when manually adding test operations over the tested application’s objects.
For instructions on mapping objects of Android Open Applications, see Mapping Android Object Names.
 |
TestComplete prior to 12.40 used the Layout value for the ObjectType property when mapping objects of the com.android.internal.view.menu.ActionMenuView and android.widget.ActionMenuView classes. TestComplete 12.40 and later uses the Bar value for this purpose. To fix tests created in earlier versions of TestComplete, remap the corresponding objects to update their identification criteria. |
For complete information on the name mapping concept, see topics of the Name Mapping section.
Note on Mapping the Device Objects
By default, the Device objects are mapped only by their type (the OSType property value); the mapping settings do not include the device name or other device-specific characteristics. The purpose of this is to create a device-independent aliases. The resultant aliases help you create tests that work with any device connected to your computer. The only requirement is that your tested application be running on this device. If your test works with two or more applications running on several devices concurrently, you can change the default mapping criteria and use device-specific aliases for the Device objects.
See Also
Testing Android Applications (Legacy)
Preparing for Testing Android Applications (Legacy)

 About Object Hierarchy
 Example