Projects created in TestComplete with early access to the VisualTest integration will not work in the version with official public support introduced in version 15.60.
Introduction
As of November 2023, we have introduced visual testing capabilities for tests in TestComplete.
Learn more about VisualTest in our documentation.
Prerequisites
Make sure you use the correct versions of TestComplete and SmartBear Test Extension if you intend to include visual testing features in your tests.
About integration
While writing your test scripts, you can use the VisualTest library and its methods to get started. Go to the Methods section to see all available methods with descriptions.
This integration supports both script and keyword testing.
Free trial
You can discover the capabilities of visual testing with our 14-day free trial. Learn more here.
How to get started
Script Tests
Follow the steps below if you use this integration for the first time:
-
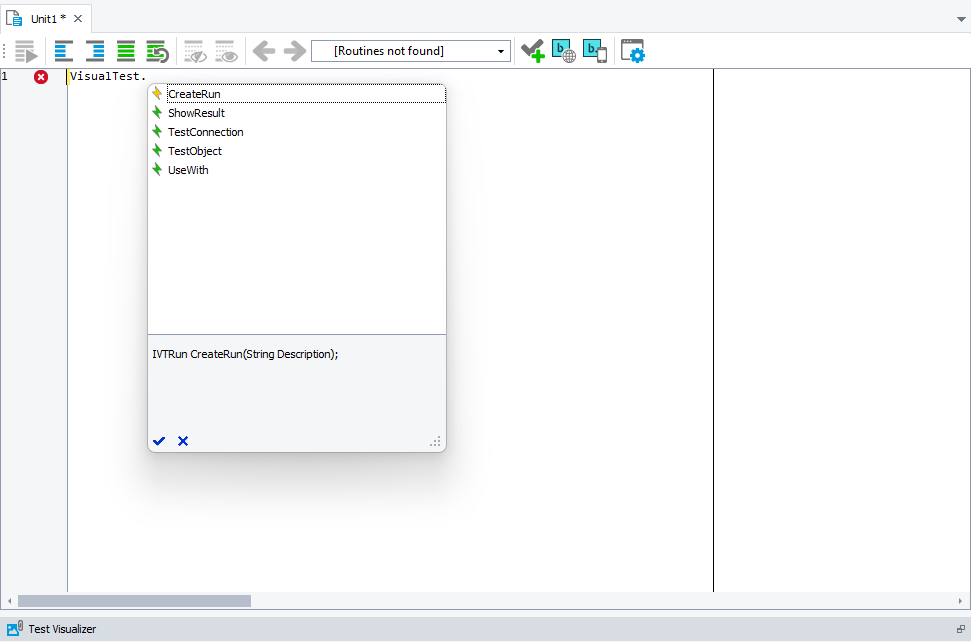
Open a script test in TestComplete and in the script area start writing:
VisualTest.
-
You will see available methods from the product library you can use in your script:
The
Capture()method will send your screenshots to VisualTest. -
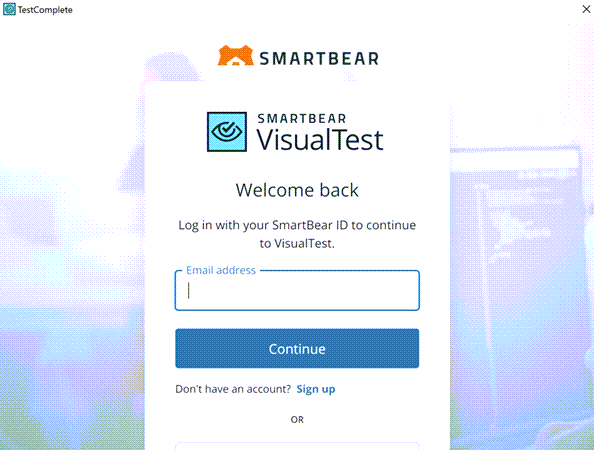
Run your script. Depending on the complexity of your script it might take a while for TestComplete to show a pop-up window asking you to log into your VisualTest account:
You only need to authenticate once the first time you use visual testing.
-
After the completion of your test, you can see the logs from the execution.
View Comparisons in the VisualTest documentation to learn more.
Keyword Tests
Follow the steps below if you use this integration for the first time:
-
Open a keyword test and record steps.
-
Add a new VisualTest operation at the desired location.
-
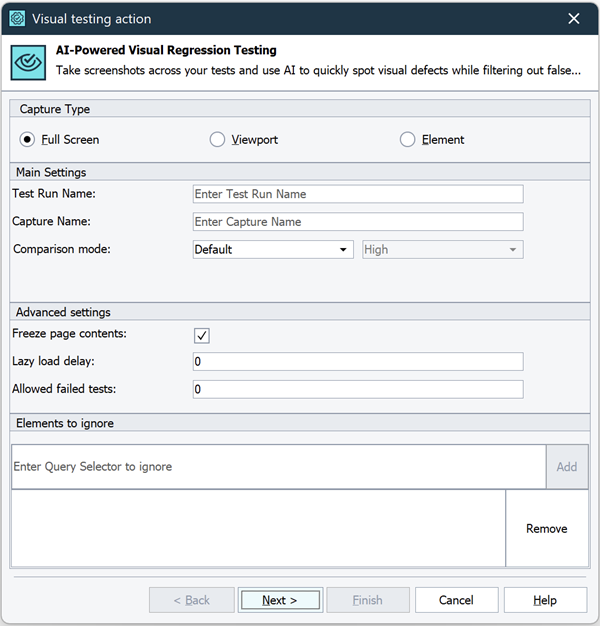
Checkpoint Wizard will ask you to configure this step:
You need to choose one of the capture types:
- Full Screen
- Viewport
- Element
Test Run and Capture names are optional.
-
Rerun your test. Depending on the complexity of your script it might take a while for TestComplete to show a pop-up window asking you to log into your VisualTest account:
You only need to authenticate once the first time you use visual testing.
-
After the completion of your test, you can see the logs from the execution.
View Comparisons in the VisualTest documentation to learn more.
Methods
| Method | Description |
|---|---|
CreateRun(String Description) |
Creates a Visual Test run. |
Capture(Object Element, |
Performs the capture of a specific element with provided arguments. The element variable must be a page object for Fullscreen of Viewport capture. For Element capture any element can be used. ImageType can be: Fullpage, Viewport or Element. |
AddIgnoredElement(String elementSelector) |
Adds the element to be ignored during comparison. Multiple elements can be added with sequential calls to this method. Elements are ignored only during the next capture. |
SetComparisonMode(CompMode comparisonMode, |
Sets the comparison mode to override the project comparison settings. It will be active only during the next capture. |
Code Samples
The following examples show how you can use the VisualTest functions in your tests:
-
CreateRun()andCapture()JavaScript, JScript
function BasicUsage()
{
pageObject = Sys.Browser("chrome").Page("https://bearstore-testsite.smartbear.com/");
let testRun = VisualTest.CreateRun("Basic usage test run");
testRun.Capture(pageObject, "full screen capture", testRun.Fullpage);
testRun.Capture(pageObject, "view port", testRun.Viewport);
elementObject = pageObject.FindElement(“#header “);
testRun.Capture(elementObject, "element capture", testRun.Element);
}Python
def BasicUsage():
pageObject = Sys.Browser("chrome").Page("https://bearstore-testsite.smartbear.com/")
testRun = VisualTest.CreateRun("Basic usage test run")
testRun.Capture(pageObject, "full screen capture", testRun.Fullpage)
testRun.Capture(pageObject, "view port", testRun.Viewport)
elementObject = pageObject.FindElement(“#header “)
testRun.Capture(elementObject, "element capture", testRun.Element) -
LazyLoadDelay()JavaScript, JScript
function LazyLoadDelay()
{
pageObject = Sys.Browser("chrome").Page("https://smartbear.com/");
let testRun = VisualTest.CreateRun("LazyLoadDelay test run");
const lazyLoadDelay = 4 * 1000; // milliseconds, for fullpage screenshot, will load lazy content before capturing screenshot
testRun.Capture(pageObject, "lazy load image", testRun.Fullpage, lazyLoadDelay);
}Python
def LazyLoadDelay():
pageObject = Sys.Browser("chrome").Page("https://smartbear.com/")
testRun = VisualTest.CreateRun("LazyLoadDelay test run")
lazyLoadDelay = 4 * 1000; // milliseconds, for fullpage screenshot, will load lazy content before capturing screenshot
testRun.Capture(pageObject, "lazy load image", testRun.Fullpage, lazyLoadDelay) -
AddIgnoredElement()JavaScript, JScript
function BasicUsage()
{
pageObject = Sys.Browser("chrome").Page("https://bearstore-testsite.smartbear.com/");
let testRun = VisualTest.CreateRun("Basic usage test run");
testRun.AddIgnoredElement('#content-center > div > div > div.artlist.artlist-grid.artlist-6-cols.artlist-boxed.artlist-homepage-categories > article:nth-child(2) > div.art-picture-block > a > img');
testRun.Capture(pageObject, 'image name', testRun.Fullpage);
}Python
def BasicUsage():
pageObject = Sys.Browser("chrome").Page("https://bearstore-testsite.smartbear.com/")
testRun = VisualTest.CreateRun("Basic usage test run")
testRun.AddIgnoredElement('#content-center > div > div > div.artlist.artlist-grid.artlist-6-cols.artlist-boxed.artlist-homepage-categories > article:nth-child(2) > div.art-picture-block > a > img')
testRun.Capture(pageObject, "image name", testRun.Fullpage) -
SetComparisonMode()JavaScript, JScript
function ComparisonMode()
{
Browsers.Item(btChrome).Run("https://bearstore-testsite.smartbear.com/");
pageObject = Sys.Browser("chrome").Page("https://bearstore-testsite.smartbear.com/");
//Modify the page:
var element = pageObject.FindElement("//h1[.='Welcome to our store.']");
let style = element.style;
style.cssText = "background:red";
let comparisonModeTestRun = VisualTest.CreateRun("Comparison check baseline");
comparisonModeTestRun.SetComparisonMode(comparisonModeTestRun.Layout, comparisonModeTestRun.Low);
comparisonModeTestRun.Capture(pageObject, 'full view', comparisonModeTestRun.Fullpage);
comparisonModeTestRun.Capture(pageObject, 'full view 2', comparisonModeTestRun.Fullpage);
}Python
def ComparisonMode():
Browsers.Item(btChrome).Run("https://bearstore-testsite.smartbear.com/")
pageObject = Sys.Browser("chrome").Page("https://bearstore-testsite.smartbear.com/")
//Modify the page:
element = pageObject.FindElement("//h1[.='Welcome to our store.']")
style = element.style
style.cssText = "background:red"
comparisonModeTestRun = VisualTest.CreateRun("Comparison check baseline")
comparisonModeTestRun.SetComparisonMode(comparisonModeTestRun.Layout, comparisonModeTestRun.Low)
comparisonModeTestRun.Capture(pageObject, 'full view', comparisonModeTestRun.Fullpage)
comparisonModeTestRun.Capture(pageObject, 'full view 2', comparisonModeTestRun.Fullpage)
VisualTest operations with TestExecute
TestExecute can run your tests with VisualTest operations without the need to log in to VisualTest while CI testing. To do this, TestExecute needs to know your VisualTest API Key and read it from a text file in a specified directory.
To get your API Key:
-
Go to VisualTest.
-
Log in with your credentials.
-
Click the button next to your name in the top right corner.
-
Select Profile.
-
In Your API Key, click Copy to save the key to your clipboard.
Now, to run your test with VisualTest operations in TestExecute, follow the steps:
-
Open a new text file and paste the key from your clipboard. This file should contain only the API key.
-
Save the file as api_key.txt in one of these directories:
-
In the folder that contains your project (for example,
C:\Users\user\Documents\TestComplete 15 Projects\TestProject1). -
In the folder with the executable file (.exe) of either TestComplete or TestExecute (for example,
C:\Program Files (x86)\SmartBear\TestComplete 15\x64\Bin\api_key.txt).
-
-
Run your test. The application loads the API Key from the file. The file is deleted afterward if you run the application as administrator or if you have save permissions. The key will be since now stored in the AppData directory as encrypted text.
Troubleshooting
-
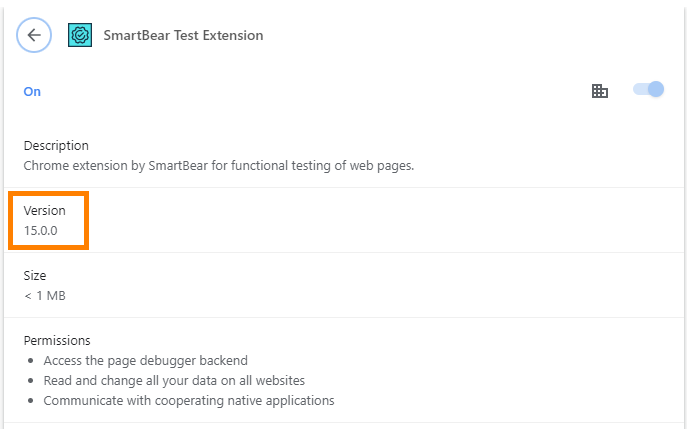
Make sure you have installed the correct version of SmartBear Test Extension if your tests fail:
It should be version 15.0.0 (or later).


