After each test run, TestComplete generates a test log and stores it to the Log subfolder of your project or project suite folder. To view these logs, you must have TestComplete installed on your computer.
To view test logs outside TestComplete (for example, on a computer where TestComplete is not installed), you can export them to an external file:
Note: You can also share test results by uploading them to our online storage. Shared test results can be viewed in any modern web browser. To view them, TestComplete is not required. See Sharing Test Results.
JUnit reports
You can export test results to a JUnit report:
Note: The generated JUnit report differs from the JUnit-style report that the TestComplete Test build step for Jenkins with the Generate JUnit-style report option (or the publishJUnitReports parameter) enabled generates.
From the TestComplete IDE
If you have a Summary report generated for your test run, you can export it to a JUnit report:
Note: To learn in which cases TestComplete generates Summary reports, see Summary Report.
-
In the Project Explorer, locate the needed test result and open it.
-
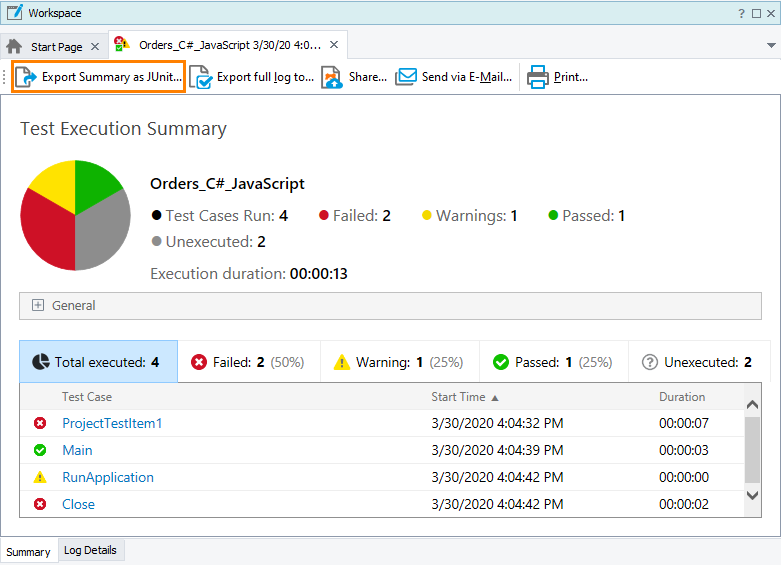
Open the Summary report.
-
Click
 Export Summary as JUnit on the report toolbar:
-
Specify the name and location of the file to create and click Save.
TestComplete will export the results of all test cases that the Summary report contains to the JUnit report. You can then parse the report or publish it by using any framework that is compatible with JUnit reports.
From Tests
Use the Log.SaveResultsAs method:
JavaScript, JScript
Log.SaveResultsAs("C:\\Work\\Log\\Log.xml", lsJUnit);
Python
Log.SaveResultsAs("C:\\Work\\Log\\Log.xml", lsJUnit)
VBScript
Call Log.SaveResultsAs("C:\Work\Log\Log.xml", lsJUnit)
DelphiScript
Log.SaveResultsAs('C:\Work\Log\Log.xml', lsJUnit);
C++Script, C#Script
Log["SaveResultsAs"]("C:\\Work\\Log\\Log.xml", lsJUnit);
A JUnit report is created only for a Summary report generated for your test run.
From the command line
To generate a JUnit report for any test run, use the /ExportSummary command line argument.
For example:
If there are test cases specified for the run, TestComplete will export their results. If no test cases are specified, TestComplete will export the results of the executed tests. For example, if you run a script routine that is not marked as a test case, TestComplete will export the routine results.
For more information on TestComplete command-line arguments, see TestComplete Command Line.
MHT
You can export test results to a single MHT file that contains the web page and all accompanying files:
From TestComplete IDE
-
In the Project Explorer, right-click the needed results under the Project Log or Project Suite Log node and then click Export to.
-
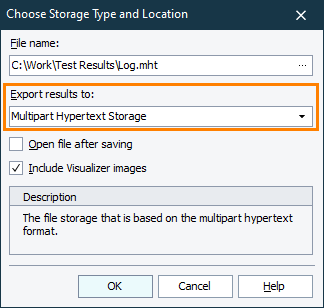
The Choose Storage Type and Location dialog appears.
-
In the Export results to drop-down list, select Multipart Hypertext Storage:
-
Specify the file name of the MHT file to create.
Note: MHT files can be viewed in Internet Explorer (we recommend version 9 or later), but not Chrome or Firefox. If you send MHT files via email, the recipient may need to unblock the MHT file to view its contents. For details, see Issue With Multipart Hypertext Files Sent via E-mail.
-
To include Test Visualizer images in the exported log, select Include Visualizer images.
Note: These images take additional disk space. -
Click OK.
As an alternative, you can export the full log or a specific log node (for example, a test item log), or a single entry log:
-
Double-click a log in the Project Explorer to open it.
-
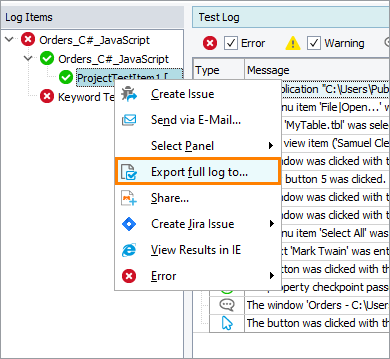
To export the entire log or a log tree node, right-click it in the Log Items tree and then click Export to:
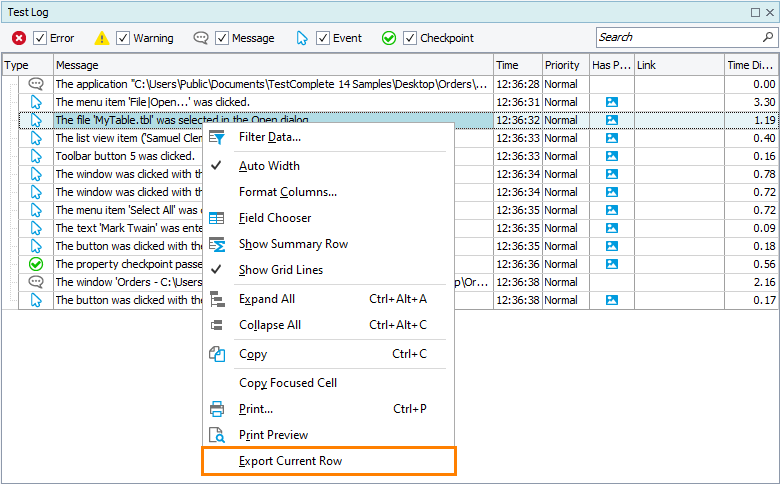
To export a single row or a folder, right-click it in the Test Log panel and then click Export Current Row from the context menu:
-
The Choose Storage Type and Location dialog appears.
-
In the Export results to drop-down list, select Multipart Hypertext Storage:

-
Specify the file name of the MHT file to create.
Note: MHT files can be viewed in Internet Explorer (we recommend version 9 or later), but not Chrome or Firefox. If you send MHT files via email, the recipient may need to unblock the MHT file to view its contents. For details, see Issue With Multipart Hypertext Files Sent via E-mail.
-
To include Test Visualizer images in the exported log, select Include Visualizer images.
Note: These images take additional disk space. -
Click OK.
From tests
Use the Log.SaveResultsAs method:
JavaScript, JScript
Log.SaveResultsAs("C:\\Work\\Log.mht", lsMHT);
Python
Log.SaveResultsAs("C:\\Work\\Log.mht", lsMHT)
VBScript
Call Log.SaveResultsAs("C:\Work\Log.mht", lsMHT)
DelphiScript
Log.SaveResultsAs('C:\Work\Log.mht', lsMHT);
C++Script, C#Script
Log["SaveResultsAs"]("C:\\Work\\Log.mht", lsMHT);
The method will export the entire test log.
| Note: | If your project has several test items whose results you want to export, call Log.SaveResultsAs from the last test item only. |
From command line
Use the /exportLog command-line argument:
TestComplete.exe "C:\My Projects\MySuite.pjs" /run /p:MyProj /exportLog:"C:\TestLogs\Log.mht"
TestComplete will export the entire test log to the specified file. For more information on TestComplete command-line arguments, see TestComplete Command Line.
HTML
You can export test results to an HTML page. The exported results will include images, scripts, styles, and helper data files that contain the results data:
From TestComplete IDE
-
In the Project Explorer, right-click the needed results under the Project Log or Project Suite Log node and then click Export to.
-
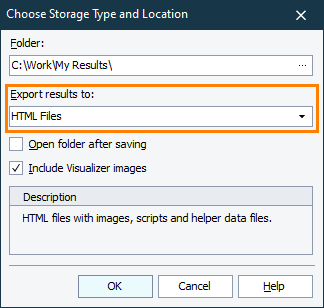
The Choose Storage Type and Location dialog appears.
-
In the Export results to drop-down list, select HTML Files:
-
Specify the folder to which exported test results will be placed. If the folder does not exist, it will be created.
-
To include Test Visualizer images in the exported log, select Include Visualizer images.
Note: These images take additional disk space. -
Click OK.
Another option is to export the full log or a specific log node (for example, a test item log), or a single entry log:
-
Double-click a log in the Project Explorer to open it.
-
To export the entire log or a log tree node, right-click it in the Log Items tree and then click Export to:

To export a single row or a folder, right-click it in the Test Log panel and then click Export Current Row from the context menu:

-
The Choose Storage Type and Location dialog appears.
-
In the Export results to drop-down list, select HTML Files:

-
Specify the folder to which exported test results will be placed. If the folder does not exist, it will be created.
-
To include Test Visualizer images in the exported log, select Include Visualizer images.
Note: These images take additional disk space. -
Click OK.
From tests
Use the Log.SaveResultsAs method:
JavaScript, JScript
Log.SaveResultsAs("C:\\Work\\Log\\", lsHTML);
Python
Log.SaveResultsAs("C:\\Work\\Log\\", lsHTML)
VBScript
Call Log.SaveResultsAs("C:\Work\Log\", lsHTML)
DelphiScript
Log.SaveResultsAs('C:\Work\Log\', lsHTML);
C++Script, C#Script
Log["SaveResultsAs"]("C:\\Work\\Log\\", lsHTML);
The method will export the entire test log.
| Note: | If your project has several test items whose results you want to export, call Log.SaveResultsAs from the last test item only. |
To compress test results exported in the HTML format into a ZIP archive, use the lsPackedHTML parameter value of the SaveResultsAs method:
JavaScript, JScript
Log.SaveResultsAs("C:\\Work\\Log\\Log.zip", lsPackedHTML);
Python
Log.SaveResultsAs("C:\\Work\\Log\\Log.zip", lsPackedHTML)
VBScript
Call Log.SaveResultsAs("C:\Work\Log\Log.zip", lsPackedHTML)
DelphiScript
Log.SaveResultsAs('C:\Work\Log\Log.zip', lsPackedHTML);
C++Script, C#Script
Log["SaveResultsAs"]("C:\\Work\\Log\\Log.zipLog.zip", lsPackedHTML);
From command line
Use the /exportLog command-line argument:
TestComplete.exe "C:\My Projects\MySuite.pjs" /run /p:MyProj /exportLog:"C:\TestLogs\Log.html"
| Note: | TestComplete also supports the .htm extension. |
TestComplete will export the entire test log to the specified file. For more information on TestComplete command-line arguments, see TestComplete Command Line.
XML
You can also export test results to an XML format file from tests by using the Log.SaveResultsAs method:
JavaScript, JScript
Log.SaveResultsAs("C:\\Work\\Log\\Log.xml", lsXML);
Python
Log.SaveResultsAs("C:\\Work\\Log\\Log.xml", lsXML)
VBScript
Call Log.SaveResultsAs("C:\Work\Log\Log.xml", lsXML)
DelphiScript
Log.SaveResultsAs('C:\Work\Log\Log.xml', lsXML);
C++Script, C#Script
Log["SaveResultsAs"]("C:\\Work\\Log\\Log.xml", lsXML);
Notes:
-
You can specify either a fully-qualified path to the file that will contain test results or a folder path. When you specify the name of an external file, test results are saved to this file. Otherwise, TestComplete automatically creates the Description.tcLog file within the specified folder and saves test results to the created file.
-
If your project has several test items whose results you want to export, call
Log.SaveResultsAsfrom the last test item only.
-
Double-click a log in the Project Explorer to open it.
-
Right-click within the Test Log panel and select
 Print Preview from the context menu. The Print Preview window appears.
 -
Click
 Export To PDF on the toolbar.
– or –
Select File > Export To PDF from the main menu of Print Preview.
-
The PDF Export Options dialog appears, where you can specify PDF export options. If you want TestComplete to open the generated file right after the results have been exported to it, enable the Open After Export option.
tcLogX
You can export test results to a file of the .tcLogX format. It is a TestComplete internal file format which represents a single file (archive) that contains test log data.
You export test results to this format from by using the /exportLog command line parameter:
TestComplete.exe "C:\My Projects\MySuite.pjs" /run /p:MyProj /exportLog:"C:\TestLogs\Log.tcLogX"
To view results exported to the .tcLogX format, import them into a TestComplete project:
-
Open a project in TestComplete.
-
In the Project Explorer, right-click the <ProjectName> Logs node and select Add > Existing Log File.
-
Browse for a .tcLogX file and click Open.
The log is added to your project and you can now view it in TestComplete.
TestComplete 32-bit executable is located in the <TestComplete>\Bin folder.
TestComplete 64-bit executable is located in the <TestComplete>\x64\Bin folder.
TestComplete 32-bit executable is located in the <TestComplete>\Bin folder.
TestComplete 64-bit executable is located in the <TestComplete>\x64\Bin folder.
TestComplete 32-bit executable is located in the <TestComplete>\Bin folder.
TestComplete 64-bit executable is located in the <TestComplete>\x64\Bin folder.
TestComplete 32-bit executable is located in the <TestComplete>\Bin folder.
TestComplete 64-bit executable is located in the <TestComplete>\x64\Bin folder.
TestComplete 32-bit executable is located in the <TestComplete>\Bin folder.
TestComplete 64-bit executable is located in the <TestComplete>\x64\Bin folder.
TestComplete 32-bit executable is located in the <TestComplete>\Bin folder.
TestComplete 64-bit executable is located in the <TestComplete>\x64\Bin folder.
TestComplete 32-bit executable is located in the <TestComplete>\Bin folder.
TestComplete 64-bit executable is located in the <TestComplete>\x64\Bin folder.
TestComplete 32-bit executable is located in the <TestComplete>\Bin folder.
TestComplete 64-bit executable is located in the <TestComplete>\x64\Bin folder.

 JUnit reports