Video Tutorial
Prerequisites
-
Your TestComplete projects must be prepared as described in Prepare TestComplete Project for Integration and added to your team project’s source control repository.
-
Your test agents on which you will run tests must have TestComplete (or TestExecute) installed.
Note: You can configure the pipeline to install TestComplete (or TestExecute) automatically. See below.
-
Your team project must have the TestComplete test adapter extension installed. See Install TestComplete Test Adapter Extension.
Configure a pipeline
-
Open the web portal of your team project. You can navigate to it directly in your web browser, or you can open it from Team Explorer in Visual Studio.
-
Navigate to the Pipelines page.
-
Open an existing pipeline or click New pipeline to create a new one.
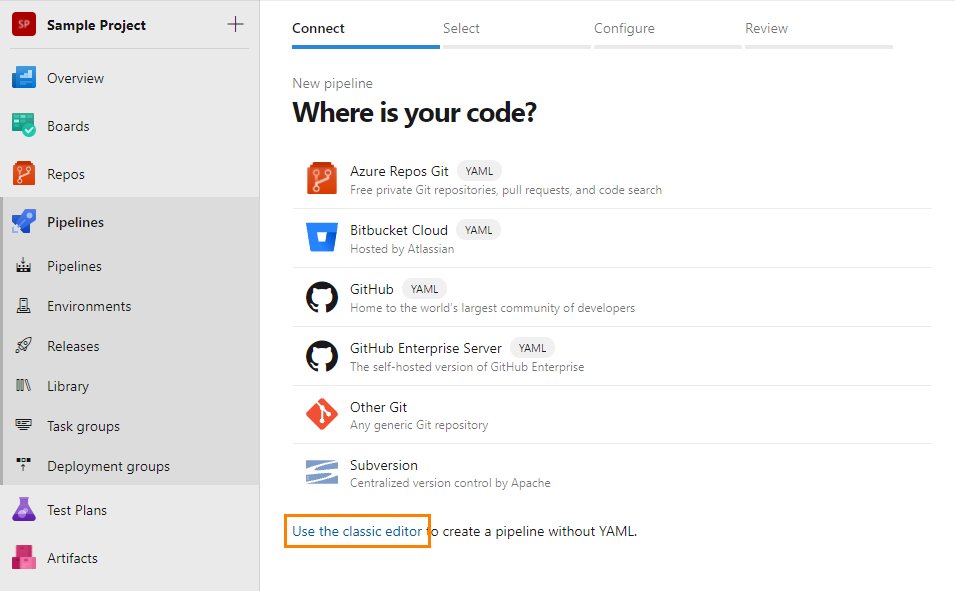
You can create a YAML script that describes your pipeline, or you can create a pipeline with the visual editor. To create a pipeline with the visual editor, click Use the classical editor:
-
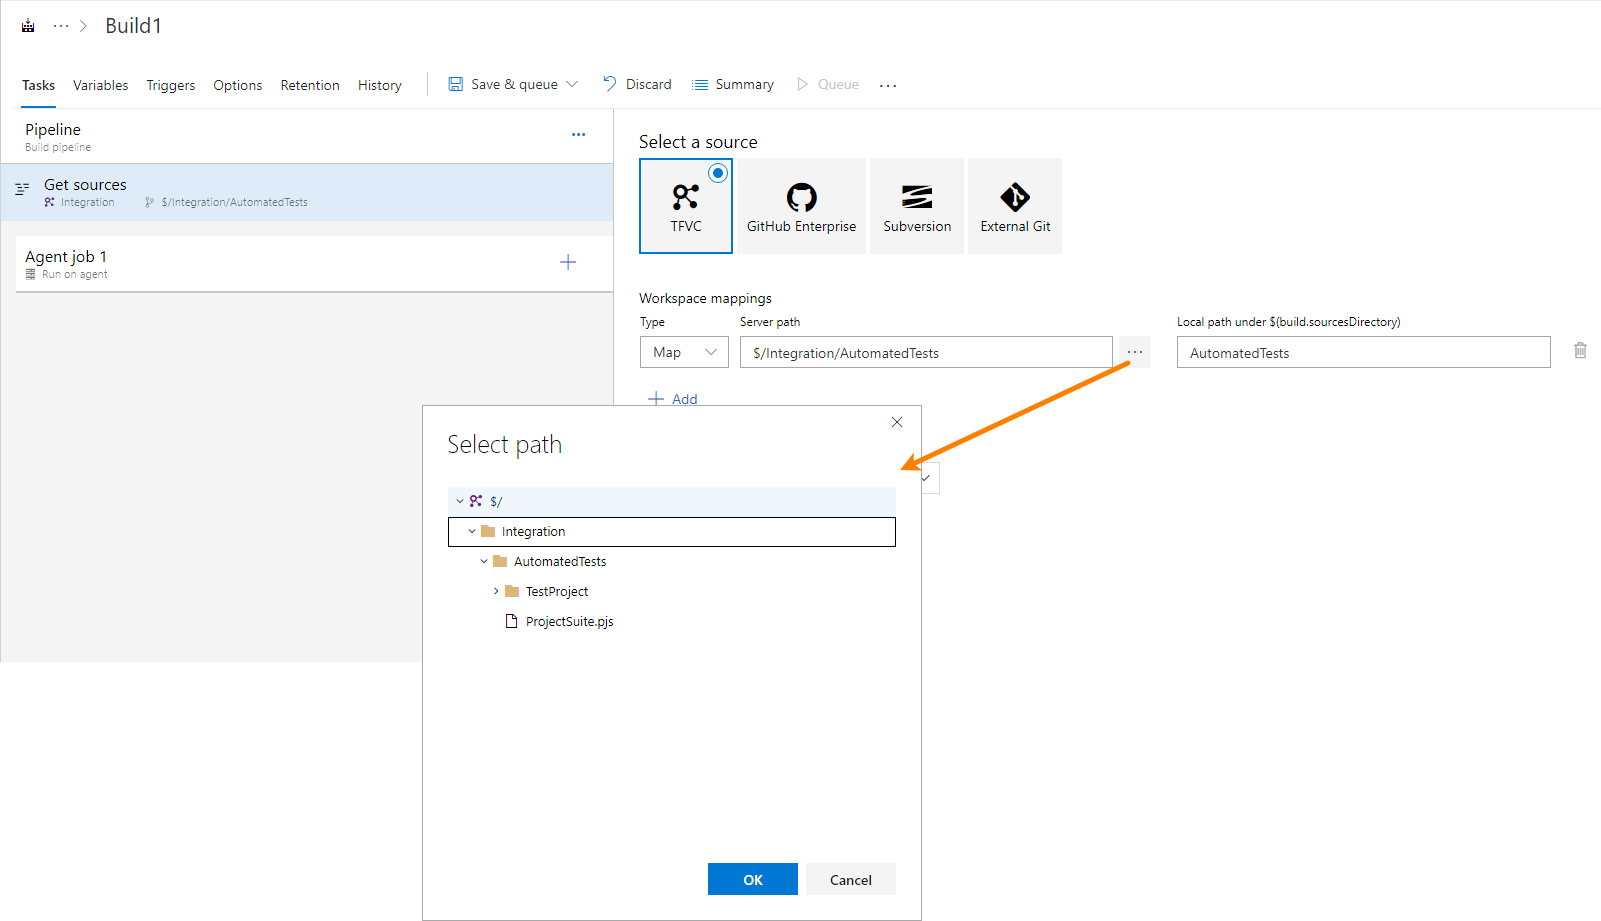
If needed, specify the repository that stores your TestComplete project files:
For example:
-
Add stages and jobs that will run your TestComplete tests.
-
Specify agents on which your tests will run:
-
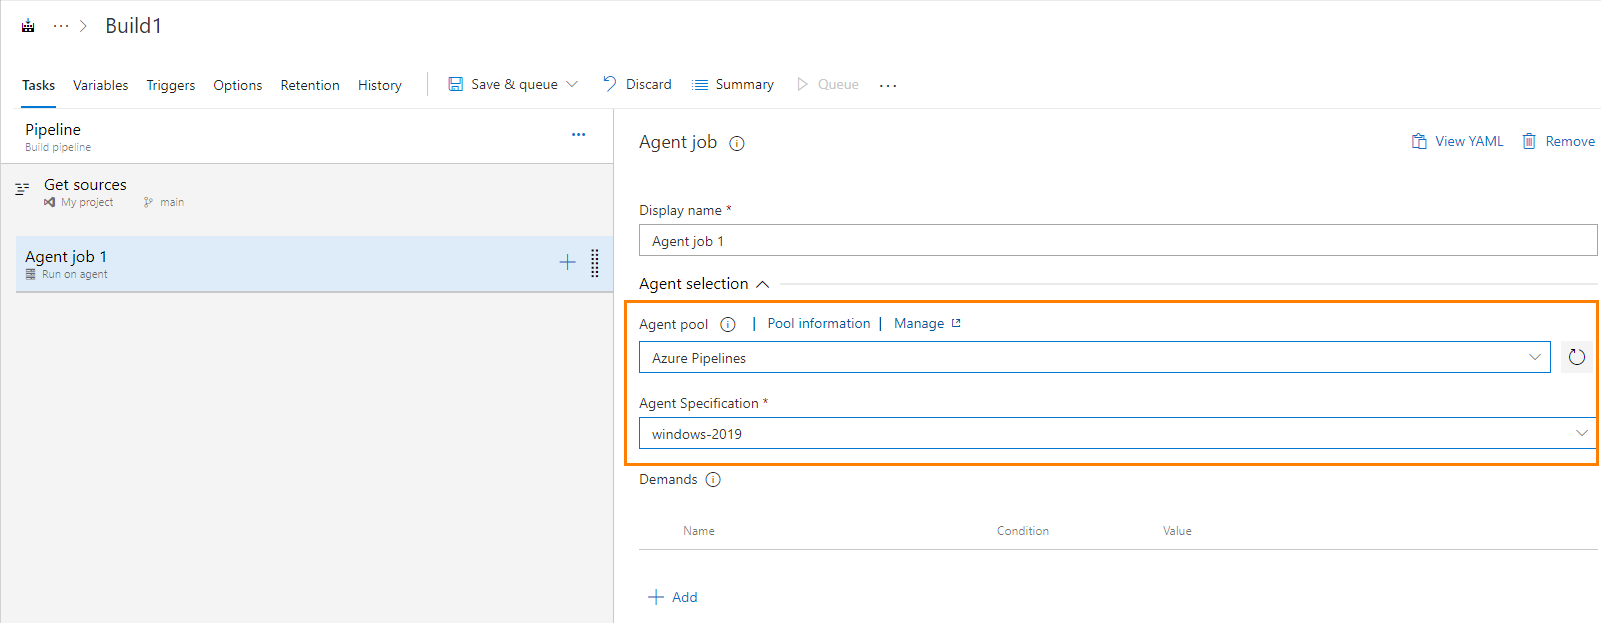
If you use Microsoft-hosted agents, specify a Windows-based virtual machine that will be used to create agents. For example:
 The agents must have TestComplete (or TestExecute) installed on them, and the installed product must use the SmartBear ID-based license. To learn how to install the product on the agents and how to specify the SmartBear ID, see below.
Note: Running web tests in Edge on Microsoft-hosted agents is not supported. As a workaround, you can use another web browser, or you can run your web tests on self-hosted agents instead.
-
If you use self-hosted (private) agents, you can do one of the following:
-
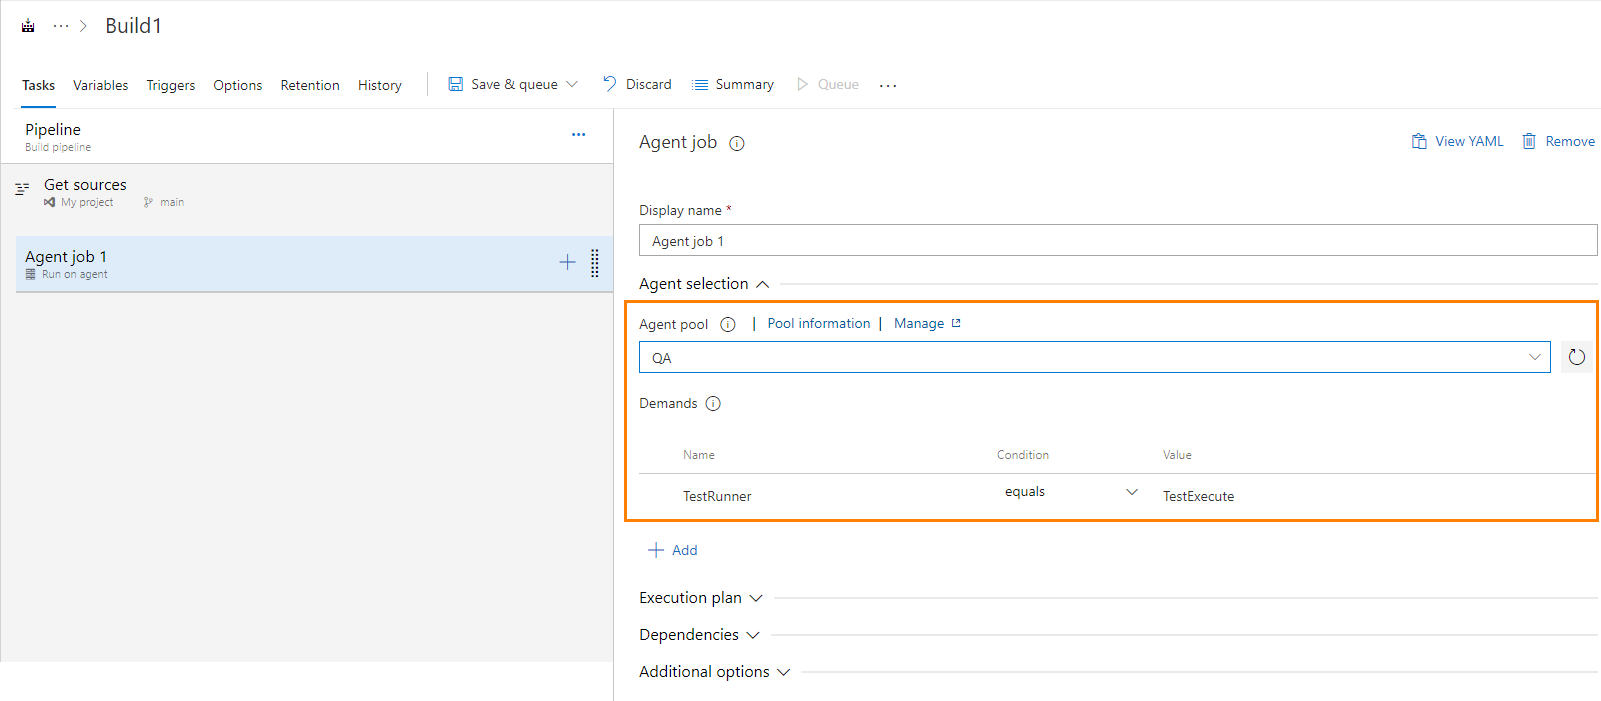
Use demands to specify agents that already have TestComplete (or TestExecute) installed:
-
Configure the pipeline to install TestComplete (or TestExecute) to the agents. See below.
-
If needed, configure the job to distribute the tests among multiple agents. To learn how to do it, see Run tests in parallel using the Visual Studio Test task. Note: Your tests must be able to run independently from each other.
-
-
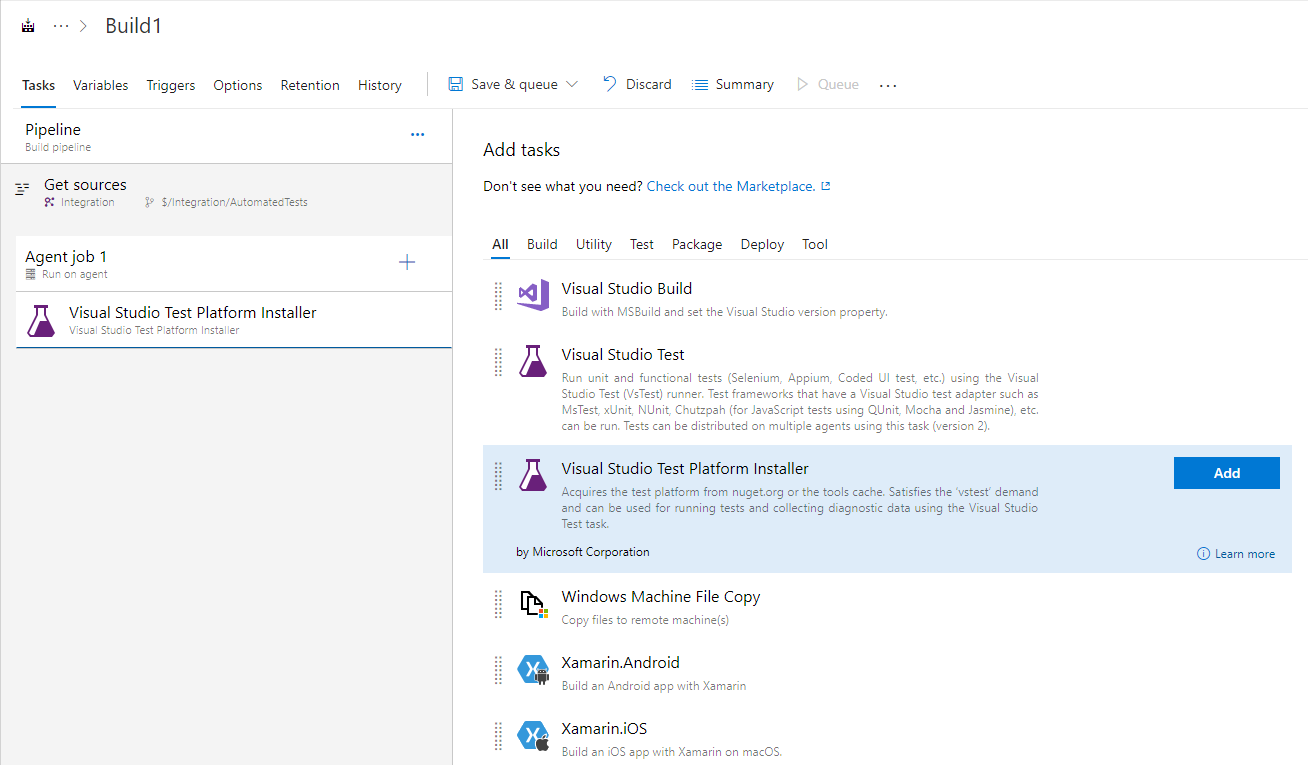
If your test agents do not have Visual Studio installed, you can add the Install Visual Studio Test Platform task to the stage. The task will install the test platform that allows running tests on computers where Visual Studio is not installed. To learn about the task, see the task description.
-
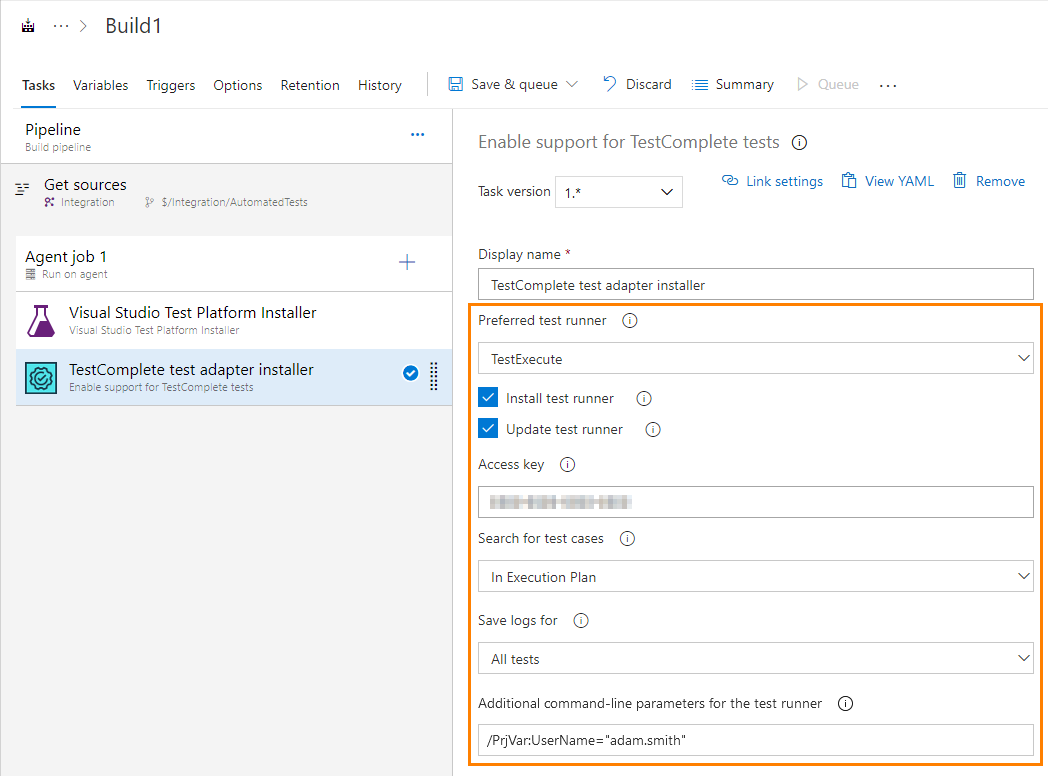
 Add the Enable support for TestComplete tests task.
Note: If the task is not available, make sure that you have the TestComplete Test Adapter extension installed on your server. See Install TestComplete Test Adapter Extension.
Configure the task:
-
Select the application that you want to use to run tests: TestComplete or TestExecute.
Note: If the selected application is not installed on the agent, the one that is installed will be used instead.
-
If needed, configure the task to install the specified test runner on agents. If neither TestComplete nor TestExecute is installed on the agent, the task will install the selected preferred test runner to the agent.
-
If needed, configure the task to update the test runner. The task will update the installed product to match the extension version. If any patches or updates, for instance, Google Chrome Support update, are available for the product, the task will install them either.
-
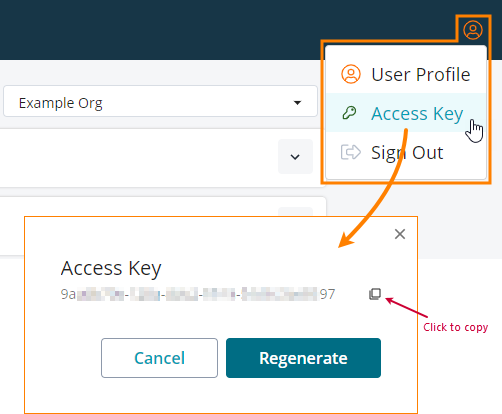
If you use a SmartBear ID-based license for your TestComplete (TestExecute) instance, specify the access key assigned to your SmartBear account. This key will be used to license the TestComplete (TestExecute) instances running on agents.
 How to get the access key from the Licensing Portal
If you are already logged in with your SmartBear account on the test agent, you can skip this step.
If you use a key-based license, skip this step.
If you do not have the SmartBear ID-based license yet and want to try it, please contact our Customer Care team or our Sales team.
-
Specify how the test adapter will search for tests to run:
-
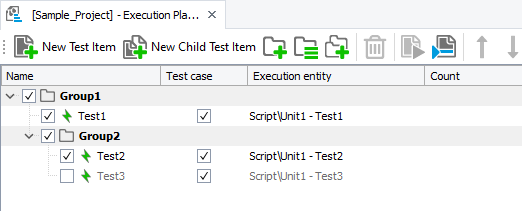
In Execution Plan - The test adapter will search for test cases in the Execution Plan of your TestComplete projects. It will run the following items:
-
Separate keyword tests and script routines marked as test cases.
-
Separate BDD scenarios.
-
Scenario outlines.
 The Treat each example in Scenario Outline as a separate test case option of the project must be disabled.
-
-
Among project items - The test adapter will search for test cases among all items of TestComplete projects. It will run the following:
-
Keyword tests and script tests that have any tag assigned to them.
 By default, the test adapter treats all tests with tags assigned to them as test cases and will run all these tests. To run only tests that have a specific tag assigned, use the filter expression.
 -
BDD scenarios.
-
Scenario outlines, if the Treat each example in Scenario Outline as a separate test case option of the project is disabled.
-
Script routines marked as test cases in code. To mark a routine as a test case, add a comment in the
// @"test_case_name"format right before the routine declaration. Do not omit double quotes.
-
You can also specify a filter expression to run only those found tests that match it. See below.
-
-
Specify when you want to retrieve test logs: only for failed tests, for failed tests and for tests with warnings, or for all tests.
-
If needed, configure the task to pass additional command-line parameters to TestComplete (or TestExecute).
You can, for example, use the
/EnableModuleparameter to disable redundant TestComplete modules and addons on your test agents. You can also pass pipeline and task variables to your TestComplete tests by using the/PrjVarand/PSVarparameters or by using custom parameters. See Pass Environment Variables to TestComplete Tests.
YAML
name: Build1
…
stages :
- stage: QA
…
jobs:
- job: Job1
…
- task: InstallTestCompleteAdapter@1
inputs:
installExecutor:true
updateExecutor: true
: '123-456-789'
searchMode: ExecutionPlan
logsLevel: '0'
cmdLineParams: '/PrjVar:UserName="adam.smith"'
preferredExecutor: TE
… -
-
By default, Microsoft-hosted agents have their screen resolution set to 1024 × 768. This may affect automated tests that interact with GUI. To avoid possible issues, set a proper screen resolution on the agents before running tests. You can do this by using the Screen Resolution Utility extension provided by Microsoft. See Run TestComplete Tests on Microsoft-Hosted Agents.
-
Add the Visual Studio Test task to your pipeline and configure the added task to run your TestComplete tests:
By specifying a TestComplete project suite directly
-
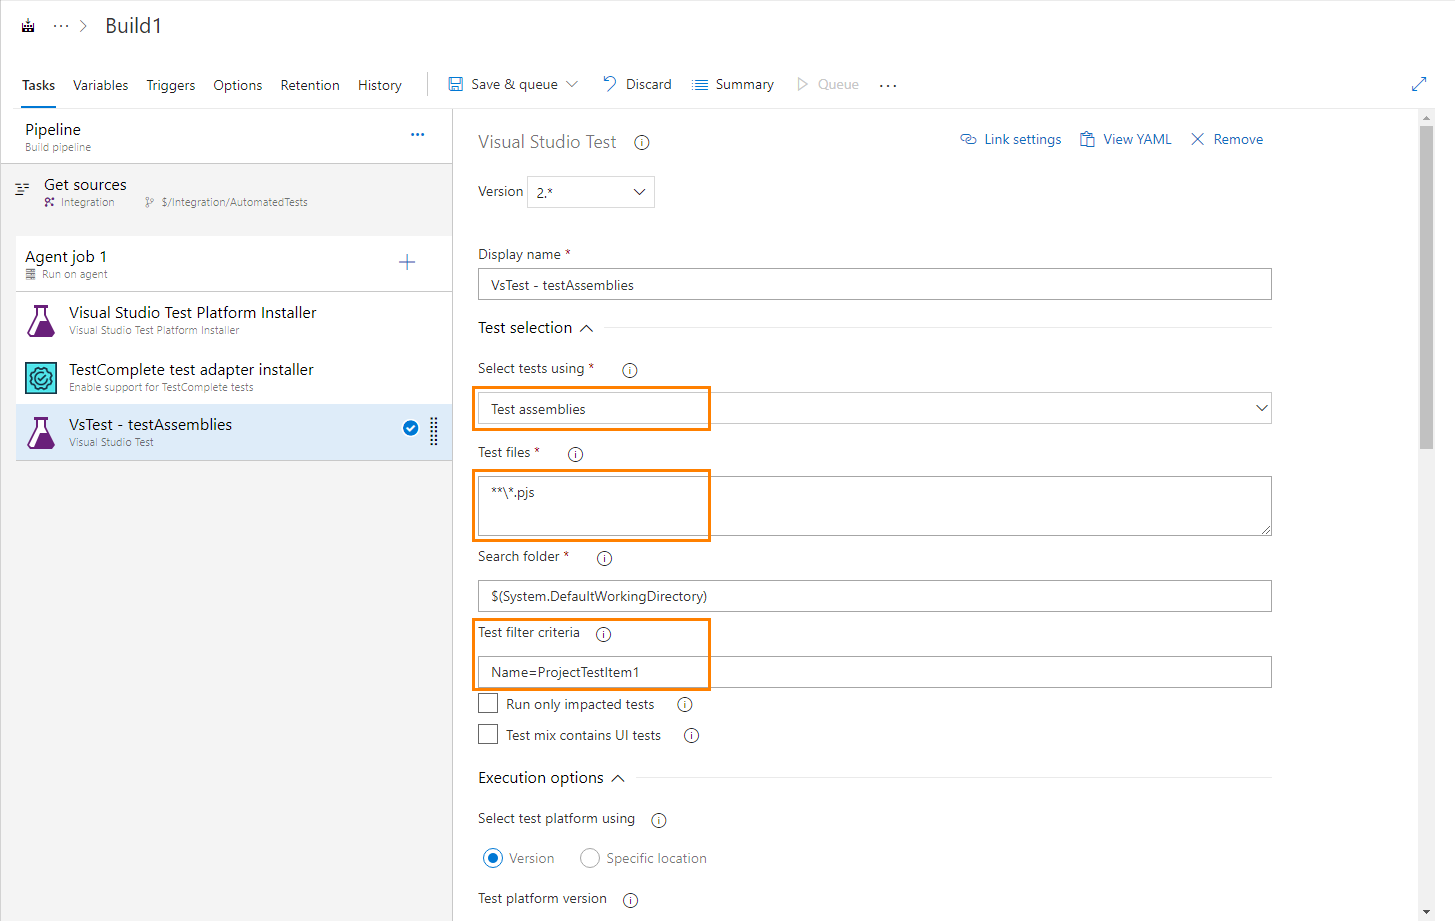
Configure the task to select tests by using assemblies.
-
Specify the project suite file (.pjs) that contains your tests and that the task will run.
-
Specify the folder on your agent where the task will search for TestComplete project files. By default, it will search for the files in the agent’s working folder.
Note: If you specify any Search folder other than the default working folder, in the Path to custom test adapters text box, specify the path to the TestComplete test adapter: $(System.DefaultWorkingDirectory)\TestCompleteAdapter.
-
If needed, you can use a filter expression to specify test items of your TestComplete project that you want to run.
-
You may also specify the test run name to which test results will be assigned.
YAML
name: Build1
…
stages:
- stage: QA
displayName: QA
jobs:
- job: Job1
displayName: Job1
…
steps:
…
- task: InstallTestCompleteAdapter@1
…
- task: VSTest@2
inputs:
testSelector: 'testAssemblies'
testAssemblyVer2: '**\*.pjs'
searchFolder: '$(System.DefaultWorkingDirectory)'
testFiltercriteria: 'Name=Test1'
vsTestVersion: 'toolsInstaller'
testRunTitle: 'Automated tests'
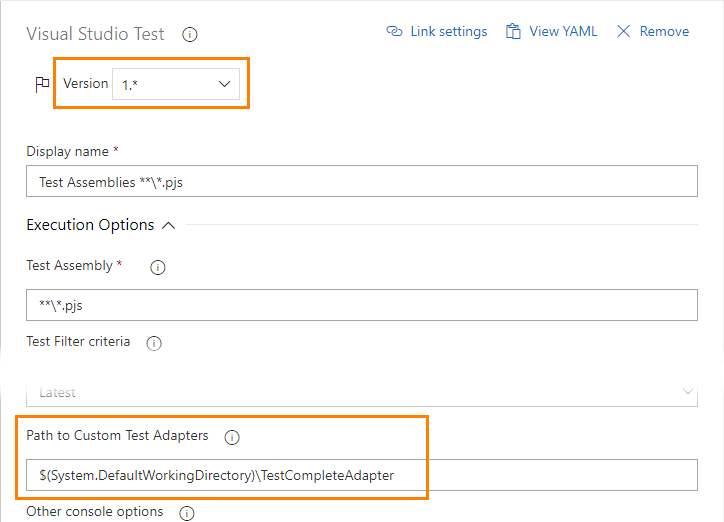
…If you are using version 1 of the Visual Studio Test task or if you have set the Search folder value to any value other than the default working folder, in the Path to Custom Test Adapters text box, specify the path to the TestComplete test adapter: $(System.DefaultWorkingDirectory)\TestCompleteAdapter.
By specifying a test plan
 To run TestComplete tests as part of a test plan, your TestComplete project must be bound to your team project, and your TestComplete test cases must be linked to the team project’s test cases. See Link TestComplete Test Cases to Azure DevOps Test Cases.
-
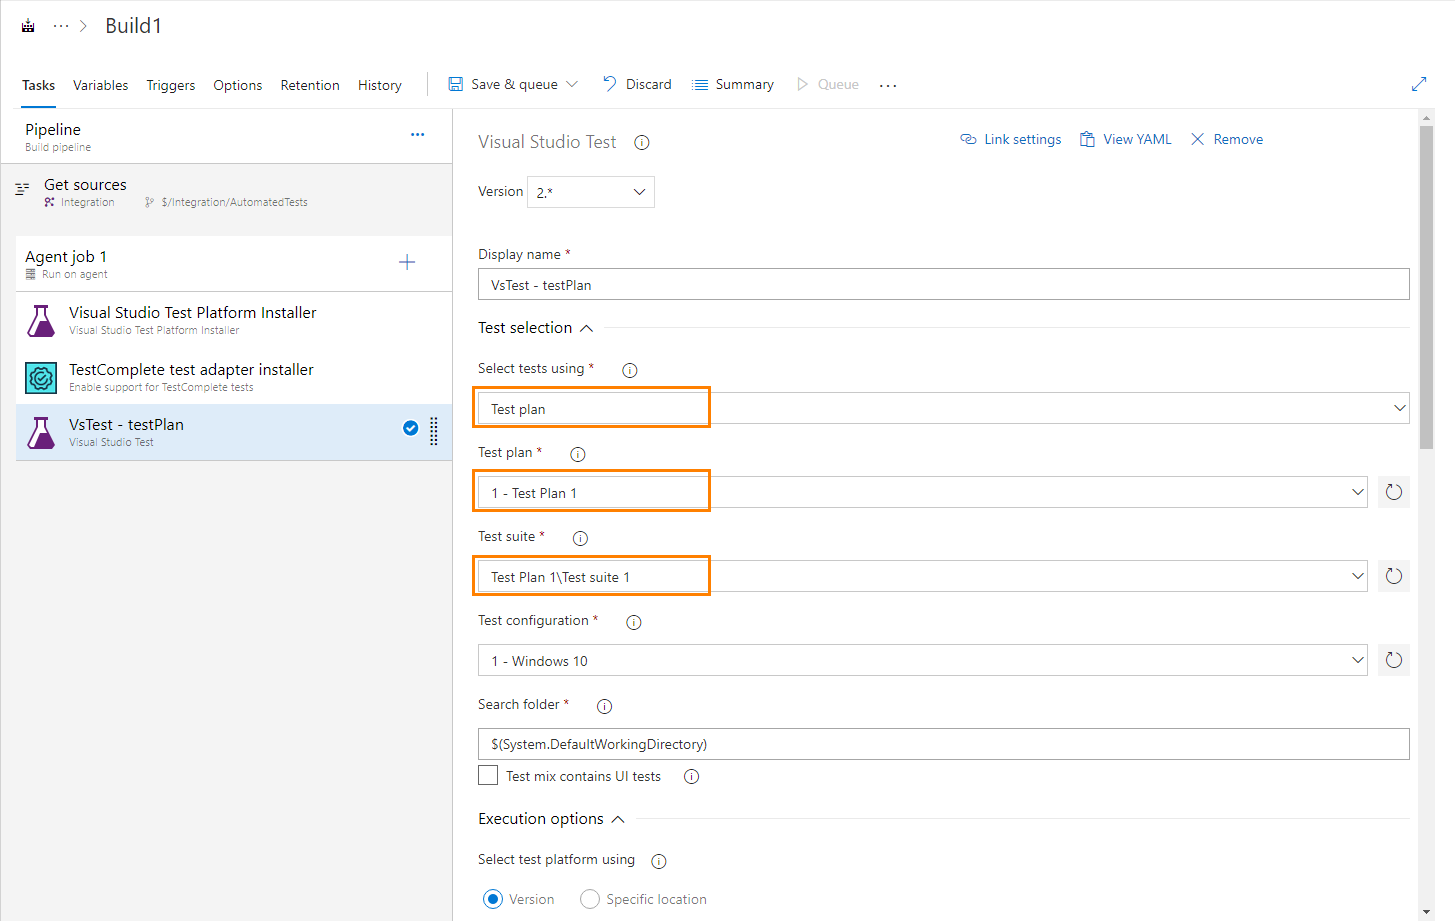
Configure the task to run tests of a test plan.
-
Specify the test plan and a test suite that includes the TestComplete tests.
-
Specify the test environments where you want to run tests.
-
Specify the folder on your agent where the task will search for TestComplete project files. By default, it will search for the files in the agent’s working folder.
Note: If you specify any Search folder other than the default working folder, in the Path to custom test adapters text box, specify the path to the TestComplete test adapter: $(System.DefaultWorkingDirectory)\TestCompleteAdapter.
-
You may also specify the test run name to which test results will be assigned.
YAML
name: Build1
…
stages:
- stage: QA
displayName: QA
jobs:
- job: Job1
displayName: Job1
…
steps:
…
- task: InstallTestCompleteAdapter@1
…
- task: VSTest@2
inputs:
testSelector: 'testPlan'
testPlan: 'My test plan 1'
testSuite: 'My test suite 1'
testConfiguration: '8'
searchFolder: '$(System.DefaultWorkingDirectory)'
vsTestVersion: 'toolsInstaller'
testRunTitle: 'Automated tests'
… -
-
If needed, specify other pipeline properties. You can learn more at docs.microsoft.com/en-us/azure/devops/pipelines/index.
-
Save the changes.
Run a pipeline
Queue the created pipeline, for example, by clicking Run. On the Build page of the pipeline, you can monitor the pipeline progress.
The Visual Studio Test task will locate the specified TestComplete tests and run them.
View test results
-
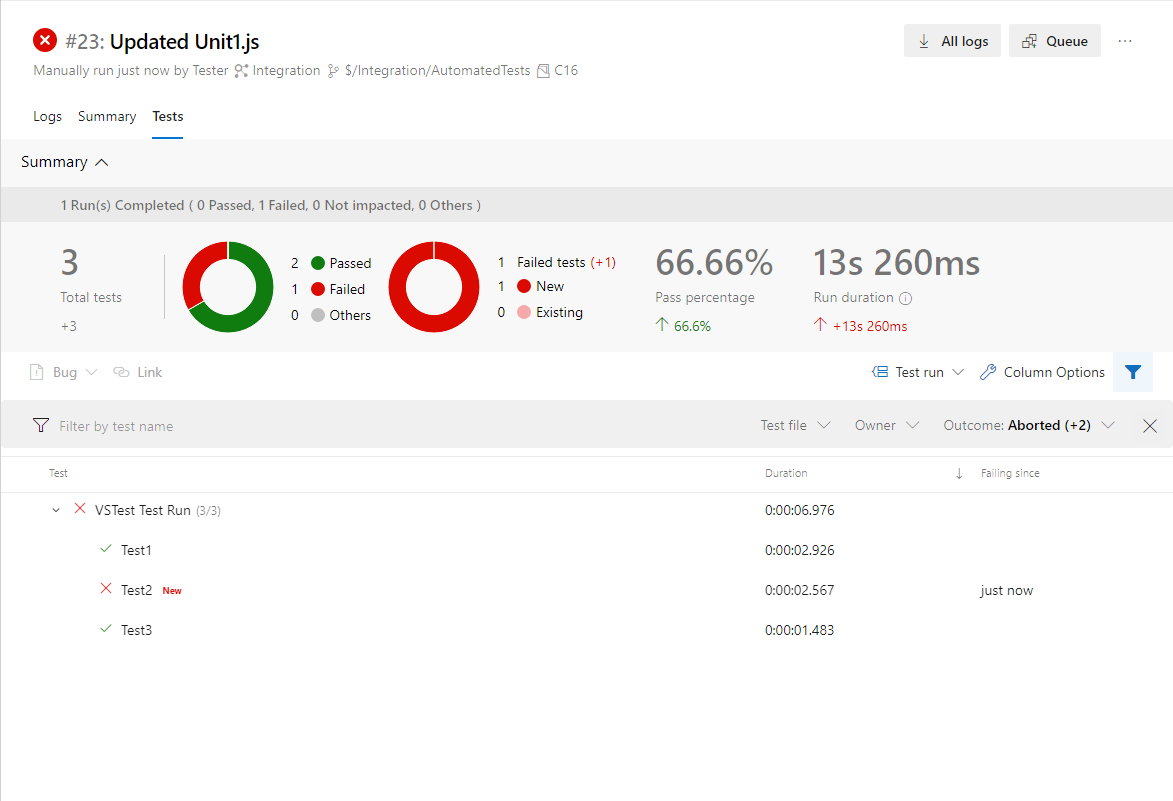
Switch to the Tests section of the pipeline. It shows a summary report of a test run: the number of failed and passed tests and the status of each of them:
-
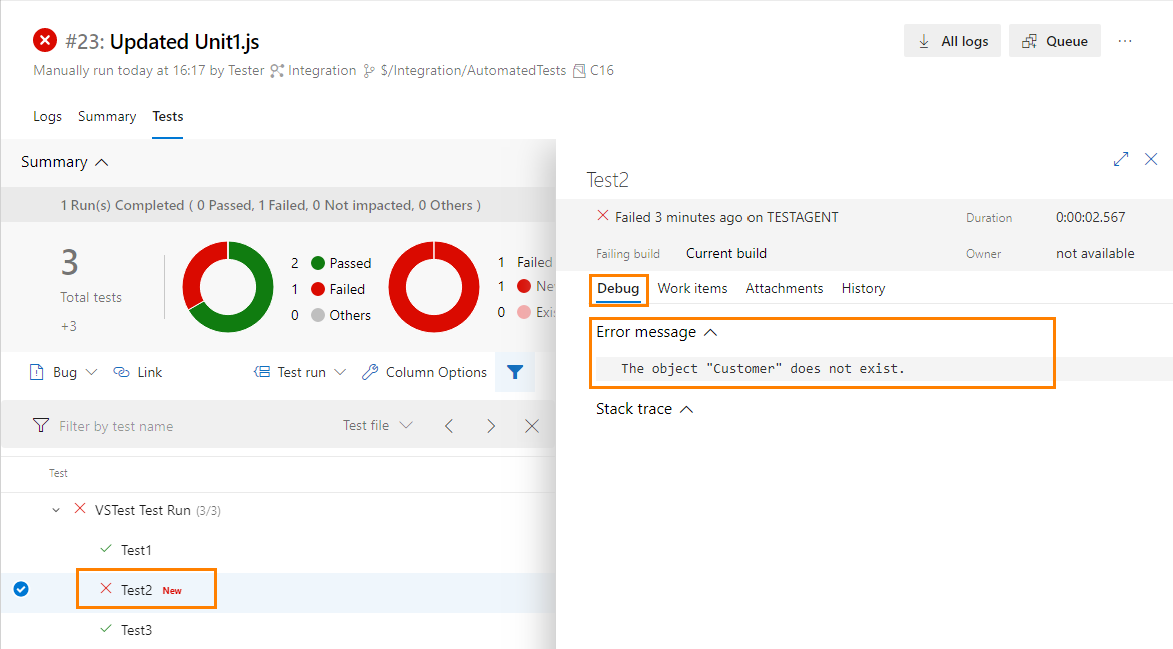
If a test has failed, you can view information on the occurred error in the Debug section:
-
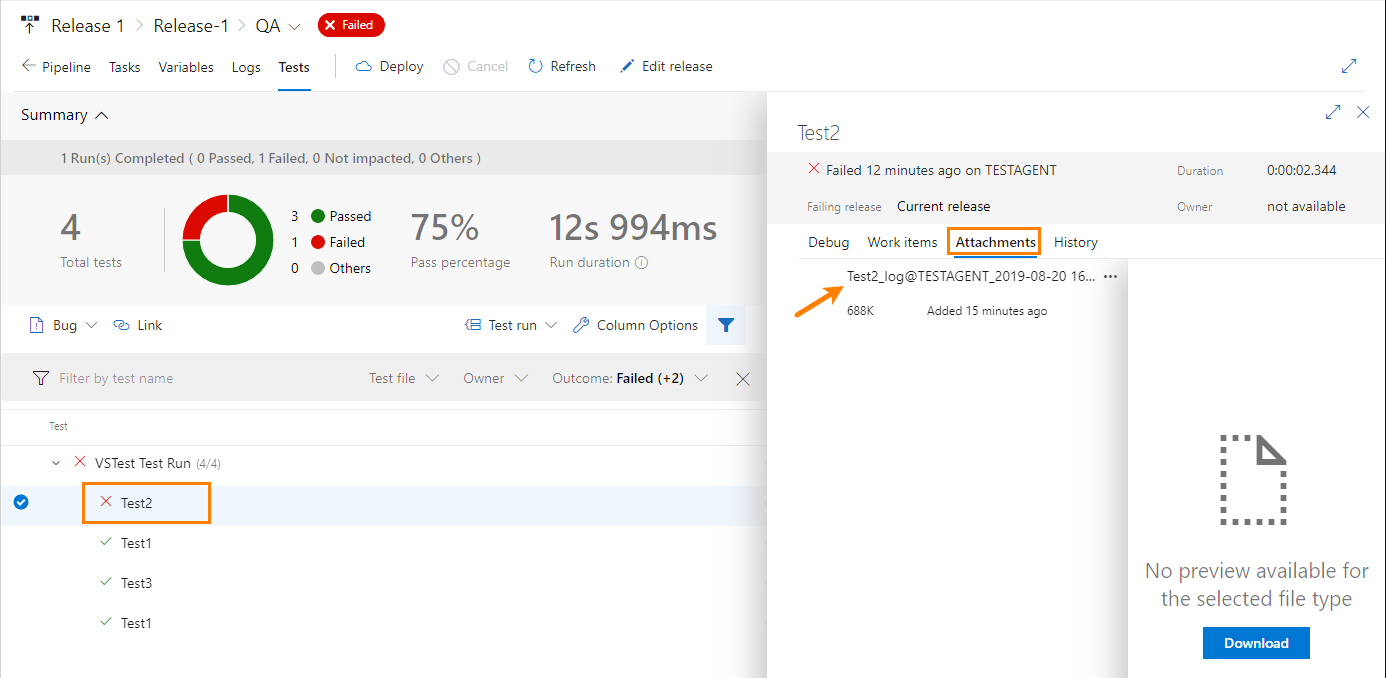
To get the detailed test log, you can download the log in the .mht format from the Attachments section:
Depending on the Save logs for setting value, logs could be available only for failed tests, for failed tests and for tests with warnings, or for all tests.
-
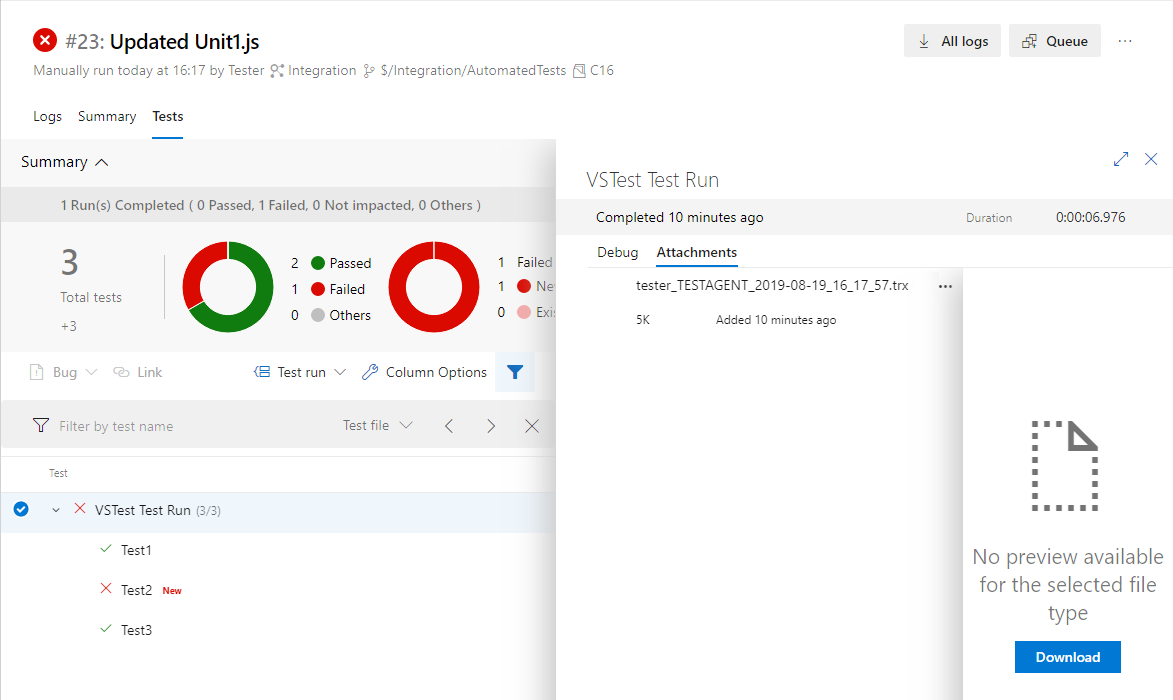
To get a log generated for the entire test run, click the test run, then switch to the Attachments section and download the .trx file:
See Also
Integration With Azure DevOps and Team Foundation Server via TestComplete Test Adapter
Install TestComplete Test Adapter Extension

 By specifying a TestComplete project suite directly