
Use the Select BitBar Device dialog to connect to a mobile device running in the BitBar device cloud or controlled by a private Appium server and open a testing session on it.
Requirements
This dialog is available only if the following requirements are met:
-
You have an active license for the TestComplete Mobile module.
-
The Appium Support plugin is enabled in TestComplete. You can check the plugin state in the File > Install Extensions dialog in TestComplete. You can find the plugin in the Mobile group.
-
Your current project is configured to use cloud-compatible mobile support (enabled by default).
To call the dialog
Click Show Mobile Screen on the TestComplete toolbar.
– or –
In the Mobile Screen window, click Select Device in the device list.
To select the device
Depending on whether you use BitBar or a device controlled by a private Appium server:
 BitBar
BitBar
-
If there is no BitBar API key specified in the current TestComplete project, enter the API key you will use to run tests and click Apply.
-
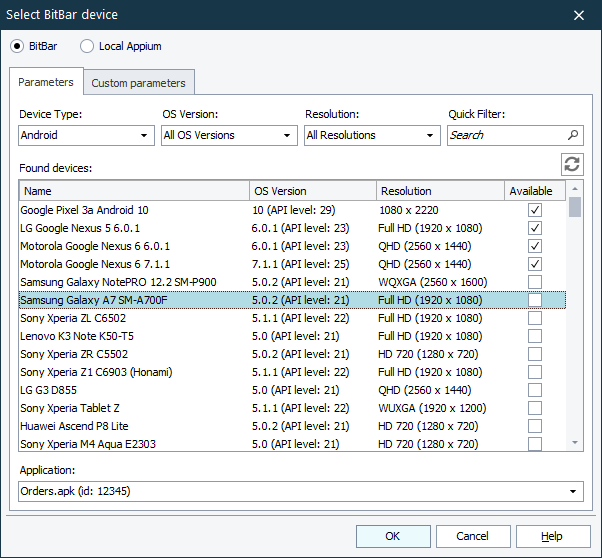
On the Parameters tab, select the mobile device and a tested application for which you want to open a testing session.
The Found devices list contains all the devices that are available for you in BitBar and that match the search criteria. If needed, you can filter the list by using the Device Type, OS Version, Resolution and Quick Search filters. Select the device to which you want to connect.
-
In the Application drop-down list box, select a mobile application for which you want to open a testing session. The application file must be either stored in the BitBar Files Library or added to the Tested Applications of the current TestComplete project. In the latter case, click Upload to BitBar to upload the application file to the BitBar Files Library and then select it in the list.
-
If needed, on the Custom parameters tab, you can specify additional capabilities to be used for the testing session. Specify the capabilities in the JSON format. For example:
JSON
{
"bitbar_project": "Automated tests",
"bitbar_description": "Testing the Orders app"
}The dialog will validate the JSON code as you are typing it.
For the list of available capabilities, see the BitBar Documentation - Desired Capabilities.
 Learn how to get the API Key
 to copy your API key to the clipboard.
To open the testing session and connect to it, click OK. To close the dialog without connecting any device, click Cancel.
Local Appium
-
Click Local Appium.
-
In the Server URL text box, enter the URL address of your Appium server.
-
In the Application Path text editor, specify the full path to the application that you want to install on the target mobile device and from which you want to open a testing session. You can type the path manually, or you can click the ellipsis button and browse for the needed application file.
-
In the Parameters editor, enter the capabilities that describe a testing session you want to open, in the JSON format. The dialog will validate the JSON code as you are typing.
For information on all available capabilities, see Appium Desired Capabilities.
To open the testing session and connect to it, click OK. To close the dialog without connecting any device, click Cancel.
See Also
Mobile Screen Window
About Mobile Tests
Connecting to Mobile Devices and Opening Testing Sessions