Before you start creating and running automated tests for a mobile application, connect TestComplete to the device and open a testing session there.
Prerequisites
Before connecting to a device and opening a testing session there, make sure that all requirements and prerequisites are met:
To open a testing session
In the BitBar device cloud
From the Object Browser
-
In TestComplete, open the Object Browser.
-
In the object tree, right-click the top-level Mobile item and then click Connect to Device. TestComplete will open the Connect to Device dialog.
-
If the current TestComplete project does not have a BitBar API key specified, to connect to the BitBar device cloud dialog, enter the API key.
-
On the Parameters tab, select the mobile device and a tested application for which you want to open a testing session.
The Found devices list contains all the devices that are available for you in BitBar and that match the search criteria. If needed, you can filter the list by using the Device Type, OS Version, Resolution and Quick Search filters. Select the device to which you want to connect.
-
In the Application drop-down list box, select a mobile application for which you want to open a testing session. The application file must be either stored in the BitBar Files Library or added to the Tested Applications of the current TestComplete project. In the latter case, click Upload to BitBar to upload the application file to the BitBar Files Library and then select it in the list.
-
If needed, on the Custom parameters tab, you can specify additional capabilities to be used for the testing session. Specify the capabilities in the JSON format. For example:
JSON
{
"bitbar_project": "Automated tests",
"bitbar_description": "Testing the Orders app"
}The will validate the JSON code as you are typing it.
For the list of available capabilities, see the BitBar Documentation - Desired Capabilities.
-
Click OK.
From the Mobile Device Screen window
-
Click Show Mobile Screen on the TestComplete toolbar.
Note: If the button is hidden, you can make it visible as it is described in Customizing Toolbars and Menus.
-
TestComplete will open the Mobile Device Screen and then show the Select BitBar Device dialog.
-
If the current TestComplete project does not have a BitBar API key specified, to connect to the BitBar device cloud dialog, enter the API key.
-
On the Parameters tab, select the mobile device and a tested application for which you want to open a testing session.
The Found devices list contains all the devices that are available for you in BitBar and that match the search criteria. If needed, you can filter the list by using the Device Type, OS Version, Resolution and Quick Search filters. Select the device to which you want to connect.
-
In the Application drop-down list box, select a mobile application for which you want to open a testing session. The application file must be either stored in the BitBar Files Library or added to the Tested Applications of the current TestComplete project. In the latter case, click Upload to BitBar to upload the application file to the BitBar Files Library and then select it in the list.
-
If needed, on the Custom parameters tab, you can specify additional capabilities to be used for the testing session. Specify the capabilities in the JSON format. For example:
JSON
{
"bitbar_project": "Automated tests",
"bitbar_description": "Testing the Orders app"
}The will validate the JSON code as you are typing it.
For the list of available capabilities, see the BitBar Documentation - Desired Capabilities.
-
Click OK.
From a keyword test
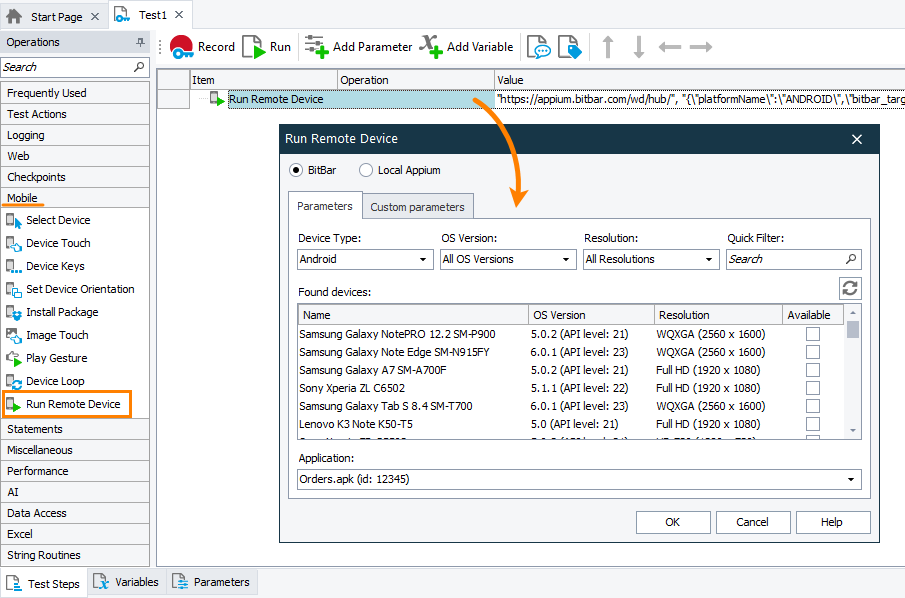
Use the Run Remote Device operation:
-
If there is no BitBar API key specified in the current TestComplete project, enter the key.
-
Select the mobile device and the tested application for which you want to open a testing session. The application file must be either added to the BitBar Files Library or to the Tested Applications collection of the current TestComplete project.
-
If needed, specify additional capabilities for the testing session. For the list of available capabilities, see the BitBar Documentation - Desired Capabilities.
From a script test
Use the Mobile.ConnectDevice method to connect to the BitBar device cloud. You can write the code manually, or you can use the Generate Run Code dialog:
-
Click
 on the Code Editor toolbar.
 -
If there is no BitBar API key specified in the current TestComplete project, enter the key.
-
In the resulting Generate Run Code dialog, select the mobile device and the tested application for which you want to open a testing session.
The application file must be either added to the BitBar Files Library or to the Tested Applications collection of the current TestComplete project.
-
If needed, specify additional capabilities for the testing session. For the list of available capabilities, see the BitBar Documentation - Desired Capabilities.
-
Copy the code that the dialog generates and insert it into your script test.
The example below shows a code snippet that connects to a mobile device in the BitBar cloud and opens a testing session on it:
JavaScript
{
var server = "https://appium.bitbar.com/wd/hub/";
var capabilities = {
"platformName": "android",
"deviceName": "Android Phone",
"automationName": "Appium",
"bitbar_target": "android",
"bitbar_device": "Samsung Galaxy A7 SM-A700F",
"bitbar_app": "123",
"newCommandTimeout": 600
};
Mobile.ConnectDevice(server, capabilities);
}
Python
server = "https://appium.bitbar.com/wd/hub/"
capabilities = {
"platformName": "android",
"deviceName": "Android Phone",
"automationName": "Appium",
"bitbar_target": "android",
"bitbar_device": "Samsung Galaxy A7 SM-A700F",
"bitbar_app": "123",
"newCommandTimeout": 600
};
Mobile.ConnectDevice(server, capabilities)
VBScript
capabilities = "{""platformName"":""ANDROID"",""bitbar_target"":""android"", ""bitbar_device"":""Samsung Galaxy A7 SM-A700F"",""deviceName"":""Android Phone"",""automationName"":""Appium"",""bitbar_app"":""123"",""newCommandTimeout"":600}"
server = "https://appium.bitbar.com/wd/hub/"
Call Mobile.ConnectDevice(server, capabilities)
End Sub
DelphiScript
var server, capabilities;
begin
capabilities := '{"platformName":"ANDROID","bitbar_target":"android","bitbar_device":"Samsung Galaxy A7 SM-A700F","deviceName":"Android Phone","automationName":"Appium","bitbar_app":"123","newCommandTimeout":600}';
server := 'https://appium.bitbar.com/wd/hub/';
Mobile.ConnectDevice(server, capabilities);
end;
C++Script, C#Script
{
var capabilities = "{\"platformName\":\"ANDROID\",\"bitbar_target\":\"android\",\"bitbar_device\":\"Samsung Galaxy A7 SM-A700F\",\"deviceName\":\"Android Phone\",\"automationName\":\"Appium\",\"bitbar_app\":\"123\",\"newCommandTimeout\":600}";
var server = "https://appium.bitbar.com/wd/hub/";
Mobile["ConnectDevice"](server, capabilities);
}
On mobile devices controlled by a private server
From the Object Browser
-
In TestComplete, open the Object Browser.
-
In the object tree, right-click the top-level Mobile item and then click Connect to Device.
-
In the resulting Connect to Device dialog, click Local Appium.
-
In the Parameters editor, enter the capabilities that describe a testing session you want to open, in the JSON format. The dialog will validate the JSON code as you are typing.
For information on all available capabilities, see Appium Desired Capabilities.
-
Click OK.
From the Mobile Device Screen window
-
Click Show Mobile Screen on the TestComplete toolbar.
Note: If the button is hidden, you can make it visible as it is described in Customizing Toolbars and Menus.
-
TestComplete will open the Mobile Device Screen and then show the Select Local Device dialog.
-
In the dialog, click Local Appium.
-
In the Parameters editor, enter the capabilities that describe a testing session you want to open, in the JSON format. The dialog will validate the JSON code as you are typing.
For information on all available capabilities, see Appium Desired Capabilities.
-
Click OK.
From a keyword test
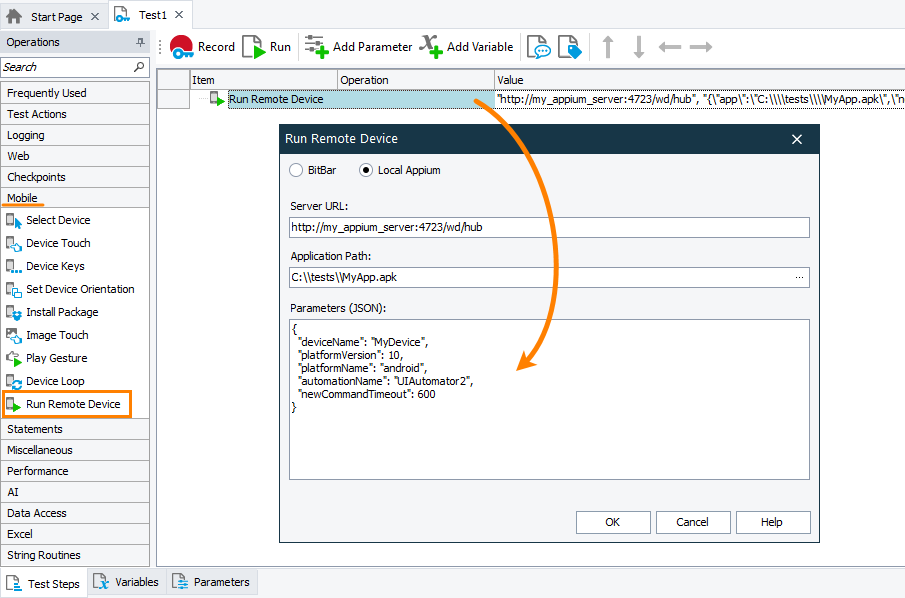
Use the Run Remote Device operation:
-
When configuring the operation, click Local Appium.
-
Specify the URL address of your Appium server and the application for which you want to open a testing session.
-
In the Parameters editor, enter the capabilities that describe a testing session you want to open, in the JSON format. The dialog will validate the JSON code as you are typing.
For information on all available capabilities, see Appium Desired Capabilities.
From a script test
Write a script code that will connect to your private server managed by Appium and start a testing session there. You can write the code manually, or you can use the Generate Run Code dialog:
-
Click
 on the Code Editor toolbar.
 -
In the resulting Generate Run Code dialog, click Local Appium.
-
Specify the URL address of your Appium server and the application for which you want to open a testing session.
-
In the Parameters editor, enter the capabilities that describe a testing session you want to open, in the JSON format. The dialog will validate the JSON code as you are typing.
For information on all available capabilities, see Appium Desired Capabilities.
-
Copy the code that the dialog generates and insert it into your script test.
The example below shows a code snippet that connects to a mobile device managed by a private Appium server and opens a testing session on it:
JavaScript
{
var server = "http://my_appium_server:4723/wd/hub";
var capabilities = {
deviceName: "MyAndroidDevice",
platformVersion: 10,
platformName: "android",
automationName: "UIAutomator2",
app: "/tests/MyApp.apk",
newCommandTimeout: 600
};
Mobile.ConnectDevice(server, capabilities);
}
Python
server = "http://my_appium_server:4723/wd/hub"
capabilities = {
"deviceName": "MyAndroidDevice",
"platformVersion": 10,
"platformName": "android",
"automationName": "UIAutomator2",
"app": "/tests/MyApp.apk",
"newCommandTimeout": 600
}
Mobile.ConnectDevice(server, capabilities)
VBScript
server = "http://my_appium_server:4723/wd/hub"
capabilities = "{""deviceName"":""MyAndroidDevice"",""platformVersion"":10,""platformName"":""android"",""automationName"":""UIAutomator2"",""app"":""\/tests\/MyApp.apk"",""newCommandTimeout"":600}"
Call Mobile.ConnectDevice(server, capabilities)
End Sub
DelphiScript
var server, capabilities;
begin
server := 'http://my_appium_server:4723/wd/hub';
capabilities := '{"deviceName":"MyAndroidDevice","platformVersion":10,"platformName":"android","automationName":"UIAutomator2","app":"\/tests\/MyApp.apk","newCommandTimeout":600}';
Mobile.ConnectDevice(server, capabilities);
end;
C++Script, C#Script
{
var server = "http://my_appium_server:4723/wd/hub";
var capabilities = "{\"deviceName\":\"MyAndroidDevice\",\"platformVersion\":10,\"platformName\":\"android\",\"automationName\":\"UIAutomator2\",\"app\":\"\\/tests\\/MyApp.apk\",\"newCommandTimeout\":600}";
Mobile["ConnectDevice"](server, capabilities);
}
After the session is open
Your tested mobile application will become available to TestComplete. You can:
-
Explore your tested application in the Object Browser and Object Spy.
-
View the application and interact with it via the Mobile Screen window.
-
Access your mobile device, your tested application, and objects in the application from your tests and simulate user actions over them. To learn more, see Creating and Running Mobile Tests.
Disconnecting from the server
When you no longer need to be connected to the testing session, you can terminate it and disconnect from the device.
From the Object Browser
In the Object Browser, under the Mobile node, find the Device node that corresponds to a testing session from which you want to disconnect. Right-click the node and then click Disconnect.
From a script test
To close the session, use the Mobile.Device(DeviceName).Disconnect method.
From a keyword test
Call the Mobile.Device(DeviceName).Disconnect method from your test by using the Call Object Method, Run Code Snippet, or Run Script Routine operation.
Remarks
After a testing session is opened on a mobile device, calling the Mobile.ConnectDevice method with the same set of capabilities will not reconnect TestComplete to that device. Instead, the method will reset the state of the tested application on the device.

 Prerequisites
 Learn how to get the API key
 to copy your API key to the clipboard.


