TestComplete considers processes, windows, and controls as objects. Before running a test command on some object, TestComplete first finds this object in the system. To do this, it uses the recognition criteria set for the object in the Name Mapping repository. If the recognition criteria match completely and the object is found, TestComplete executes the test command on it.
If TestComplete fails to find the object, it first tries to find a similar one. Depending on whether the self-healing mode is enabled, it either uses the replacement object to continue the test run or posts information on the replacement object to the test log. If it fails to find a similar object or if the automatic update of object recognition criteria is disabled, it will post the error message to the test log.
 In web tests that locate objects by using XPath expressions or CSS selectors, self-healing mode is not applicable. In such tests, if an object is not found, TestComplete will never use a replacement object and will only report the error.
This message indicates that the tested application differs from the state it had during test recording or test creation. For example, earlier test steps have failed and the needed window or control didn’t appear on the screen, the parent object of the target object didn’t exist, the recognition attributes of the object changed, and so on (see the possible reasons below).
1. Explore the test log
-
Find the first “The … object does not exist” error in the test log. Depending on the executed command, TestComplete can post several error messages to the log. Typically, the very first message corresponds to the root cause of the problem and further errors are caused by this error.
-
Select the error message in the log and explore the details on the Details and Picture tabs:
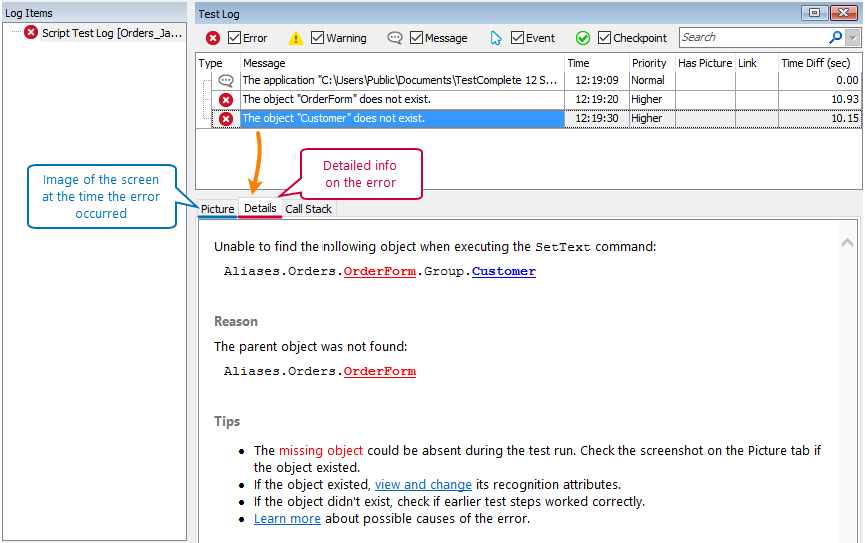
Click the image to enlarge it.
| Note: |
The Picture tab contains an image only if the Post image on error project setting was enabled during the test run. By default, the setting is enabled. |
Tips:
-
Quite often, the missing object is not the object whose method or property you called. It may be some of its parent objects. For example, the “ClickButton” command fails if the window that has the needed button was not found in the system. So, read the error message on the Details tab to understand what object caused the problem.
-
One of the possible reasons why the search fails is that the recognition attributes of the needed object have changed. To help you solve this problem, TestComplete automatically searches for objects that are similar to the missing object.
If a similar object is found, TestComplete will suggest updating the recognition attributes to use the found object in subsequent test runs:
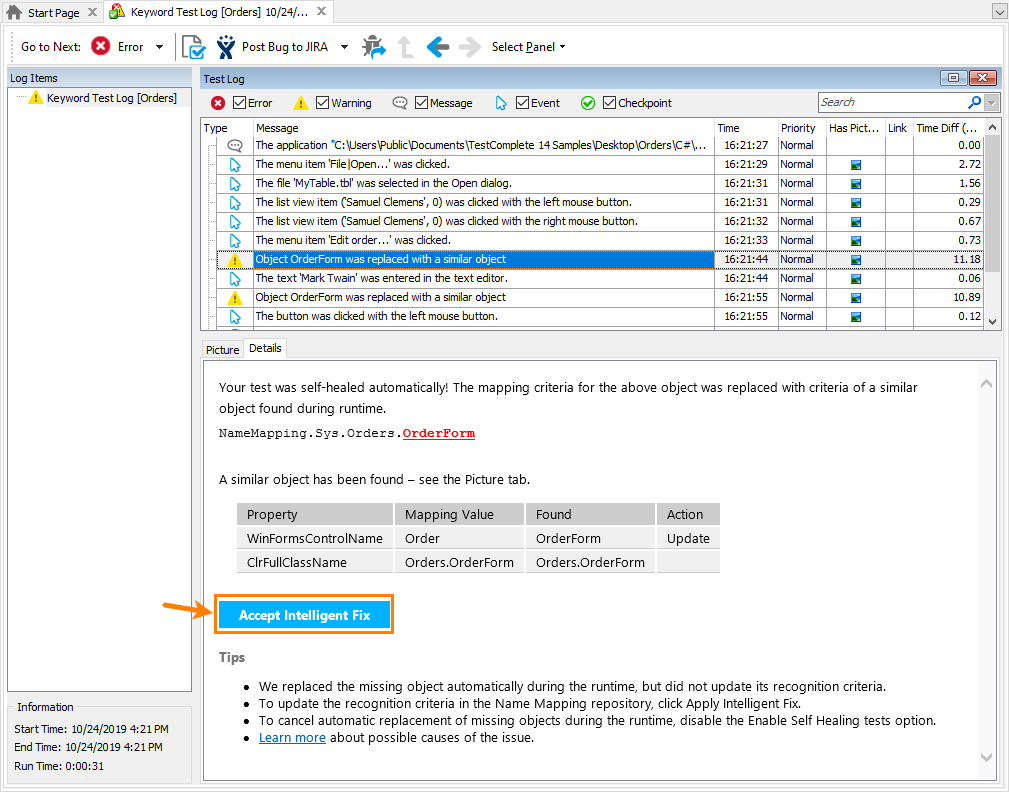
Click the image to enlarge it.
-
To better understand what test command was being executed when the error occurred, double-click the error message in the test log. TestComplete will open the test editor and will highlight the line that was being executed when the error occurred.
2. Explore the tested application
-
The tested application must be running and have the same state it had when the error occurred. If the application was closed after the test run, you can start it again and pause the run on the problematic test line. To do this:
-
Set a breakpoint on the problematic line in the script test or keyword test operation. To find that line or operation quickly, double-click the error message in the test log. TestComplete will switch to the test editor and highlight the line or operation that caused the error. To set the breakpoint, click the editor’s gutter next to the line or operation, or press F9.
-
Run your test. The test engine will automatically pause the test run when it reaches the breakpoint.
-
Examine your application and check whether the desired object exists. For instance, developers could change the tested application and remove the tested form or button from it. This change could cause an error in your test.
 See instructions for cross-platform web tests
 See instructions for cross-platform web tests
 See instructions for cross-platform web tests
In cross-platform web tests, the test engine cannot access web applications running in remote testing environments from your local TestComplete instance. As a workaround, you can do any of the following:
Run and explore your tested application on your local computer.
– or –
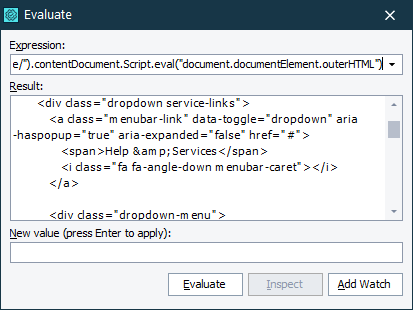
Manually check whether the problematic object that matches the specified search expression actually exists on the page. You can do it, for example, by examining the source code of the tested web page. To get the source code, you can use the following expression:
Sys.Browser().Page("*").contentDocument.Script.eval("document.documentElement.outerHTML")
You can post the source code to the test log or view it in the Evaluate dialog or the Watch List panel:
Tip: To get the source code of an individual web element, you can use the following expression:
Sys.Browser().Page("*").FindElement(".container-wrap").outerHTML
 See instructions for desktop, mobile tests, and web tests that implement the default approach
 See instructions for desktop, mobile tests, and web tests that implement the default approach
 See instructions for desktop, mobile tests, and web tests that implement the default approach
-
In TestComplete, select  Display Object Spy from the Tools toolbar. This will open the Object Spy.
-
Use the Object Spy to select the needed object on the screen:
-
You typically select a window or control by dragging the target icon ( ) to it. See how it works.
-
If you need to select a hint, menu item or another popup object, use the  “Point and fix” mode. See how it works.
After you select the object, Object Spy will display its properties.
If the object does not exist in the application, re-record your test or update its commands to match the tested application.
If the object exists, then, to find the cause of the error, explore properties of the problematic object:
-
In TestComplete, select  Display Object Spy from the Tools toolbar. This will open the Object Spy.
-
Use the Object Spy to select the needed object on the screen:
-
You typically select a window or control by dragging the target icon ( ) to it. See how it works.
-
If you need to select a hint, menu item or another popup object, use the  “Point and fix” mode. See how it works.
After you select the object, Object Spy will display its properties.
One more tip:
By default, the test engine logs images of the tested application for every simulated test command to help you understand what happened in the application during the test run. You can find these images on the Picture tab of the test log. A possible alternative is to record a video of your test run. See the description of the VideoRecorder extension for information on how to do this.
Below are typical causes of the problem and typical ways to eliminate them.
Most possible causes
 The object didn’t exist at the time TestComplete tried to obtain it.
 The object didn’t exist at the time TestComplete tried to obtain it.
 The object didn’t exist at the time TestComplete tried to obtain it.
It’s quite possible that the needed window or control, or some of its parent objects didn’t exist in the system at the needed time. This can happen in the following cases:
-
Your test failed to simulate some actions that open the needed window. Check earlier error messages in the log to find the root cause of the problem.
-
The developers changed the application logic, and your test doesn’t have commands to invoke the needed window or control. In this case, you need to modify your tests.
-
It takes some time for the tested application to display a window or control on screen. The test engine waits for the objects to appear, but the default waiting timeout may be insufficient. In this case, modify your test so that it waits for the needed object longer. The way you do this depends on the type of your test. For detailed information, see Waiting for Process or Window Activation.
 The object’s identification properties changed.
 The object’s identification properties changed.
 The object’s identification properties changed.
To recognize windows and controls, TestComplete uses properties that identify the object among its siblings. One of the most possible causes of the error is that the actual values of identification properties differ from the values that the project stores.
During the test run, if TestComplete cannot find a tested object using the expected properties, it will try to find an object similar to the missing one.
If the object is found
If the Enable Self-Healing mode option is enabled, TestComplete will use the found object during the test and suggest updating the expected properties to match the found object:

Click the image to enlarge it.
If the option is disabled or if the self-healing mode is not applicable, the error message will show the Intelligent Fix button:
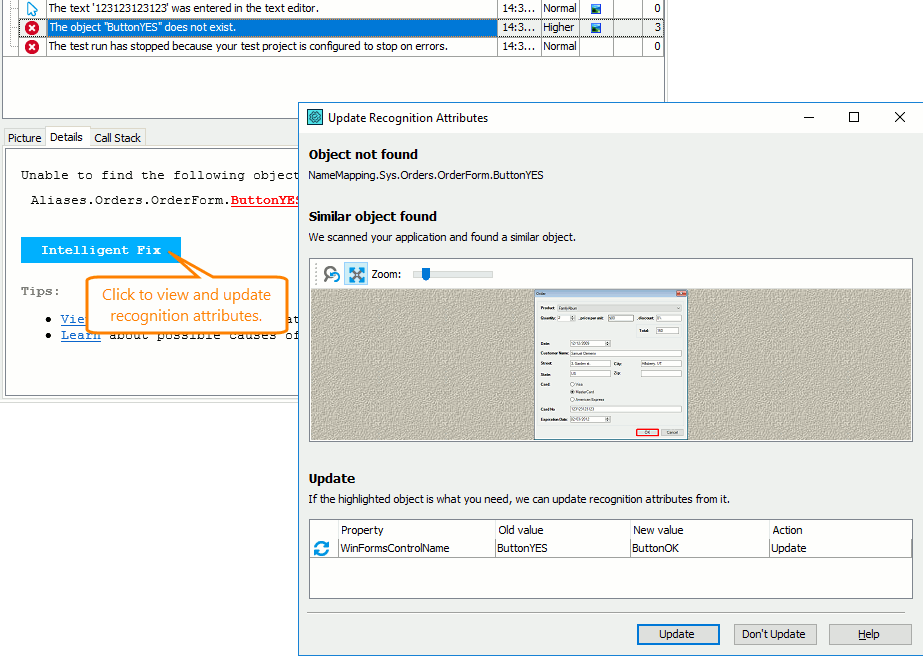
Click the image to enlarge it.
Click the button to open the Update Recognition Attributes dialog and follow its instructions to update the identification properties.
Note: In web tests that locate web objects by using XPath expressions or CSS selectors, TestComplete will not search for a replacement object, and neither the self-healing nor updating of the recognition attributes will be available.
If the object is not found
Click the View and change link in the Details panel of the error message:
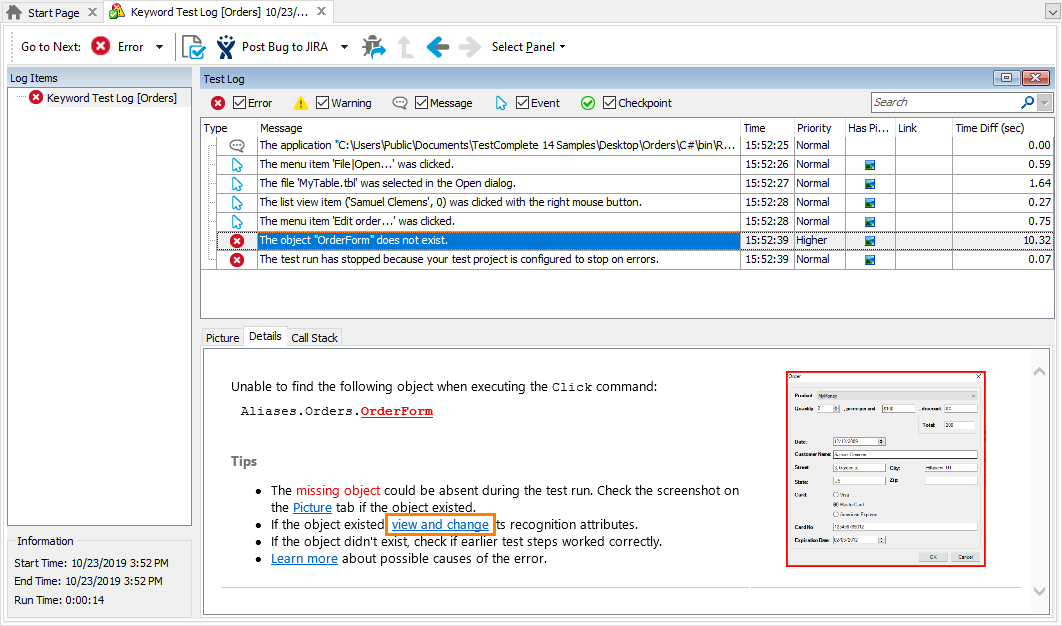
Click the image to enlarge it.
TestComplete will open the Name Mapping repository and select the problematic object in it. You can update its identification properties automatically with the Update Name Mapping wizard (see Update Name Mapping Wizard) or you can modify the property list and property values manually (see Basic Mapping Criteria).
Tips:
-
If the identification criteria include the Index property and the value of this property has changed, exclude this property from the criteria. It does not provide the unique identification of the tested object in your case. Explore other properties of the missed object and try to find properties that identify the object uniquely.
Besides using the object’s properties for identification, you can also use properties of its child objects. For instance, you can map a form by the text of one of its buttons or text boxes.
-
The identification criteria can include the caption (or text) of the tested window or control. You can use wildcards (* and ?) or regular expressions to specify variable parts of the caption. ? stands for any single character, * stands for an arbitrary string. For instance, if the window caption looks like MyFile - Notepad, you can replace the file name with * and use the following identification criteria: * - Notepad. To specify more complicated parts of a caption, use regular expressions.
You can use these wildcards to specify the value of any properties of string type like WndClass or wText.
-
Do not use the Name and FullName properties for object identification.
-
To map objects of Open Applications, TestComplete uses the object names defined in the application code, for instance, edit11, button1 and so on. Open Applications are applications that provide the test engine with access to their internal objects, methods and properties. TestComplete uses the application-defined names as unique identification attributes of test objects. If the application-defined name of the tested object has been changed, you have to alter the mapping settings and use the new application-defined name.
 The object’s position in the object tree was changed.
 The object’s position in the object tree was changed.
 The object’s position in the object tree was changed.
If the identification settings are correct, then perhaps the object resides on another level of the object tree than it did during test creation or recording. This happens if developers changed the tested application and added or removed some forms or controls. A typical example of this situation is when developers added a panel between the form and the missed button or when they remove the substrate panel between the form and the tested control.
If the object hierarchy has changed, then the general solution is to change your test or tests in order for them to match the new hierarchy. However, this can be a time-consuming task. If the object is mapped and is addressed in tests by its alias, then to solve the problem faster, you can update the name mapping tree:
-
Switch to the Project Explorer panel (you can do this by selecting View | Project Explorer from the TestComplete main menu).
-
In the Project Explorer, double-click the NameMapping item. This will invoke the Name Mapping Editor.
-
In the editor, expand the Mapped Objects section (by default, it is collapsed) and find the desired object in this section.
-
Drag the object to the needed level in the Mapped Objects tree.
If the object hierarchy changes from one application run to another, it is recommended to move the object to the highest level which it may occupy and command the test engine to search for the object from this level and deeper:
-
Drag the object to the highest level it may occupy.
-
Right-click somewhere within the Mapped Objects section of the Name Mapping editor and select Field Chooser from the context menu. This will open the list of available columns.
-
Drag the Extended Find column from the list to the Mapped Objects table.
-
Close the column list.
-
Select the Extended Find check box for the object. If a confirmation dialog appears, click Yes.
For more information on mapping object names, see Name Mapping.
 One of the parent objects causes the ambiguous recognition problem.
 One of the parent objects causes the ambiguous recognition problem.
 One of the parent objects causes the ambiguous recognition problem.
If all the settings are correct and the object exists in the application at the moment TestComplete is addressing it, then perhaps there is an ambiguous object recognition in the tested application. For example, there is an ambiguity in the mapping of one of the object’s parent objects, and TestComplete cannot identify the object you are addressing. To solve this problem, we recommend that you eliminate the ambiguous recognition in the corresponding mapped object. For detailed information, see Message - Ambiguous Recognition of the Tested Object.
Other possible cases
 The tested process was not found.
 The tested process was not found.
 The tested process was not found.
Check whether the tested process is running in the system. To identify processes, TestComplete uses their names and indexes. Verify that your test works with the process whose index coincides with the process index that you used when creating or recording the test.
 The alias refers to a mapped object that is not in the NameMapping project item.
 The tested application stopped responding.
 The tested application stopped responding.
 The tested application stopped responding.
If the tested application has stopped responding to user actions and operating system’s messages, TestComplete is unable to find the required window or control. You can check whether the application is frozen in the Windows Task Manager. To display it, right-click an empty space in the operating system’s taskbar and select Task Manager from the context menu. In the Task Manager, switch to the Applications tabbed page and find the needed application on this page. If the application is frozen, the Status column will display Not Responding.
According to the Freeze Diagnostics properties of your test project, the test engine may automatically terminate an application if it stopped responding. If the test engine terminated the application, you will see the error message “The process does not respond. It will be terminated.” in the test log. In addition, TestComplete will automatically generate a detailed error report that will help you find the cause of the issue faster. For more information on how to view and change the Freeze Diagnostics properties, see Diagnosing Application Freezes.
 The object tree model differs from the model that was used to create the test.
 The object tree model differs from the model that was used to create the test.
 The object tree model differs from the model that was used to create the test.
-
For desktop applications
TestComplete supports two object tree models: Tree and Flat. Tests created for one of these models are not compatible with the other model. The Flat model was the default one in TestComplete 3 and earlier. Since TestComplete 4, the default tree model is Tree. If you run tests created for the Flat model, you may need to check which of the models is active. To do this:
-
Switch to the Project Explorer (you can do this by selecting View | Project Explorer from the TestComplete main menu).
-
Right-click your project in the Project Explorer and select Edit | Properties from the context menu. This will open the project editor and activate its Properties page.
-
Select General from the tree of property groups in the left part of the page. Check the value of the Object tree model setting on the right.
-
For web pages
If you are testing a web page, you may need to check the tree model which TestComplete uses for web objects (see Web Tree Models). To do this:
-
Switch to the Project Explorer (you can do this by selecting View | Project Explorer from the TestComplete main menu).
-
Right-click your project in the Project Explorer and select Edit | Properties from the context menu. This will open the project editor and activate its Properties page.
-
Select Open Applications | Web Testing from the tree of property groups in the left part of the page. Check the value of the Tree model setting on the right. The model must be the same as the model you used when creating the test.
 In web tests that locate objects by using XPath expressions or CSS selectors, self-healing mode is not applicable. In such tests, if an object is not found, TestComplete will never use a replacement object and will only report the error.
 See instructions for cross-platform web tests
 See instructions for desktop, mobile tests, and web tests that implement the default approach
 Display Object Spy from the Tools toolbar. This will open the Object Spy.
 ) to it. See how it works.
 “Point and fix” mode. See how it works.
 The object didn’t exist at the time TestComplete tried to obtain it.
 The object’s identification properties changed.
 The object’s position in the object tree was changed.
 One of the parent objects causes the ambiguous recognition problem.
 The tested process was not found.
 The alias refers to a mapped object that is not in the NameMapping project item.
 The tested application stopped responding.
 The object tree model differs from the model that was used to create the test.


