 |
Information in this topic applies to generic desktop applications (.NET, WPF, Delphi and others). |
 |
Connected and Self-Testing applications are deprecated. These technologies will be removed in one of the future releases of TestComplete. To create test code that runs from within your tested apps, use TestLeft, a SmartBear functional testing tool for developers. |
To handle events in TestComplete, you use Event controls. These controls are ActiveX objects registered in the operating system. You can use them to create event handlers in TestComplete, as well as in any other application that supports working with ActiveX controls. This topic explains how you create handling code for TestComplete events in C# Connected Applications.
1. Preparing the Event Control
Before you start creating event handlers, you need to prepare the Event control that you will use for event handling.
-
Open your test project in TestComplete, and open your Event control for editing. To do this, right-click the Event control in the Project Explorer and choose Edit from the context menu.
-
In the Event Control editor, add the desired events to the Event control. The steps you need to perform depend on the events to be handled. See Adding Events to Event Controls for complete information.
-
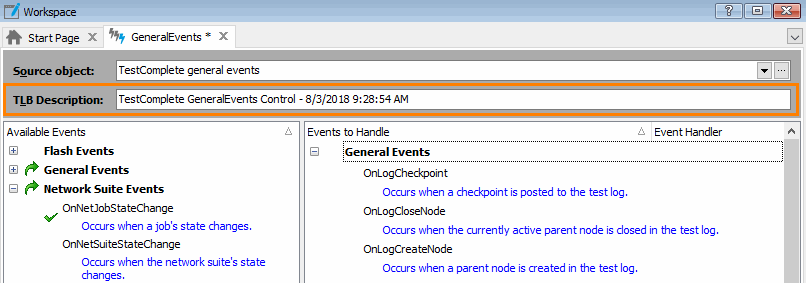
In the TLB Description edit box at the top of the Event Control editor, specify some descriptive text for your Event control. This text will identify the control among other ActiveX objects in the system.

-
Select File | Save from the TestComplete main menu to save the changes.
2. Adding the Event Control to the Toolbox Panel
In order to handle events in a C# application, you need to add the Event control to Visual Studio’s Toolbox panel. The installation of the control is similar to the installation of any other ActiveX component:
-
Open your C# application in Microsoft Visual Studio.
-
Switch to the Toolbox panel (if it is hidden, select the View | Toolbox menu item to make it visible).
-
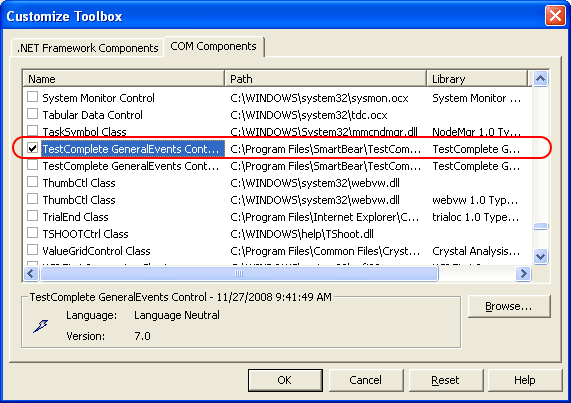
Right-click the Toolbox panel and select Add/Remove Items from the context menu. This will call the Customize Toolbox dialog.
-
Switch to the COM Components tabbed page of the dialog. It displays a list of ActiveX controls registered in the operating system. Search for the
Eventcontrol using the description you have specified in the TLB description field of the Event Control editor.
-
When the control is found, check it and press OK. The control will appear in Visual Studio’s Toolbox.
3. Creating the Event Handler
3.1. Creating the Event Hander Function
To create an event handler:
-
Open some form of your C# application for editing.
-
Drop the
Eventcontrol on the form. -
Select the
Eventcontrol on the form and open the Properties window. -
Switch to the Events page of the window and double-click the desired event.
Visual Studio will create the event handler function.
Now you can write the event handler’s code. See below.
3.2. (Important) Writing Event Handler Code
To work with objects and variables the C#Script code imported into a C# application, uses objects of the var type. These objects are analogues to Variant variables in Visual Basic or Delphi. If you assign a C# object object to a variable or property of the var type, the subsequent use of this variable or property will cause an error. For example, this may happen within an event handling routine:
C#
private void axEventControl1_OnLogError(object sender, AxEventControl.ItcControlEvents_OnLogErrorEvent e)
{
var lp = (var)e.logParams; // Incorrect
lp["AdditionalText"] = "Message"; // <-- An error occurs
…
}
The error occurs because Visual Studio does not support automatic type casting of the AxEventControl.ItcControlEvents_OnLogErrorEvent object to the var object.
To solve the problem, use the following approach:
C#
private void axEventControl1_OnLogError(object sender, AxEventControl.ItcControlEvents_OnLogErrorEvent e)
{
var lp = new var(e.logParams);// Correct!
lp["AdditionalText"] = "Message"; // Correct!
…
}
3.3. Attaching Event Controls to Event Sources
To make your Event control respond to events of TestComplete or ActiveX objects, you should establish a link between the control and TestComplete (or between the control and the desired object). We call this attaching an Event control to the event source. You should attach the control to every object, whose events you are going to handle. The Event control can only process the TestComplete engine’s events or events of an ActiveX object if it has been attached to them.
To attach an Event control to TestComplete or desired object, use the following methods of the Event control:
-
EventControl.AttachToTestComplete()- Establishes the link to the TestComplete engine. Call this method if you need to handle TestComplete events. -
EventControl.AttachTo(Obj)- Attaches the Event control to any object specified by the Obj parameter. This object must implement theIDispatchinterface. Use this methods to handle events of ActiveX objects that reside outside of TestComplete.Note: The AttachTomethod is available if your Event control contains events of external ActiveX objects. If the control only contains TestComplete events, the method is unavailable.
It may be convenient to attach an Event control to the desired event source after your C# Connected Application has been started. You can call the AttachToTestComplete and AttachTo methods within the OnLoad event handler of the application’s main form. For instance, to handle events of the Document object of Microsoft Word, follow these steps:
-
Add Microsoft Word’s events to the list of project events. See Adding Events to Event Controls for more information on this.
-
Attach the Event control to TestComplete by calling the
EventControl.AttachToTestCompletemethod. -
Attach the Event control to each Microsoft Word’s Document object, whose events you would like to handle. That is, call
EventControl.AttachTo(DocumentObject)for each Document object:C#
// Attaching Event control to TestComplete
EventControl1.AttachToTestComplete();
// Getting references to Microsoft Word and Document objects
var WordAppObject = Connect.Sys["OleObject"]("Word.Application");
DocObject1 = WordAppObject["Documents"]["Item"](1);
DocObject2 = WordAppObject["Documents"]["Item"](2);
// Attaching to Microsoft Word and Document objects
EventControl1.AttachTo(DocObject1);
EventControl1.AttachTo(DocObject2);
EventControl1.AttachTo(WordAppObject);
3.4. Detaching Event Controls From Event Sources
When the testing is over, it is recommended to detach from the objects whose events were processed. This will prevent you from possible malfunction in the application under test and in the system.
To detach from TestComplete, call the EventControl.DetachFromTestComplete method. To detach from other objects, call EventControl.DetachFrom(Obj):
C#
// Attaching Event control to event sources
EventControl1.AttachToTestComplete();
EventControl1.AttachTo(DocObject1);
EventControl1.AttachTo(WordAppObject);
...
// Test code ...
...
// Detaching Event control from event sources
EventControl1.DetachFrom(DocObject1);
EventControl1.DetachFrom(WordAppObject);
EventControl1.DetachFromTestComplete();
The DetachFrom method is available only if your Event control contains some events of external ActiveX objects. It is not available if the control contains only TestComplete events.
 |
After the Event control has been detached from TestComplete or an object, it will not receive notifications about events that occur in TestComplete or this object, thus you will not be able to handle these events. |
See Also
Handling Events - Overview
Creating Event Handlers for External COM Objects
Creating Connected Applications in C#
Creating Event Handlers in Connected Applications

 1. Preparing the Event Control