 The information in this topic applies to web tests that implement the default approach (rely on Name Mapping and run in local environments).
This topic explains how TestComplete represents the internal structure of a Flex application and how you can change the object hierarchy within your Flex application. For more information on principles of addressing applications’ windows, controls and objects, see Naming Objects.
General Notes
Like any other application, a Flex application is represented as a hierarchy of objects. To obtain any application’s object, you should first obtain the web browser process and the page hosting the application under test, then access the application and finally obtain the desired object. For more information, see Addressing Objects in Flash and Flex Applications.
The way TestComplete represents a Flex application in the Object Browser depends on the value of the native showInAutomationHierarchy property of internal objects of the application. You can change the value of this property to move objects within the object’s hierarchy to make the hierarchy more suitable for your testing needs (see below.)
Object Hierarchy
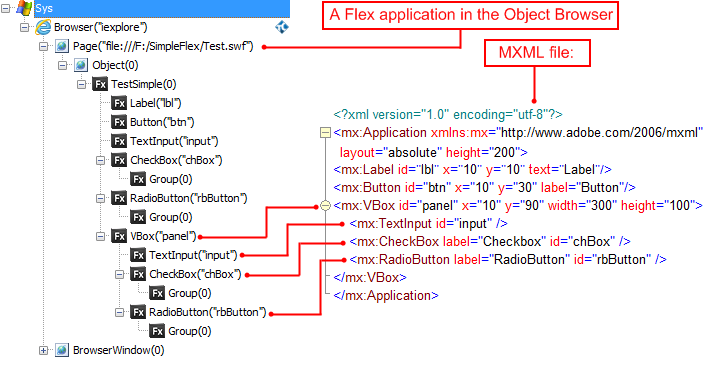
The easiest way to understand how TestComplete represents the internal structure of your Flex application is to explore the application in the Object Browser or Object Spy.
As you can see, the internal structure of a Flex application corresponds to the .mxml file that declares the interface of your Flex application.
Container Objects in the Object Tree
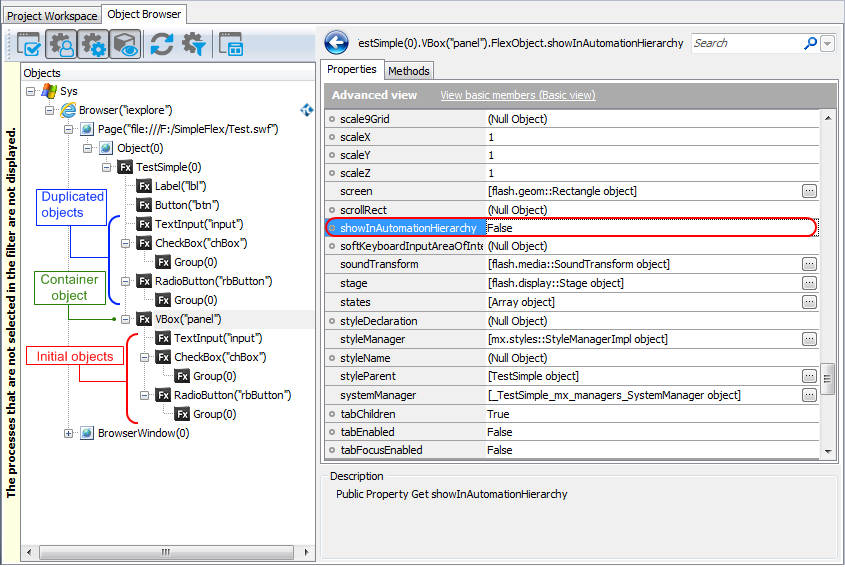
Flex applications often include container objects (like Canvas, HBox, VBox, etc.) that are not really important for functional testing. To simplify scripting access to child objects of these containers, TestComplete duplicates them in the object hierarchy as follows:
- TestComplete finds a container object and checks whether its
showInAutomationHierarchynative property is set to False (the default value of this property). - Child objects of the container whose
showInAutomationHierarchynative property is set to True are duplicated in the object hierarchy. TestComplete places copies as children of the first ancestor container whoseshowInAutomationHierarchyproperty is set to True. - Child objects of this container whose
showInAutomationHierarchynative property is set to False are not duplicated in the object hierarchy.
These child objects are more important for testing than their container. By moving children of a container object to a higher level in the object hierarchy, TestComplete simplifies scripting access to such objects in tests. The paths to duplicated objects in the object hierarchy become shorter, which improves the TestComplete performance and test readability. So, while creating your Flex application, you can make testing it easier by modifying the showInAutomationHierarchy property of container objects and their child objects as described above.
To access the showInAutomationHierarchy native property of a Flex container object in your tests, use the FlexObject property (ContainerFlexObj.FlexObject.showInAutomationHierarchy).
For backward compatibility, TestComplete also leaves the initial container and its child objects in the object tree, so you can see these child objects twice in the Object Browser panel (as children of the initial container object with the showInAutomationHierarchy property set to False and as children of an ancestor container with the showInAutomationHierarchy property set to True). However, when recording automated tests, TestComplete operates with duplicated objects that were created on a higher level.
See Also
Accessing Native Properties and Methods of Flash and Flex Objects
Testing Flash and Flex Applications

 General Notes
