After you create a team build containing your TestComplete tests, you can assign that build to a test plan.
Requirements
You must have access to your team project’s test plans:
-
To access and manage test plans from Microsoft Test Manager, you must have one of the following Microsoft Visual Studio versions with Microsoft Test Manager installed:
-
Microsoft Visual Studio 2015–2017 (the Enterprise or Test Professional edition).
-
Microsoft Visual Studio 2010–2013 (the Ultimate or Premium edition).
-
-
To access a test plan by using your team project’s Web Portal:
-
Important: You must have the Microsoft Test Manager extension installed on your Team Foundation Server or for your Azure account.
-
Access your project directly from your web browser:
-
For Azure DevOps Services (formerly known as Visual Studio Team Services or VSTS):
https://dev.azure.com/<Your_Azure_Account_Name>/<Project_Name>– or –
https://<Your_VSO_Account_Name>.visualstudio.com/<Project_Name>(if your organization has not moved to thedev.azure.comdomain yet) -
For On-Premises Team Foundation Server:
http://<Your_Server_Name>:8080/tfs/<Collection_Name>/<Project_Name>
You can find information on Web Portal at docs.microsoft.com/en-us/azure/devops/project/navigation/.
-
-
Prerequisites
 For Azure DevOps Services and Team Foundation Server 2018.
To run TestComplete tests as part of a test plan from the Web Portal of your team project, you must have a release pipeline that is based on the Run automated tests from Test Manager template and that uses a build instance that includes your TestComplete test files as an artifact.
Note: If you are going to run your TestComplete tests as part of a test plan from Microsoft Test Manager in lab environments, skip this step.
To create a release pipeline:
-
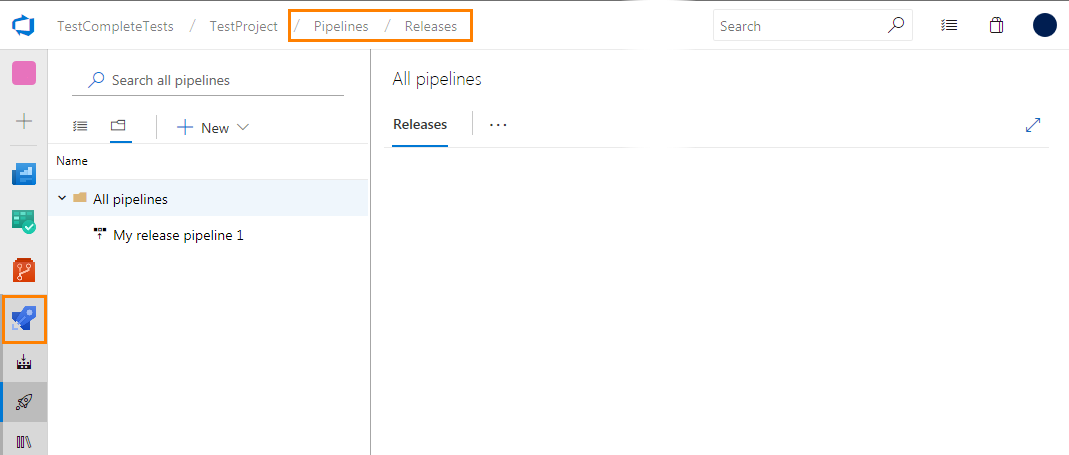
Open the Web Portal of your team project and navigate to the Pipelines > Releases page:
-
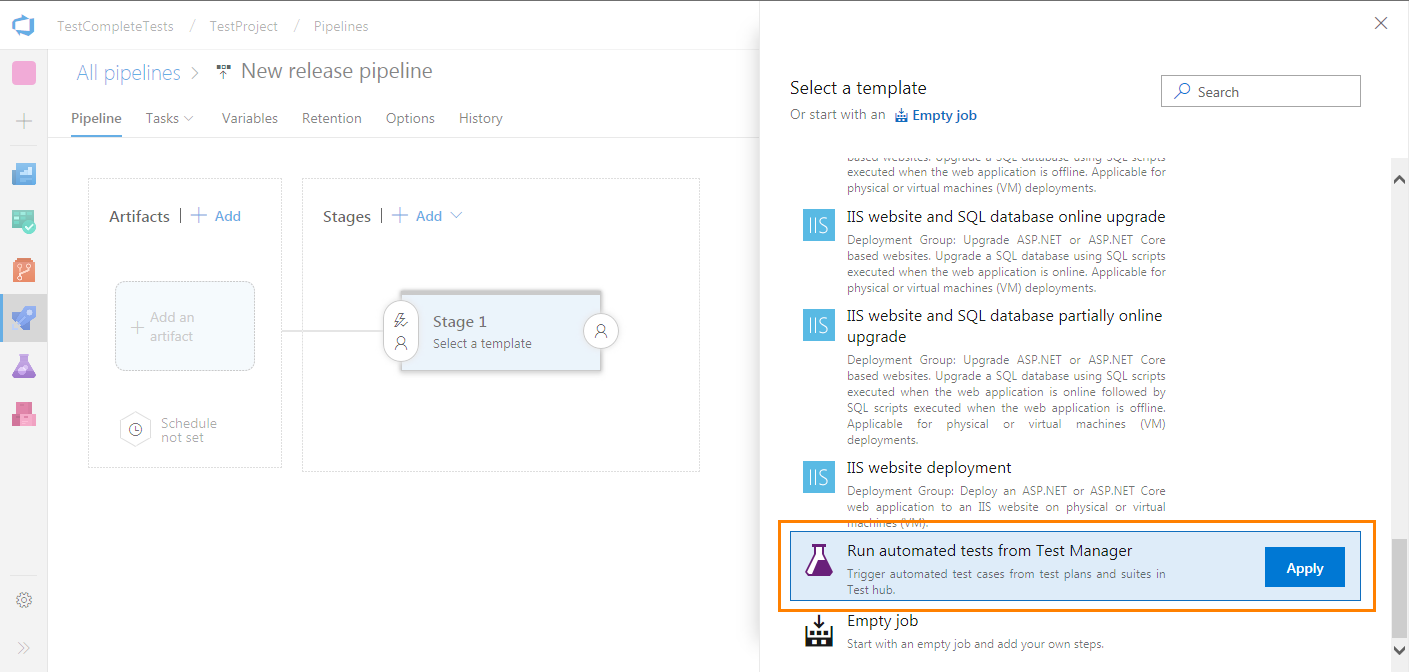
Click New > New release pipeline. In the resulting Select a template wizard, select the Run automated tests from Test Manager template and click Apply:
-
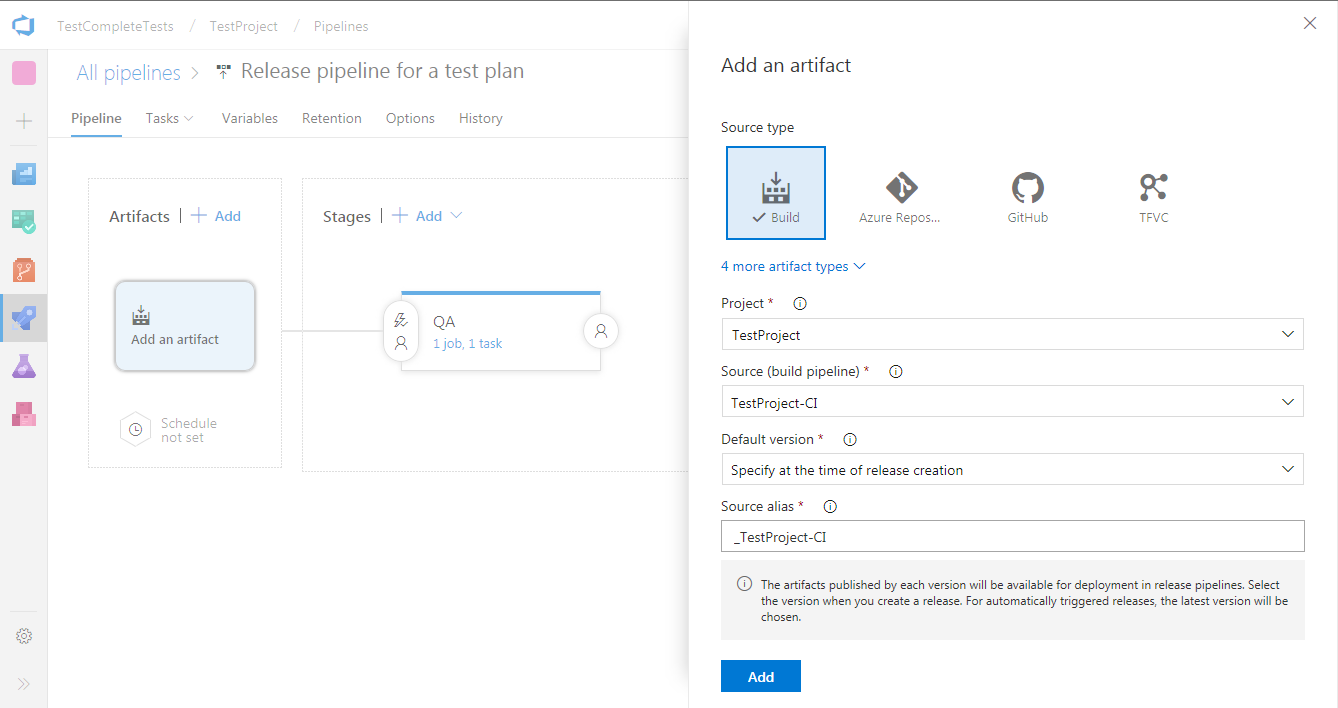
Add the artifact that includes the results of your build created on step Create a Build Containing TestComplete Tests to the pipeline:
-
By default, the created pipeline includes a single stage that has one task: Visual Studio Test.
-
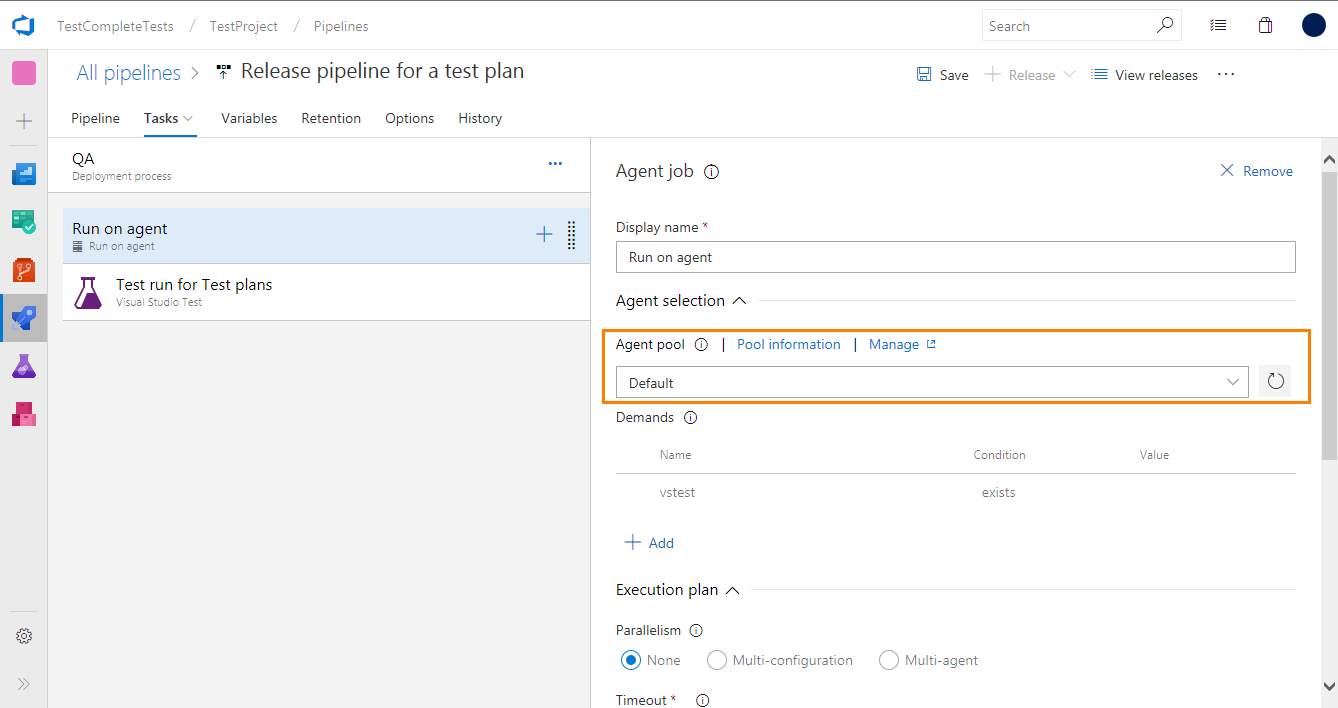
Make sure the task will run on the proper agent that meets all the needed requirements:
-
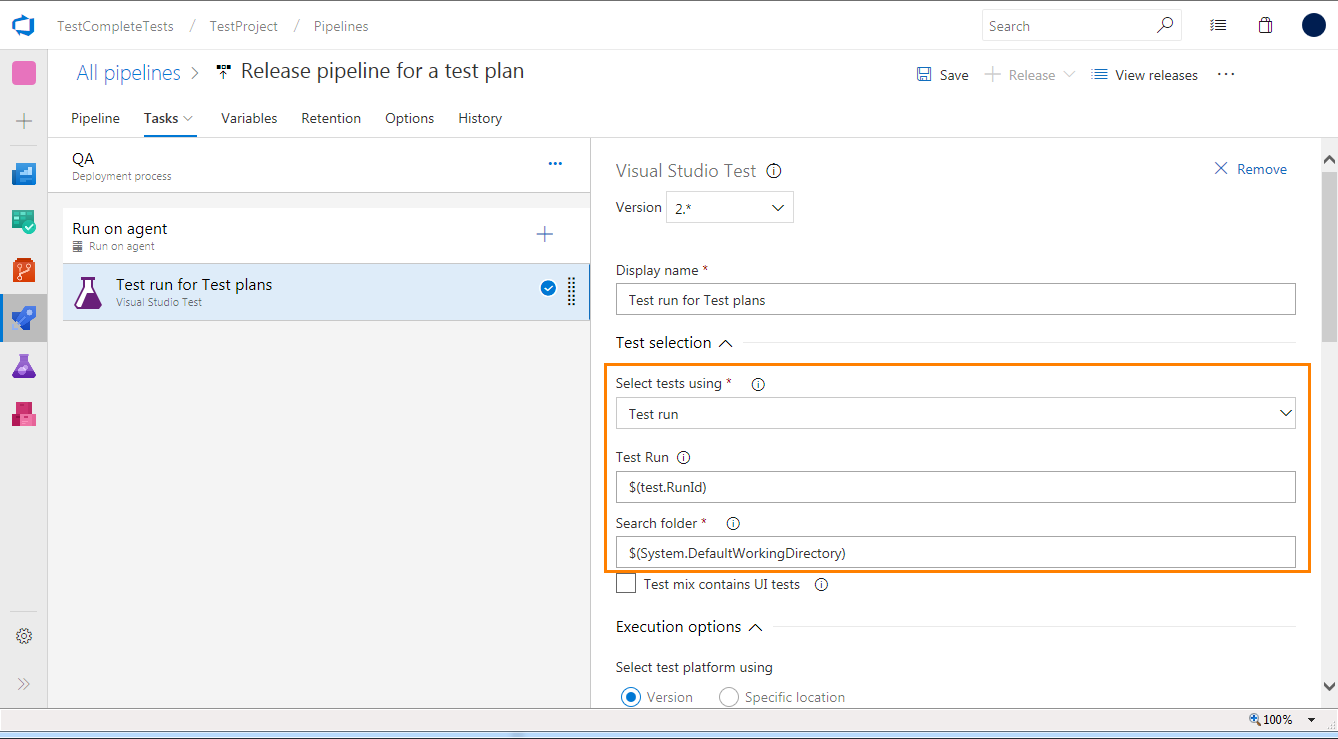
If you have a Visual Studio Test task, make sure that:
-
The Select tests using setting is set to Test Run.
-
The Search folder setting contains the path to the folder where your TestComplete test items (.tc12test files) reside.
-
-
Save the pipeline.
Create and Configure a Test Plan
From the Web Portal
 You must either have the Enterprise account type or the Microsoft Test Manager extension must be installed.
-
Open the Web Portal of your team project.
-
Navigate to the Test Plans page of your project:
-
Select the needed test plan or click New Test Plan to create a new one.
-
Configure your test plan settings:
-
In the Build drop-down list, select the build that includes your TestComplete tests.
-
In the Release definition drop-down list, select a release configured to run your TestComplete tests.
-
In the Environment drop-down list, select the stage of the release that runs your TestComplete tests.
-
-
Save the changes.
-
Select your test plan or the test suite to which you want to add a test case with associated TestComplete tests. To learn how to associate TestComplete tests with test cases, see 3. Associate a Test Project With a Test Case (Run TestComplete Tests as Part of a Test Plan).
-
Click Add existing. In the resulting dialog, find the needed test case and click Add.
From Microsoft Test Manager
-
Launch Microsoft Test Manager and connect to your team project.
-
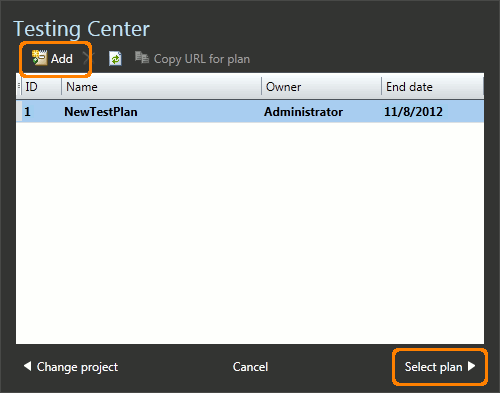
Go to the Testing Center and select the needed test plan. If you do not have a test plan, create it:
-
Open the Properties page of your test plan:
-
In the Filter for builds drop-down list, select the needed build definition.
In Build in use, click Modify and select the build you want to use for testing:

-
If you run tests in a lab environment, in the Test settings drop-down list, select the appropriate test settings.
Note: You can run automated tests in lab environments only if you use XAML builds. In the Test environment drop-down list, select the lab environment where you want to run TestComplete tests.

-
Save the changes.
-
Select your test plan or a test suite to which you want to add a test case with TestComplete tests associated. To learn how to associate TestComplete tests with test cases, see 3. Associate a Test Project With a Test Case (Run TestComplete Tests as Part of a Test Plan).
-
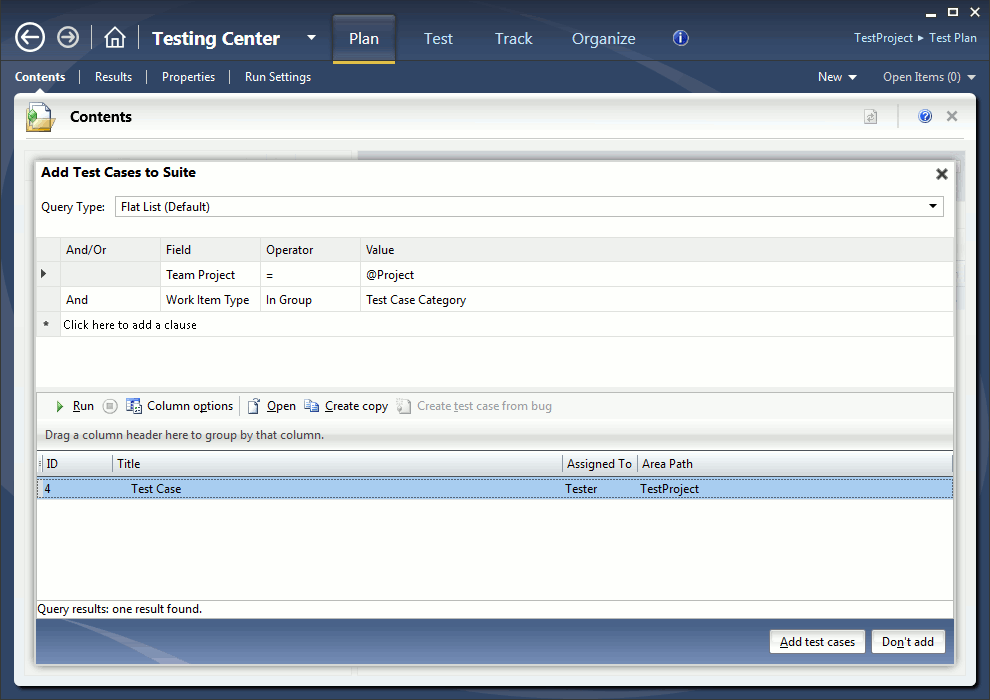
Click Add. In the resulting dialog, find the needed test case and click Add test case:
See Also
Run TestComplete Tests as Part of a Test Plan
Creating a Build Containing TestComplete Tests
Running Test Cases with Associated TestComplete Tests

 Requirements


 Prev
Prev