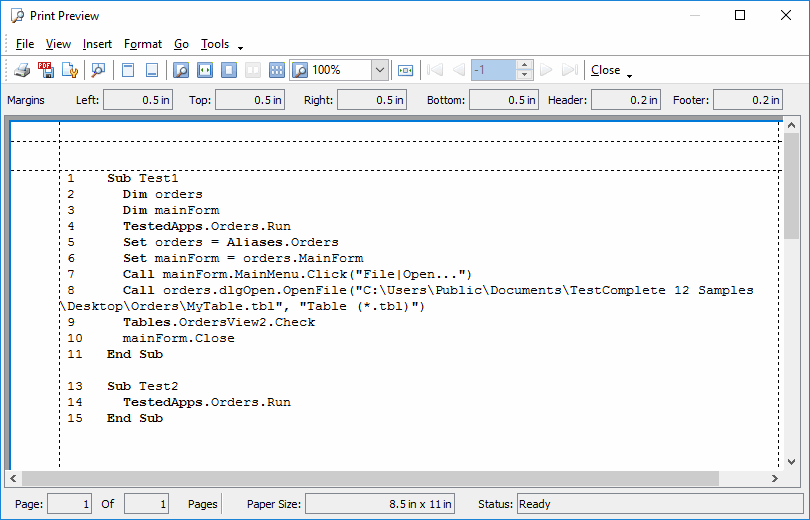
Within Print Preview, you can format a report for printing (including colors and background), set paper size and page formatting, choose printers and so on.
This form can be called from the Test Log window and from the Code Editor.
To call it from the Test Log window do the following:
-
Open the Test Log.
-
Select File | Print Preview from the main menu of TestComplete.
-- or --
-
Open the Test Log.
-
Right-click somewhere in the Log page and choose
 Print Preview item from the context menu.
To call it from the Code Editor do the following:
-
Open the Code Editor.
-
(Optional.) Select the text you want to print with the mouse cursor. If text is not selected, then the whole text of the unit will be printed.
-
Choose File | Print Preview from the main menu of TestComplete.

| Note: | The view of the form is different for panels that contain HTML content (for example, Summary and Details). For such panels, the Print Preview form is shown using the built-in component of Internet Explorer installed on your machine. For more information on this Print Preview form, see your Internet Explorer’s help. |
The main view of the preview provided by TestComplete is page-oriented, and you can format your report interactively within it. The Print Preview form only has the Standard toolbar that contains an item that specifies the report viewing mode and calls a dialog where you can configure the page size, layout and other report settings. Some toolbar options are also available on the context (right-click) menu.
The toolbar includes a Close button. Print Preview is modal, so you must close it (not just minimize it) to return to the main TestComplete window.
To print from Print Preview, you can select  Print from of the Standard toolbar, or choose
  Print Dialog, or File | Print, and click OK from the dialog once you are satisfied with your settings.
You can do any of the following from the Print Preview --
-
Change page margins: either drag the margins on screen, or use
 Page Setup to set margins numerically, or use File | Page Setup.
 -
Export test results to a .pdf file: either click the
 Export To PDF button on the form's toolbar or select File | Export To PDF from the form's main menu.
 -
Use the Header/Footer page of the Page Setup dialog to create and configure a report’s header and footer.
-
Select Format | Page Numbering from the form’s menu to change the format of page numbers in your report. See Page Number Format Dialog for more information.
-
Select Format | Date and Time from the form’s menu to change the date and time format of the report. See Date and Time Format Dialog for more information.
-
Use the
 Fit To Page option to adjust the margins onscreen as needed to shrink the report so that it fits on the page.
 -
Select what pages to print, how many copies, and the desired printer for the output: Select
 Print from the Standard toolbar, or File | Print.
 -
Configure the main part of the form by using zoom button step increments, IntelliMouse support, margin-line color and so on: Use File | Options to open the Options dialog.
See Also
Print Preview - Options Dialog
Print Preview - Print Dialog
Print Preview - Zooming
