Test Visualizer data, especially screenshots of the whole desktop, can take a lot of disk space. To save disk space, you can limit the amount of saved data or disable the Visualizer. This will also speed up test recording and playback.
| Note: | Test Visualizer is always disabled if your tests are run from a Connected Application. |
To reduce the amount of Visualizer data
-
Select Tools > Current Project Properties from the TestComplete menu.
-
Select the Visualizer category.
-
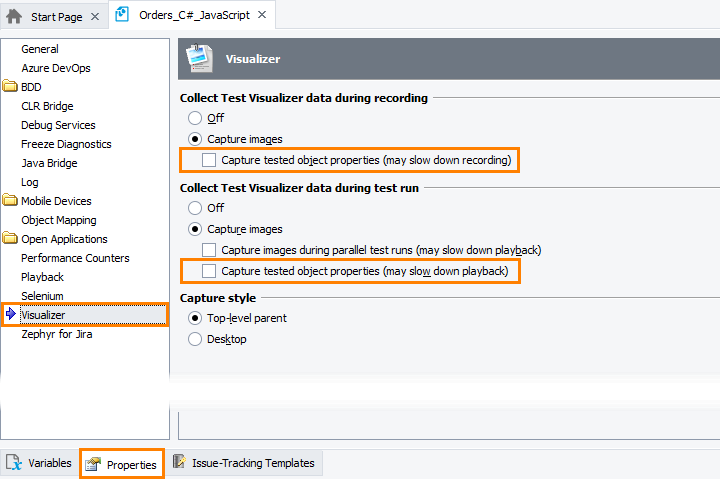
In order not to collect data on tested objects whose images the Test Visualizer captures, disable the Capture tested object properties option in the Collect Test Visualizer data during recording and Collect Test Visualizer data during test runs groups:
To disable Test Visualizer completely and not to capture screenshots, select Off.
-
As an alternative, you can set the Capture style option to Top-level parent.
To disable Test Visualizer
-
Select Tools > Current Project Properties from the TestComplete menu.
-
Select the Visualizer category.
-
Set the Collect Test Visualizer data during recording and Collect Test Visualizer data during test runs options to Off.
| Note: | The existing Visualizer images will remain in your tests, but you will be able to delete them if needed (see below). |
To enable Test Visualizer
-
Select Tools > Current Project Properties from the TestComplete menu.
-
Select the Visualizer category.
-
Set the Collect Test Visualizer data during recording and Collect Test Visualizer data during test runs options to Capture images.
If needed, enable the Capture tested object properties and Capture images during parallel playback options.
 This may reduce the test performance.
To enable or disable Test Visualizer from tests
In tests, you can use the Options.Visualizer.CollectMode property to enable or disable Test Visualizer or to change the amount of saved data.
JavaScript, JScript
Options.Visualizer.CollectMode = vcmOff; // Disable Test Visualizer
Options.Visualizer.CollectMode = vcmImgObj; // Enable Test Visualizer, save both images and object data
Python
Options.Visualizer.CollectMode = vcmOff # Disable Test Visualizer
Options.Visualizer.CollectMode = vcmImgObj # Enable Test Visualizer, save both images and object data
VBScript
Options.Visualizer.CollectMode = vcmOff ' Disable Test Visualizer
Options.Visualizer.CollectMode = vcmImgObj ' Enable Test Visualizer, save both images and object data
DelphiScript
Options.Visualizer.CollectMode := vcmOff; // Disable Test Visualizer
Options.Visualizer.CollectMode := vcmImgObj; // Enable Test Visualizer, save both images and object data
C++Script, C#Script
Options["Visualizer"]["CollectMode"] = vcmOff; // Disable Test Visualizer
Options["Visualizer"]["CollectMode"] = vcmImgObj; // Enable Test Visualizer, save both images and object data
In keyword tests, you can change the property value using the Call Object Method or Run Code Snippet operation.
To add frames to your existing tests
TestComplete adds Visualizer frames to your tests automatically during the test run:
-
Before running your test, select Tools > Current Project Properties from the TestComplete menu.
-
Select the Visualizer category.
-
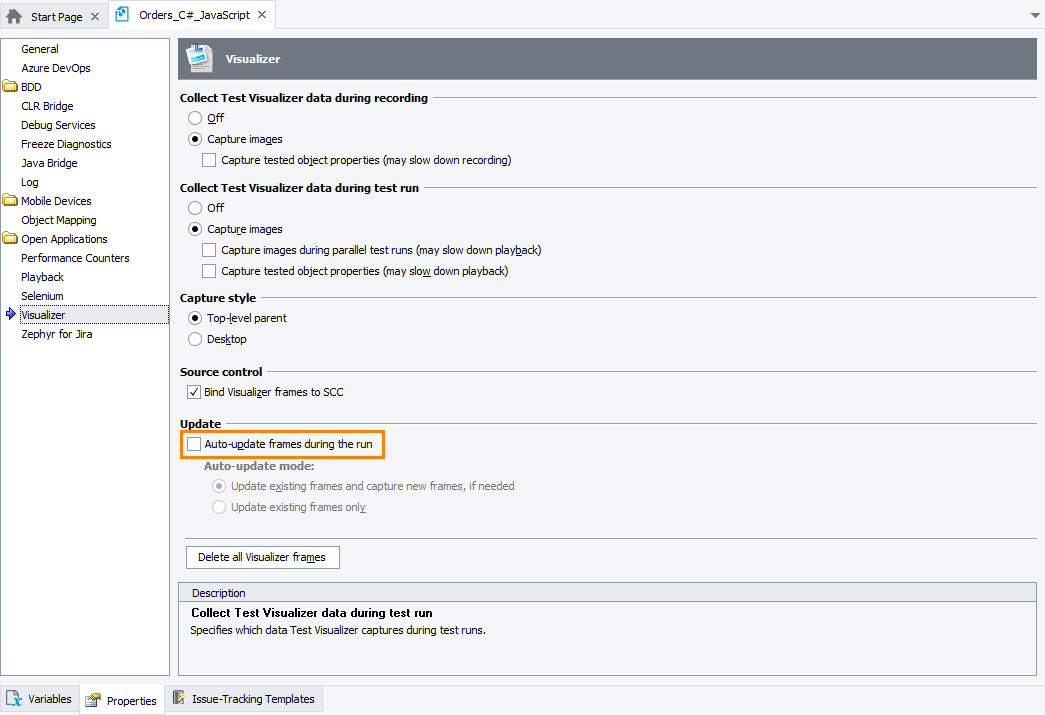
To configure Visualizer to add frames during test runs, select the Auto-update frames during the run check box.
-
Click Update existing frames and capture new frames, if needed to add frames to the existing tests.
-
Run the tests to which you want to add frames.
To delete all Visualizer images from your tests
-
Select Tools > Current Project Properties from the TestComplete menu.
-
Select the Visualizer category.
-
Click Delete all Visualizer frames.
To enable or disable Visualizer frame updates
-
Select Tools > Current Project Properties from the TestComplete menu.
-
Select the Visualizer category.
-
To configure Visualizer to update frames during test runs, select the Auto-update frames during the run check box.
To update the existing frames and capture frames for user actions that have no frames, click Update existing frames and capture new frames, if needed.
To update only the existing frames, click Update existing frames only.
-
To disable frame updating, clear the Auto-update frames during the run check box:
See Also
About Test Visualizer
Project Properties - Visualizer Options


