
A filter is a set of conditions that excludes items from a TestComplete panel that does not meet all conditions. There is only one filter active at a given time, but it can hold any number of conditions acting together. The filter is defined or modified by using the Filter dialog. To call the dialog, right-click within the desired TestComplete panel or window and select  Filter Data from the context menu. If the filter is defined, you can also press the Customize button at the bottom of the panel (or window).
The dialog has a specific view if it was called from the test log. It contains two tabbed pages: Simple Filter and Extended Filter. If the dialog was called from other panels, it does not contain tabbed pages. First, we will describe a general version of the dialog and then explain specifics of the test-log version. At the end, you will find information on creating complex filter conditions.
 General Version of the Filter Dialog
General Version of the Filter Dialog
Below is a sample view of the general version of the dialog:
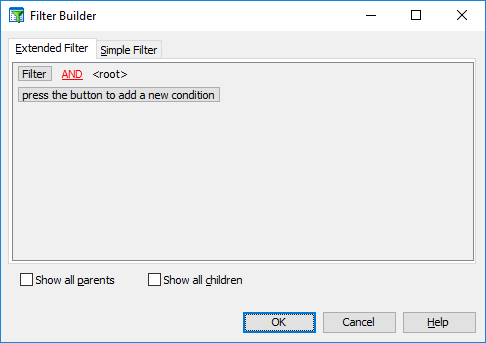
Each line in the dialog is one filter expression, or condition. Existing lines can be edited in place. To add a new line, do any of the following:
-
Press the button at the bottom of the condition list (the button’s caption is press the button to add a new condition). This will create a condition on the same level as the last one.
-
Press Ins. This will create a condition on the same level as the selected one.
-
Click the ellipsis button to the left of an existing condition and in the resulting menu select Add Condition. This will create a condition on the same level as the selected one.
-
Click the Filter button and in the resulting menu select Add Condition. This will create a condition at root level.
You can then edit the new line in place. For each condition line there are several columns. Each column holds a drop-down list from which you select a value, except for the last column, which is an edit box for the value.
In the first column, specify a field to be used in the condition. A field is a column name, and the drop-down list offers you all available columns for the active TestComplete panel (window).
In the second column, specify a comparison operator. The set of available comparison operators depends on the type of the selected field. For instance, for string fields you can use the like and not like operators.
In the last column, type in the threshold against which the comparison will be made. Do not use quote marks for strings, unless the quote mark is part of the actual string.
If you use the like or not like operator, you may use the _ and % wildcards in the filter value to create search patterns. The _ character is used as a pattern for any single symbol; % - as a pattern of a string of any symbol. For a sample of using wildcards, see the image above.
Note that for the comparison operators is blank and is not blank there is no value at all, while for between and not between there are two values that must be specified.
If there are several conditions, they are linked to each other logically. To do this, any of the following operators can be used:
- AND (all the conditions linked with AND must be true)
- OR (at least one of the conditions linked with OR must be true)
- NOT AND (at least one of the conditions linked with AND must be false)
- NOT OR (all the conditions linked with OR must be false)
The logical operator that links conditions of the root level is specified at the top of the Filter dialog.
Test-Log Version of the Filter Dialog
If the dialog was called from a test log, it contains two pages: Simple Filter and Extended Filter:
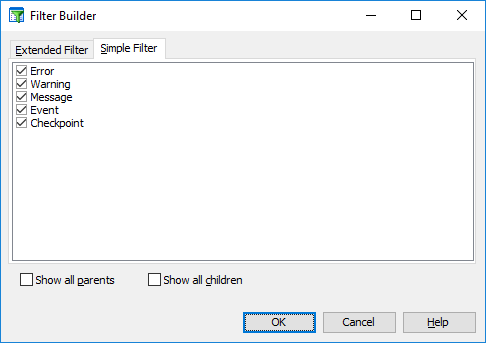
On the Simple page, there are filter conditions that are provided by the test log. These conditions filter the test log and let you only view specific types of messages. To set a filter, select the appropriate check boxes in the dialog. Selecting these check boxes is similar to selecting check boxes that reside at the top of test log pages.
Note that in the test log, messages can be organized in a tree-like structure. If the child message’s type meets the filter condition and the parent message’s type does not meet it, the log will hide the parent message (the child message will be displayed at a higher level).
To view parent messages regardless of the filter condition, select the Show all parents check box. If it is selected, TestComplete will always display parent messages for those child messages that match the filter condition.
The Show all children check box provides a similar effect to child messages. If this check box is selected, the log will always display all child messages for those messages that match the filter condition.
On the Extended Filter page, you can create custom filter conditions. You can work with this page the same way you would work with the general version of the dialog.
 |
Unlike the general version, the test-log version of the dialog does not support saving filter conditions to or loading them from a file.
If you need to see all the messages that were posted within one day (for example, today), specify the following condition: Time is today or Time BETWEEN today_date AND tomorrow_date. Otherwise, if you specify the Time equals today_date condition, the test log will contain only those messages that were posted at midnight (today at 0 hours 0 minutes 0 seconds). |
To apply the filter and changes you have made in the dialog, press OK. To close the dialog without saving any changes, press Cancel.
Creating Complex Filter Conditions
Using the Filter dialog, you can create filters that include complex conditions (in the test-log version of the dialog, you can do this on the Extended Filter page). This can be achieved by using condition groups. Like conditions of the root level, a condition group unifies several conditions linked to each other with the same logical operator, but the entire group is linked to other conditions or groups with a different operator. This may be necessary to build expressions like the following:
((Type Description = Error) AND (Priority > 2)) OR ((Type Description = Warning) AND (Priority <> 2))
To create a condition group
-
To create a group for conditions of the root level, click the Filter button and in the resulting menu select Add Group.
-- or --
-
To create a group linked to the selected condition or group, click the ellipsis button to the left of this condition (group) and select Add Group from the menu.
Conditions of a group occupy the filter level below the level of the condition or another group this group is linked to. The logical operator that links conditions in a group is specified at the group row (its caption ends with applies to the following conditions). At that, the logical operator that links the entire group to other conditions or groups is specified by the operator at the previous level.
To delete the selected condition or group, click the ellipsis button to the left of it and in the subsequent menu select Remove Row. Note that if you delete a row that has other rows linked to it, all of the rows below the selected one will be deleted as well. To remove all of the conditions and group rows from the current filter, click the Filter button and select Clear All from the menu.