During the test run you often need to pause the test execution until a needed process is launched or until a needed window or control becomes available.
By default, TestComplete waits for objects, windows or processes for a period of time specified by the Auto-wait timeout project’s option. If the object, window or process with which the operation interacts has not been found before the specified timeout period elapses, the operation fails.
You can modify the default value of the project’s Auto-wait timeout property or you can set a custom timeout for individual operations in your test.
| Note: | To wait for the desired objects, windows and processes, you can also call the WaitNNN method from your keyword tests. For information on how to do this, see Waiting for an Object, Process or Window Activation. |
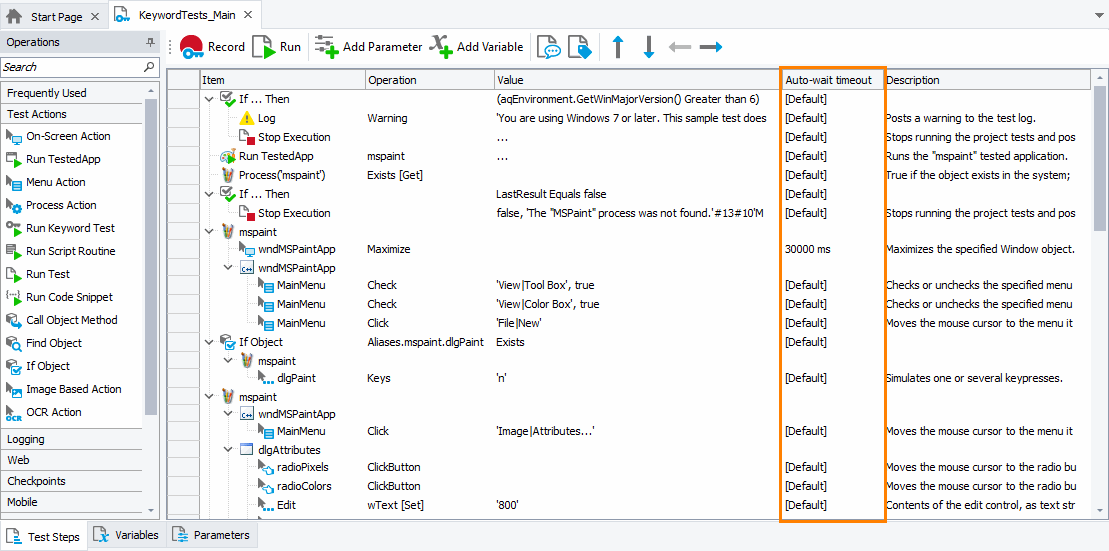
A timeout for keyword test operations is specified in the Auto-wait timeout column on the Test Steps page of the Keyword Test editor. The column holds the number of milliseconds the operation waits for the underlying object or process to become available.
| Note: | The timeout value is only meaningful for operations that simulate user actions against processes, windows and controls. |

If the timeout period specified in the column is set to [Default], the operation uses the default timeout specified by the project’s Auto-wait timeout property. If the timeout specified in the column is set to 0, the operation does not wait for the underlying process or object and executes the specified action immediately.
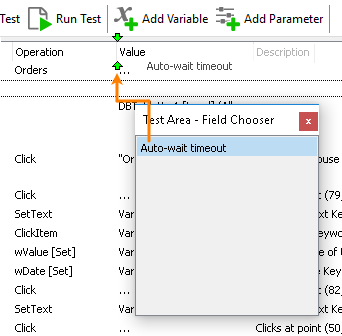
By default, the column is hidden in the Keyword Test editor. To make it visible, do the following:
-
Right-click anywhere within the Test Steps page of the editor.
-
Select Field Chooser from the context menu.
-
Drag the Auto-wait timeout column to the column header area.

You can specify a custom timeout for operations by editing the value in the column or by using the Set Auto-Wait Timeout dialog.
Specifying an Operation Timeout in the Auto-Wait Timeout Column
-
Make the Auto-wait timeout column visible in the Keyword Test editor.
-
Select the Auto-wait timeout column of the desired operation and then click it or press F2. This will activate the in-place editor.
-
In the ensuing in-place editor, specify the number of milliseconds the operation should wait for the underlying process or object. You can also use the up and down buttons to increase or decrease the number of milliseconds.
To restore the default timeout value, set -1 in the Auto-wait timeout column.
Specifying an Operation Timeout in the Dialog
-
Select the operation whose timeout you want to change (you can use SHIFT-click and CTRL-click for multi-selection).
-
Right-click the selected operation (or operations) and choose
 Set Auto-Wait Timeout for Operations from the context menu.
 -
In the ensuing Set Auto-Wait Timeout dialog clear the Use project default Auto-wait timeout check box.
-
In the Auto-wait timeout edit box specify the desired number of milliseconds the selected operations should wait for the underlying processes or objects. You can also use the up and down buttons to increase or decrease the number of milliseconds.
To restore the default timeout, enable the Use project default Auto-wait timeout check box in the dialog.
Press OK to close the dialog and apply the changes.
| Note: | If you use a WaitNNN method in your keyword test to wait for a needed object, the operation that calls the method uses the timeout specified by the WaitNNN method’s Timeout parameter. The value specified for the operation in the Auto-wait timeout column is ignored. |
See Also
Creating Keyword Tests - Common Tasks
Waiting for an Object, Process or Window Activation
Test Steps Page - Test Area
Project Properties - Playback Options
Waiting for Objects in Android Open Applications (Legacy)
Waiting for Objects in Image-Based Tests

 Specifying an Operation Timeout in the Auto-Wait Timeout Column