 The information in this topic applies to web tests that locate web objects by using internal identification properties provided by TestComplete and run in local environments.
This topic provides information on how you can configure your TestComplete project to enable the UI Automation engine for recognizing objects of the tested out-of-browser Silverlight applications and for exposing them for testing:
Configuring a Test Project
In order for TestComplete to recognize objects in out-of-browser Silverlight applications, you need to configure the TestComplete UI Automation engine so that it provides access to Silverlight objects:
-
Double-click the project node in the Project Explorer and switch to the Properties tabbed page of the ensuing Project editor.
-
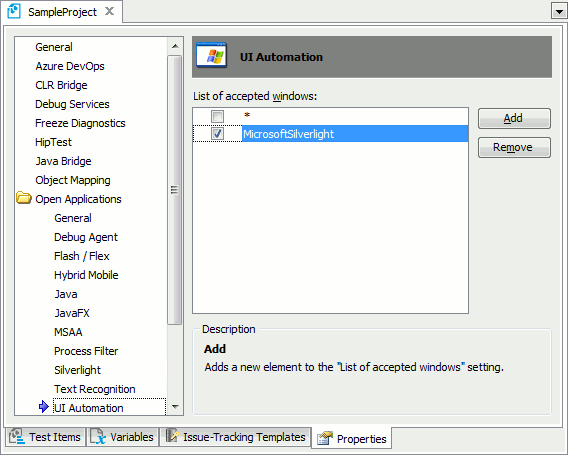
Select the Open Applications | UI Automation option category on the left of the page.
This category contains a list of window classes whose internal elements TestComplete accesses via UI Automation interfaces.
-
Add the
MicrosoftSilverlightclass name to the list.The following image shows UI Automation options configured for testing out-of-browser Silverlight applications:

-
Select File | Save All from the TestComplete main menu or press Ctrl+S to save the changes.
| Tip: | You can also modify the Default Project Properties in the described way. In this case, each new TestComplete project you create will have these properties set by default. |
Adding Silverlight Applications to the Tested Applications Collection
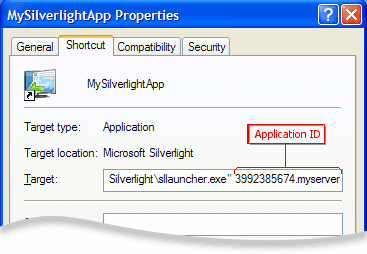
To add an out-of-browser Silverlight application to the Tested Applications collection, you need to know the application's ID. To learn this ID, examine the properties of the Start menu or the desktop shortcut used to launch the application:
-
Right-click the shortcut and select Properties from the context menu. This will display the Properties dialog.
-
Switch to the Shortcut tabbed page.
-
Examine the Target value. The application ID is specified at the end of the value:

-
Make note of the application ID (for example, copy it to the clipboard).
Follow these steps to add the out-of-browser Silverlight application to the Tested Applications:
-
Open the TestedApps editor. To do this, double-click the TestedApps item in the Project Explorer.
-
Right-click somewhere within the TestedApps editor and select
 Add Application from the context menu. This will open the Add Tested Application wizard.
 -
In the wizard, click Generic Windows application.
-
On the next page of the wizard, in the Application box, specify the path to Microsoft Silverlight Out-of-Browser Launcher (sllauncher.exe). By default, it is located in the <Program Files>\Microsoft Silverlight folder.
-
In the Command-line parameters box, specify the Silverlight application ID that you learned earlier.
-
Click OK.
See Also
Testing Out-of-Browser Silverlight Applications - Overview
Testing Out-of-Browser Silverlight Applications - Requirements

 Configuring a Test Project