Prepare the TestComplete project suite
-
Create tests in your TestComplete project.
-
Create and organize test items that will run those tests:
-
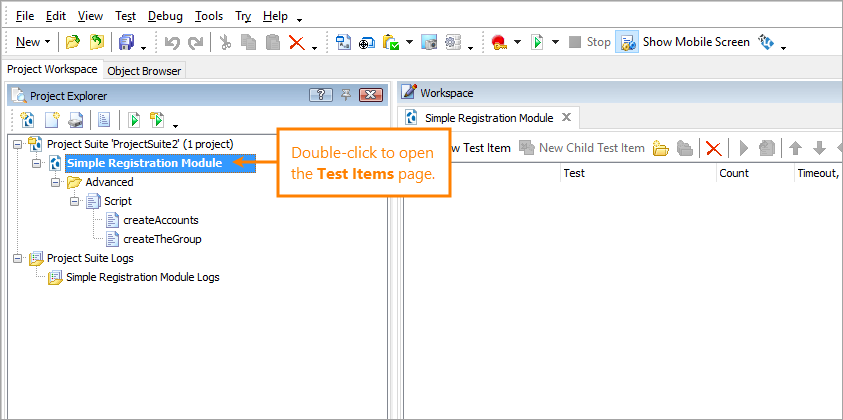
Double-click the project in the Project Explorer to open the Test Items page:
-
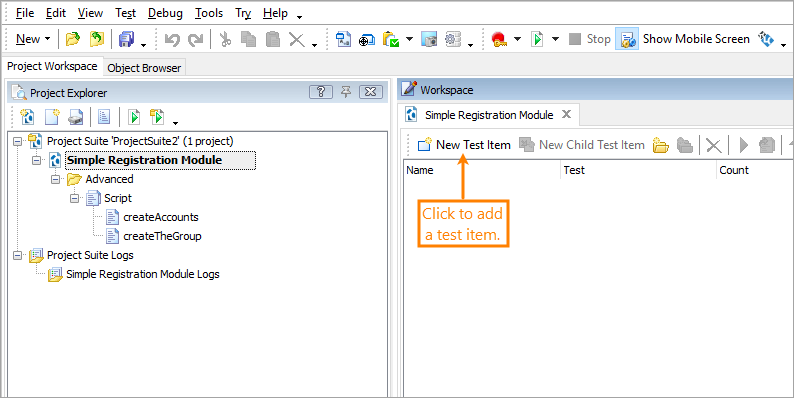
Click New Test Item to add a test item.
-
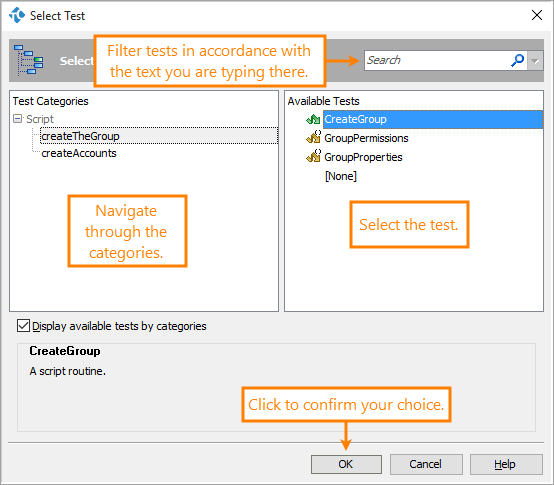
In the Test column, click the ellipsis button. TestComplete will open the Select Test dialog:
-
Select the needed test in the dialog. Use the Test Categories and Available Tests fields or search for the test with the Search field. Click OK to submit your selection.
-
Add more test items and child test items if needed and arrange them as you like.
-
Save the changes.
-
-
Make sure that your projects do not reference files outside the project suite folder. Otherwise, QAComplete will not be able to run such projects.
-
(Optional, only for assigning TestComplete tests to QAComplete tests manually) Zip up your TestComplete project suite. Include all files and folders that belong to the project suite.
Make note of where the project suite or the archive (ZIP) file resides. You can place the project suite or the archive on a local folder on the test host where it will run or in a shared network folder. Make sure that the project suite can access all need test files.
Alternatively, you can upload the archive to the server (see below).
Assign TestComplete projects
You can assign TestComplete tests to your QAComplete tests on the Automation tab of the Edit Test form or, if you use TestComplete version 12, you can add your TestComplete tests to QAComplete directly from TestComplete IDE:
Add TestComplete tests manually
1. Prepare your test library test
-
In the Test Library, open an existing test for the TestComplete project suite or add a new test.
-
Select a default test host. If you skip this step, after you assign an automated test and click Save, the system will remind you that the test host is missing.
-
Save the changes.
2. Assign the TestComplete test
-
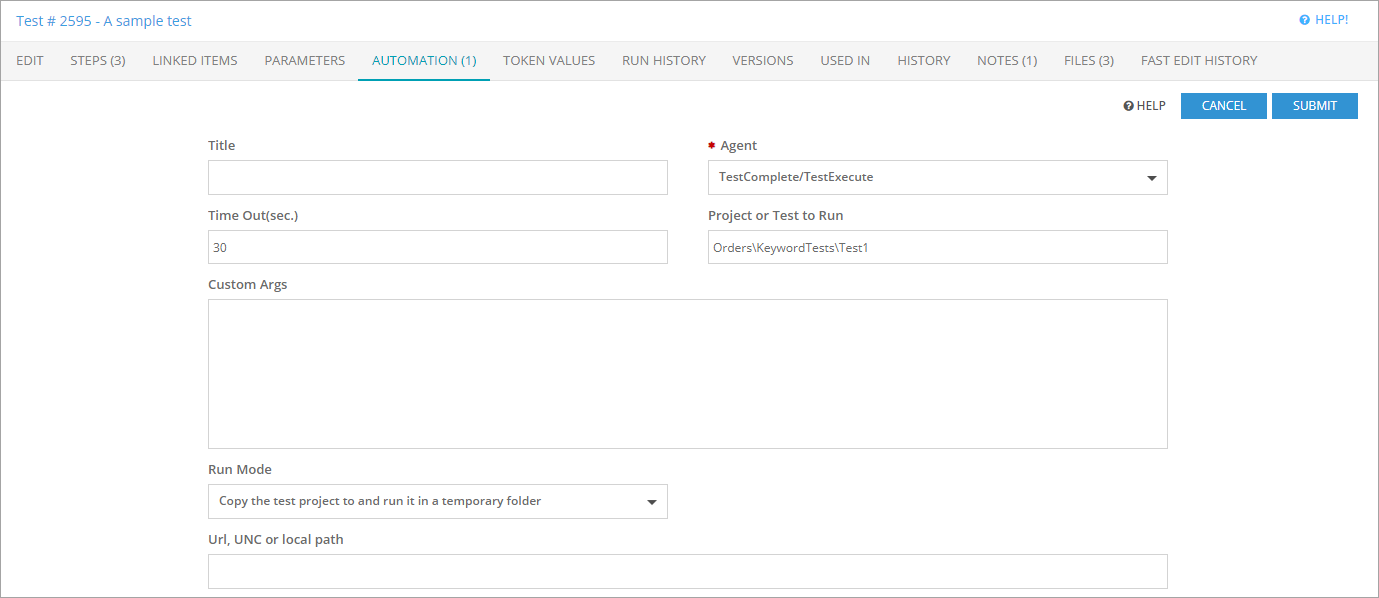
On the Automations tab of the Edit Test form, click Add New to add an automated test.
-
In the Agent drop-down list, select TestComplete/TestExecute.
-
You can leave the Title field blank, and the system will use the name of the specified TestComplete file, or you can enter a meaningful title.
-
Enter a timeout value in seconds. If the test takes longer than the given timeout, the test runner will stop running.
The Test Runner passes the timeout value to TestComplete/TestExecute as a run parameter. The minimum value is 30 seconds: if you specify a lower value, it still uses 30 seconds. If the test takes longer than the specified timeout, it will log an error and end. For more information about how TestComplete uses the timeout, please see TestComplete Command Line.
-
In Url, UNC or local path, enter the path to your TestComplete project suite or to the archive (ZIP) that contains the project suite.
The path format depends on the project suite location. Below are examples of possible values:
Value Description C:\MyTests\MyProjectSuite.pjs
-- or --
file:///C:\MyTests\MyProjectSuite.pjsA project suite (.pjs) located in the local folder on the test host. C:\MyTests\
-- or --
file:///C:\MyTests\A local folder on the test host where a project suite is located. Note: If there is more than one project suite in the folder, an error will occur. C:\MyTests\MyProjectSuite.zip
-- or --
file:///C:\MyTests\MyProjectSuite.zipAn archive (ZIP) file that contains the project suite and is located in a local folder on the test host. \\Tests-PC\SharedFolder\MyProjectSuite.pjs
-- or --
file:///Tests-PC\SharedFolder\MyProjectSuite.pjsA project suite (.pjs) located in a shared folder on a computer in your network. \\Tests-PC\SharedFolder\
-- or --
file:///Tests-PC\SharedFolder\A shared network folder where the project suite is located. Note: If there is more than one project suite in the folder, an error will occur. \\Tests-PC\SharedFolder\MyProjectSuite.zip
-- or --
file:///Tests-PC\SharedFolder\MyProjectSuite.zipAn archive (ZIP) file that contains the project suite and is located in a shared network folder.
http://downloads/mytests.com/MyProjectSuite.zip A website URL path to the archive (ZIP) file that contains the project suite. Note: If the path you entered is incorrectly formatted, QAComplete will highlight the path in red. Or, simply use File Attachments to upload the archive (ZIP) file that contains the project suite. Click Browse and navigate to the zipped file.
-
The Run Mode drop-down list specifies how the Test Agent will get your TestComplete test files and run the test.
-
To copy test files to the test host and run the test in a temporary folder there, choose Copy the test project to and run it in a temporary folder in Run Mode.
If Url, UNC or local path specifies the UNC path to a project suite file (.pjs), all the contents of the folder where the project suite file is located will be copied to the test host.
-
To run the test directly in the folder where the test files are located, choose Run the test project in place (if possible) in Run Mode. If the test files are located in a shared network folder or in a local folder on the test host, the Test Agent will run the test directly in that folder.
-
-
The Project or Test to Run field is used if you want to run a part of your TestComplete project suite:
-
To run the entire project suite, leave the Project or Test to Run field blank.
-
To run a specific project within the project suite, enter the project name.
-
To run a specific keyword test, script or project item, enter the path to the item.
Below are examples of possible field values:
Value Description (no value)All test items in all projects in the project suite. TestProject1All test items in the TestProject1 project. TestProject1\KeywordTests\Test1The Test1 keyword test in the TestProject1 project. TestProject1\Script\Unit1\Test1The Test1 script routine in the Unit1 script unit of the TestProject1 project. -
-
In the Custom Args field, you can enter custom command-line parameters to pass to TestComplete (TestExecute).
-
Click Submit.
Export TestComplete tests from the TestComplete IDE
Requirements
-
You must have TestComplete 12 installed.
-
The QAComplete Integration plugin must be enabled in TestComplete.
Tip: The plugin is installed and enabled automatically when you install TestComplete.
Upload a test from TestComplete
-
On your computer, start TestComplete and open a project suite that contains tests you want to add to QAComplete.
-
In Project Explorer in TestComplete, right-click the project suite, project, or test that you want to export and then click Export to QAComplete.
TestComplete will open the Export TestComplete Test to QAComplete wizard. Follow the wizard instructions to add your tests to QAComplete.
-
If you are exporting a script unit that contains several routines, select a routine to be exported.
-
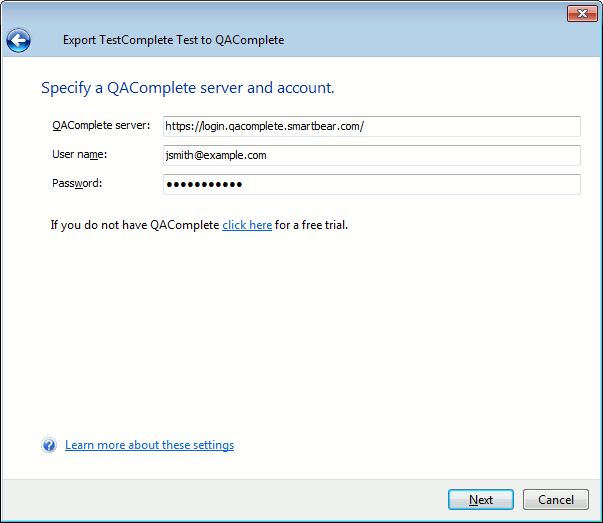
Enter the address of your QAComplete server.
- For SaaS clients, the address is https://login.qacomplete.smartbear.com/.
- For On-Premises clients, the address is https://[your server name]/, where [your server name] is your QAComplete server.
-
Enter the email address and the password that will be used to log in to the QAComplete account.
-
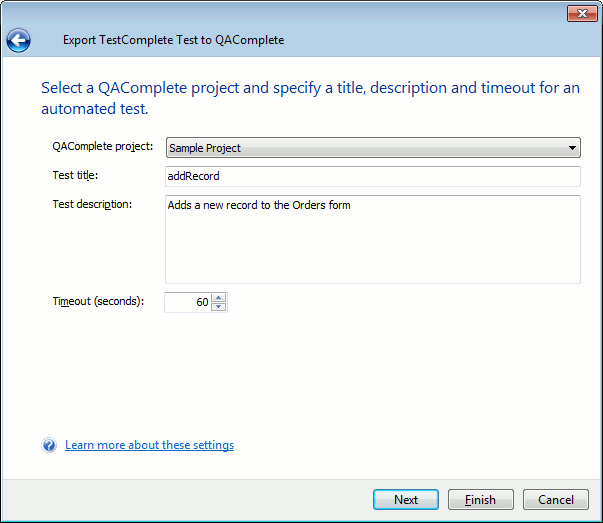
Select a QAComplete project to which you want to add tests.
-
Enter the title and description for the test. If needed, select a folder in your Test Library, to which you want to add a test.
-
Specify the timeout for the test.
-
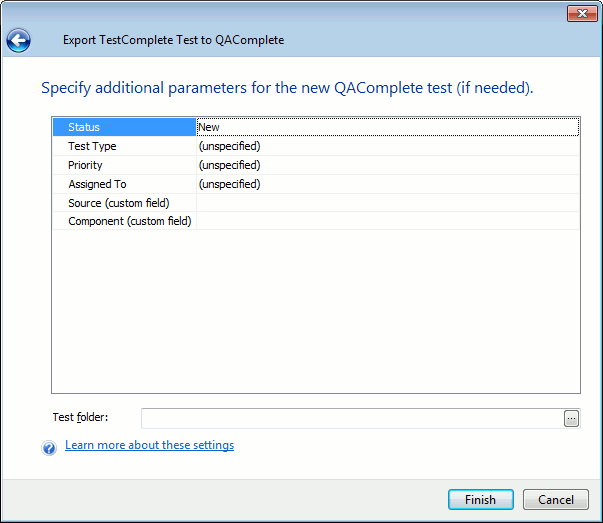
Specify additional parameters for the QAComplete test, to which the TestComplete project will be assigned:
-
The wizard will create a new test in QAComplete. Specify test parameters, if needed.
You can also find information on exporting TestComplete tests to QAComplete in the TestComplete Documentation.
The TestComplete test will be added to the Test Library of your QAComplete project, to the folder you have selected during the exporting.
To view and configure the added test in QAComplete, open the Edit form for the test you have added and switch to the Automations tab.

