1. Configure the Test Agent
| Note: | This step is optional and can be skipped if you have already configured the Test Agent during the installation. |
On the test host that will run the test:
-
Launch the Test Agent Settings tool in Start > All Programs > SmartBear > TestAgent > Test Agent Settings.
-
Click Advanced Settings.
-
If needed, specify the path to the test runner tool (testrunner.bat) that will run the API tests.
The tool is installed with ReadyAPI or SoapUI OS and is located in the folder where ReadyAPI or SoapUI OS is installed.
2. Prepare your API test
-
If needed, zip up your API test project.
-
Make note of where the project or the zipped project is located.
You can place the project or zipped project in a local folder on the test host machine that will run the project or in a shared network folder. Alternatively, you can upload the project or an archive to the server (see below).
3. Prepare your Test Library test
-
In the Test Library, open an existing test for the ReadyAPI or SoapUI OS test or add a new test.
-
Select a default test host. If you skip this step, after you assign an automated test and click Save, the system will remind you that the test host is missing.
-
Save the changes.
4. Assign the API test
-
On the Automations tab, click Add New to add an automated test.
-
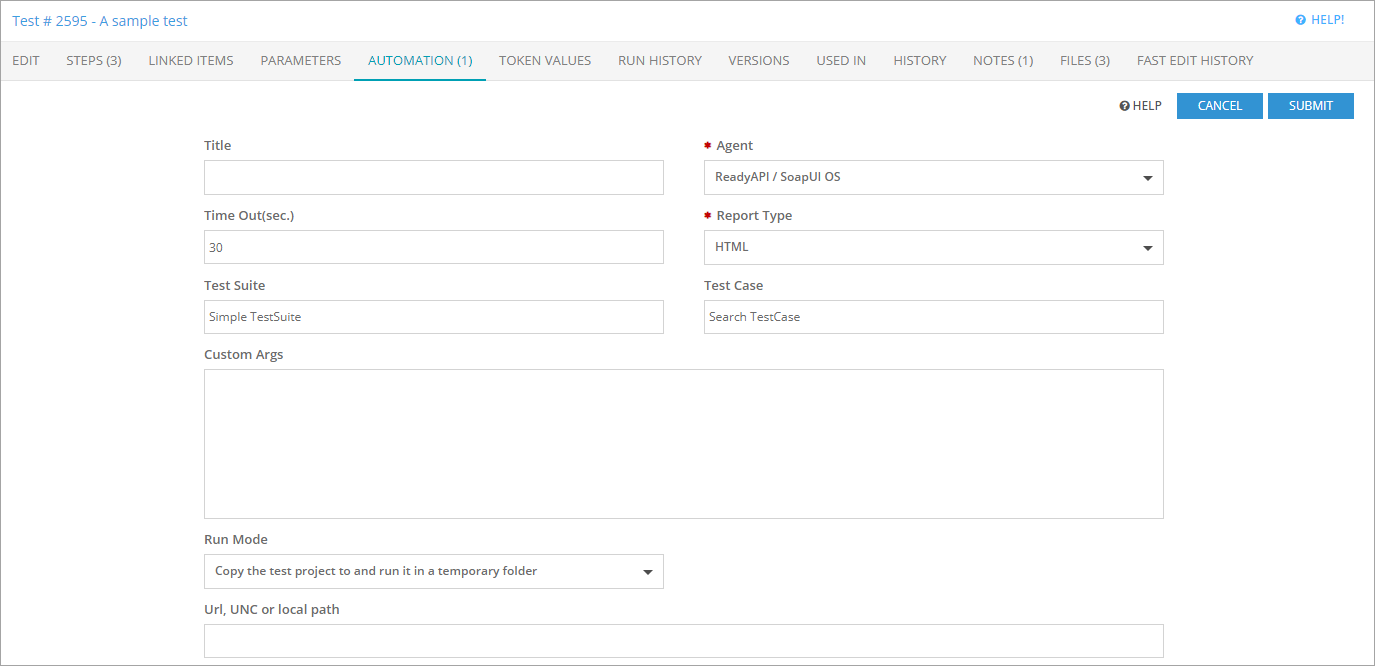
In the Agent drop-down list, select ReadyAPI / SoapUI OS.
Note: If the default host assigned to the test does not support the selected automated testing tool, the test will not run. -
You can leave the Title field blank, and the system will use the name of the attached test, or you can enter a meaningful title.
-
Enter a timeout value in seconds. If the test takes longer than the given timeout, the test runner will stop running.
-
To run a specific test suite in your project, enter its name in Test Suite. For example,
Simple TestSuite. -
To run a specific test case in your project, enter its name in Test Case. For example,
Search TestCase. -
In Report Type, choose the format for exporting the test result report. If you use SoapUI OS to run API tests, choose No Report.
-
In Custom Args, enter additional command-line arguments to pass to the test runner tool that will run your test. You can find information on command-line arguments in the ReadyAPI or SoapUI OS documentation.
-
In Url, UNC or local path, enter the path to your ReadyAPI or SoapUI OS project (.xml) or to the archive (.zip) that contains your project.
Below are examples of possible paths:
Value Description C:\MyTests\MySOAPProject.xml
-- or --
file:///C:\MyTests\MySOAPProject.xmlA project (.xml) located in the local folder on the test host. C:\MyTests\
-- or --
file:///C:\MyTests\A local folder on the test host where the project to run is located. Note: If there is more than one project in the specified folder, an error will occur. C:\My Tests\MySOAPProject.zip
-- or --
file:///C:\My Tests\MySOAPProject.zipThe archive (ZIP) file that contains the project and is located in a local folder on the test host. \\Tests-PC\SharedFolder\MySOAPProject.xml
-- or --
file:///Tests-PC\SharedFolder\MySOAPProject.xmlA project (.xml) located in a shared folder on a computer in your network. \\Tests-PC\SharedFolder\
-- or --
file:///Tests-PC\SharedFolder\A shared network folder where the project is located. Note: If there is more than one project in the folder, an error will occur. \\Tests-PC\SharedFolder\MySOAPProject.zip
-- or --
file:///Tests-PC\SharedFolder\MySOAPProject.zipThe archive (ZIP) file that contains the project and is located in a shared network folder. http://downloads/mytests.com/MySOAPProject.zip A website URL path to the archive (ZIP) file that contains the project. Note: If the path you enter is incorrectly formatted, QAComplete will highlight the path in red. Or, simply upload your project or zipped file using File Attachments. Click Browse and navigate to the desired file.
-
The Run Mode drop-down list specifies how the test agent will get your test files and run the test.
-
To copy test files to the test host and run the test in a temporary folder there, choose Copy the test project to and run it in a temporary folder in Run Mode.
-
To run the test directly in the folder where the test files are located, choose Run the test project in place (if possible) in Run Mode. If the test files are located in a shared network folder or in a local folder on the test host, the test agent will run the test directly in that folder.
-
-
Click Submit.

