This page relates to the new version of the tunnel that has been introduced to CrossBrowserTesting. If you use the legacy tunnel version, see CBT Tunnel (Legacy).
Why named tunnels?
By default, the test engine doesn’t assign any names to the tunnels you create. When you set up a new tunnel, it closes the existing “no-name” one. This default approach works fine in many cases and helps the CrossBrowserTesting cloud keep the reasonable number of open connections.
As you create more and more tests, you may want to run some of them concurrently. And to do this, you will need multiple concurrent tunnels. To create these tunnels, you need to assign names to them. The name will help the test engine differentiate tunnels, so it will not close an existing tunnel when you start another one with a new name.
Create a named tunnel
To create a named tunnel, you use the SecureTunnel command-line utility. Use the command-line parameters to get the connection of the needed type and add the --tunnelname argument to specify the name for the created tunnel:
SBSecureTunnel.exe --username "[email protected]" --authkey aaabbbXXXXXNNNNccc --acceptAllCerts --tunnelname "my tunnel"
If the tunnel name includes spaces, colons, or other symbols that cannot be used in the command line, enclose that name in quotes.
Run tests
Named tunnels are supported in live (or manual) tests and Selenium automated tests.
Live tests
To specify a named tunnel for a live test:
-
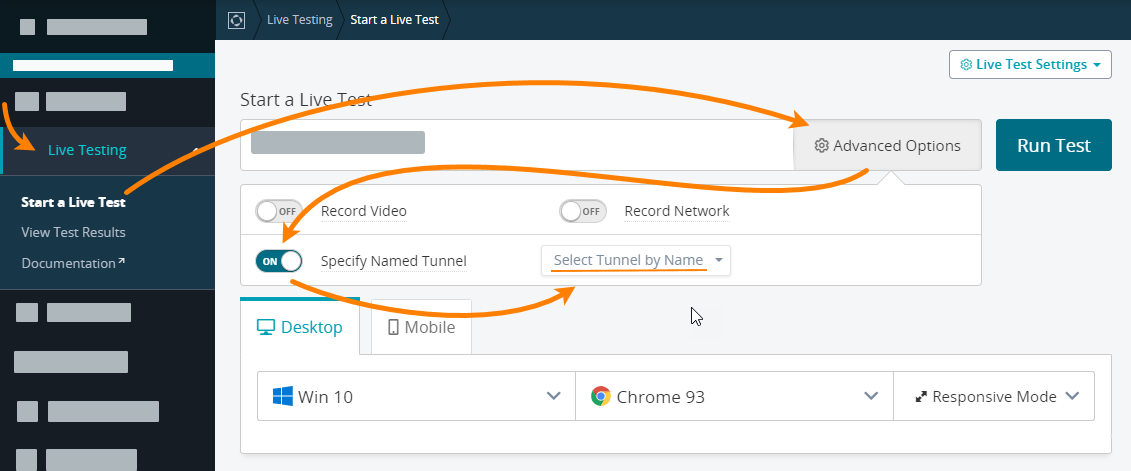
On the Live Test screen, click Advanced options.
-
Turn on the Specify Named Tunnel switcher and select the named tunnel to be used for the test:
Then do a live test as you normally would. See Live (or Manual) Testing.
Automated tests
Using tunnels is available in Selenium automated tests:
-
Start the tunnel on your computer from the command line as it is described above.
We’d suggest adding the --kill parameter to the command line. It will command the tunnel to monitor the creation of the specified file on your hard drive. The tunnel will shut down once the file is created:
SBSecureTunnel.exe --username "[email protected]" --authkey aaabbbXXXXXNNNNccc --acceptAllCerts --tunnelname "my tunnel" --kill "c:/results/ready.dat"
-
To specify a tunnel, use the
tunnel_namecapability in your Selenium script:Python
...
caps = {}
caps['tunnel_name'] = 'my tunnel'
...Java
...
DesiredCapabilities caps = new DesiredCapabilities();
caps.setCapability("tunnel_name", "my tunnel");
...C#
...
var caps = new OpenQA.Selenium.RemoteSessionSettings();
caps.AddMetadataSetting("tunnel_name", "my tunnel");
...Ruby
...
caps = Selenium::WebDriver::Remote::Capabilities.new
caps["tunnel_name"] = "my tunnel"
...JavaScript
var caps = {
...
"tunnel_name": "my tunnel",
...
}
Close named tunnels
The named tunnel is live until the command-line utility that started it is running.
To close a named tunnel automatically, you can add the --kill parameter to the command line (see above).
See Also
Local Testing — Secure Tunnels
SecureTunnel Command Line
Using Tunnels in Automated Tests

