Why use databanks in tests?
By default, script's replays use the same hard-coded data recorded for each step during the initial recording or editing.
To get larger coverage and to check how your web application works with different input values, you need to associate a databank (a file containing the data you want to input) with a script. You can associate up to 4 databank files per script. You can specify replays and suite runs to use a specific row or to randomly choose a row upon playback. Such tests are called data-driven tests.
Databank formats
- The databank must be a
.csvor.txtfile, with either commas or tabs as a value delimiter. The first line may contain column headers (recommended). If a value contains a comma, you need to add quotes. If a value contains a quote, you need to duplicate it.  For a script to use a databank, the latter should not contain cells with empty values.
-
If you have column headers in the first row of the databank, then the number of values in each of subsequent rows should not exceed the number of headers.
For example:

Associate a databank with a script
-
Prepare the databank
Create a
.csvor.txtfile with the desired data, using either commas or tabs as value delimiters. Use any text editor to create the file. Many spreadsheet applications such as Microsoft Excel, Numbers, and LibreOffice Calc also export data to CSV.Tip: We recommend that the first line contains descriptive column headers. In this case, the test will display the column names rather than indexes (1, 2, …). -
Record or Edit an existing script
If you already have an existing script you want to add a databank to, it must be a v2 script.
- Select the script from your list of saved recorded scripts.
- Select Edit Steps to get into the recording UI.
If you do not have a script yet,
- Record a new script.
- Stop the recording once the steps you want are satisfied.
- Select File > Save and follow the screen to name and save your script.
-
Import a databank
-
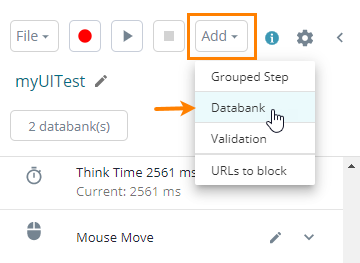
In the script recorder, select Add > Databank on the toolbar:
-
Click Browse and select one or multiple
.csvor.txtfiles from your device you want to use as databanks. To remove the file you added accidentally, click next to the file in the list.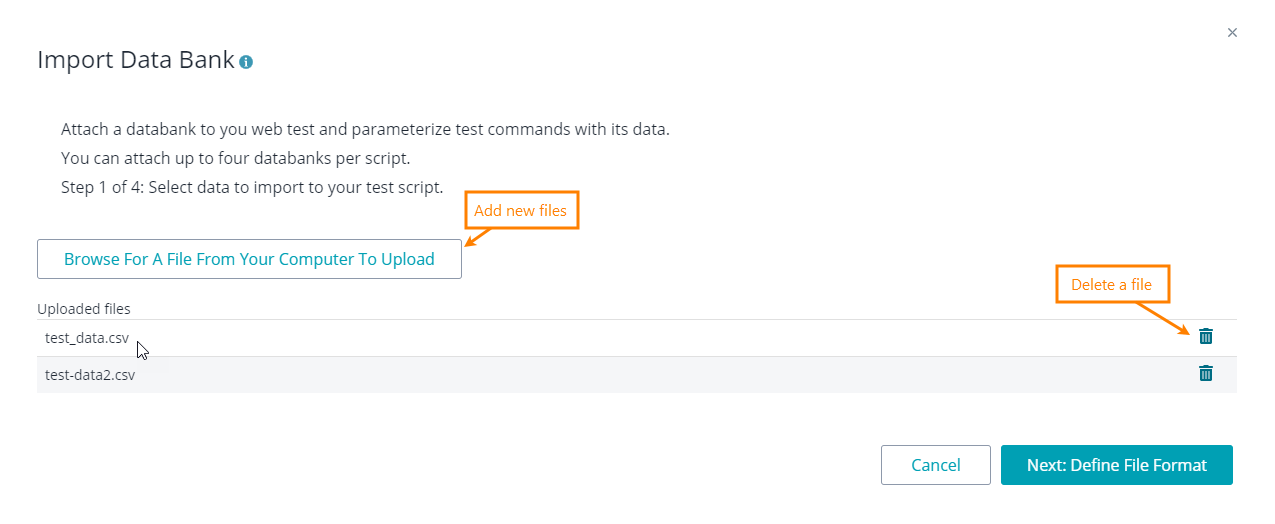
Select Next: Define File Format to proceed.
-
In First row contains, specify whether the first row of each file you have attached should be treated as a header or a data row. In the Column delimiter column, select the symbol that separates columns within your databank.
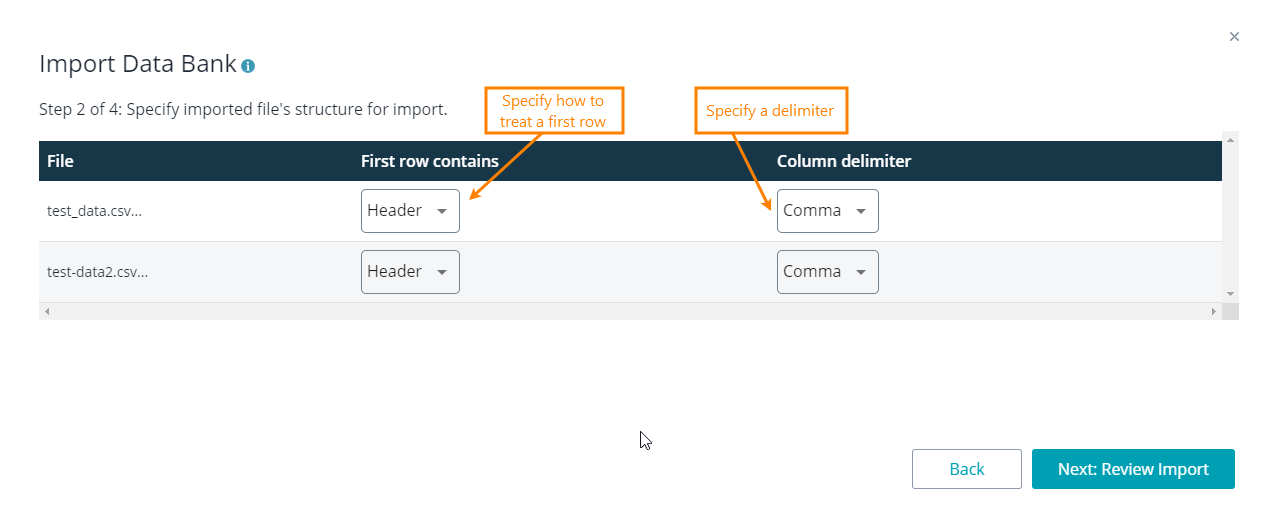
Select Next: Review Import. The app will try reading data from your files.
-
The app will display a preview of the data. If the data does not look right, click Back and change the parsing settings.
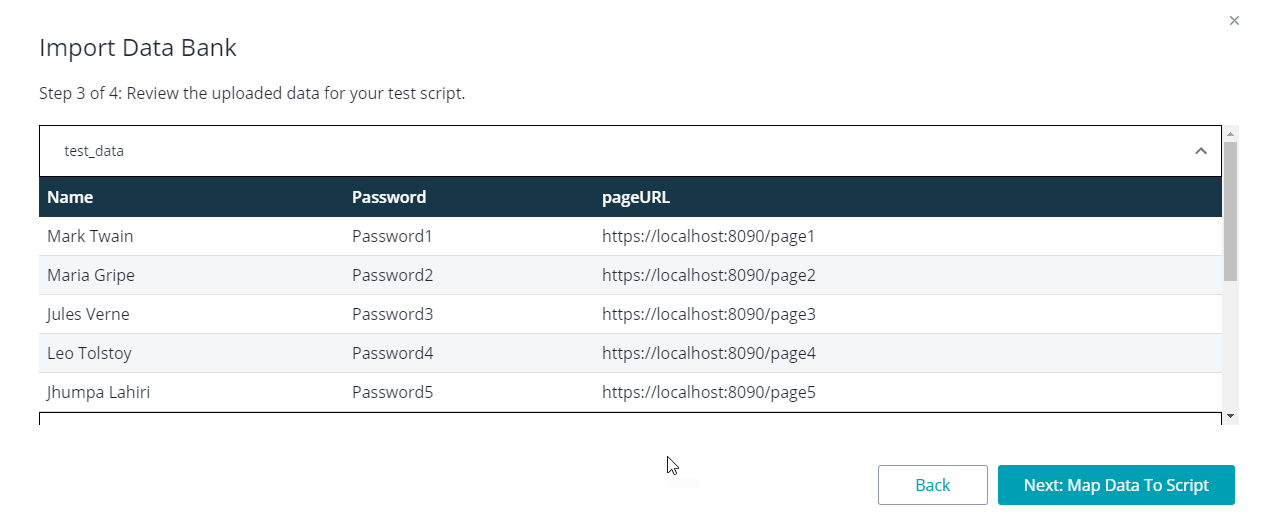
If the app loaded the data correctly, go to the next page by selecting Next: Map Data to Script.
-
On the next page, map column values to test commands in your script. The app will locate parameters within the test and list them. To command the system to use a databank for replacing parameter values, do the following for each input event:
- In the Map file column, select a file to use as the databank in the Map file column for a parameter.
- In the Map column column, select the databank column to take values from during the playback.
In both these cases, select No Mapping to skip this setting and use the hard-coded recorded value during the playback.
Tip: To change these mappings later, click # databank(s) in the script recorder. The app will show a preview of the item in the first data source’s row in the rightmost column:
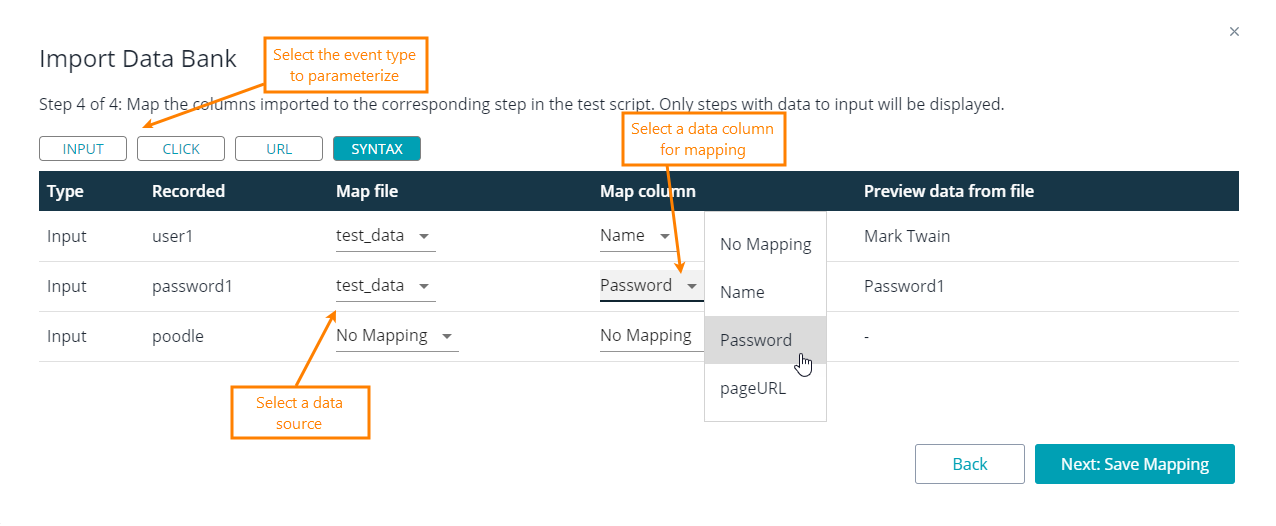
Note: Only URLs, Input fields, and Select fields are supported at this time. Select Next: Save Mapping.
- Save your script! Select File > Save and follow the prompts for creating a new script or updating the existing script.
-
| Note: | You can add up to 4 Databank files per script! |
Editing your Databank Settings
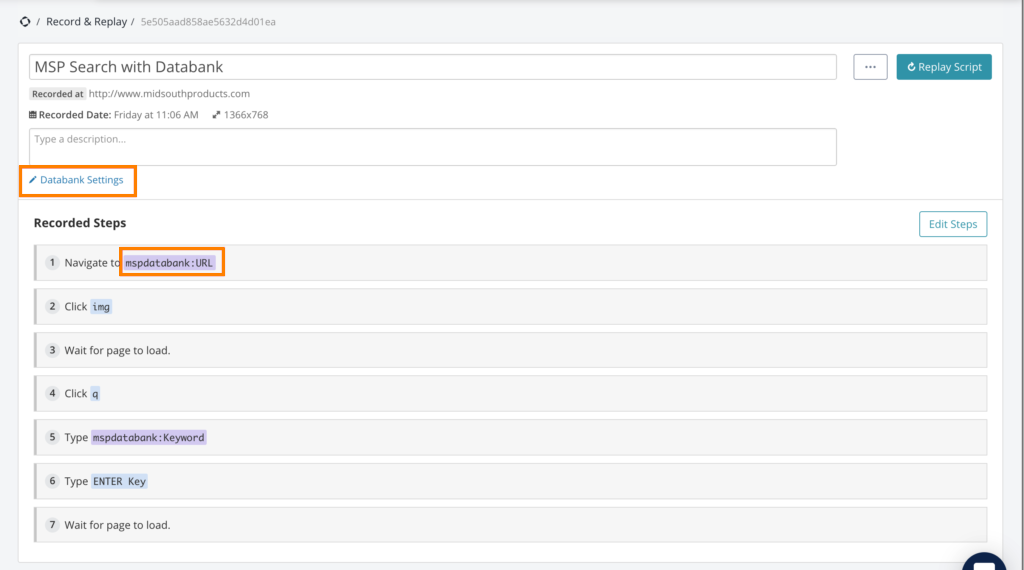
Once you’ve saved your script with attached databanks, the Script View will show a link to the Databank Settings and mapped fields:
By default, each time you replay your script, the system will select a row from the databank file randomly. You can edit the settings to choose a specific row instead.
- Select the Databank Settings link from the screenshot above and a dialog will open up.
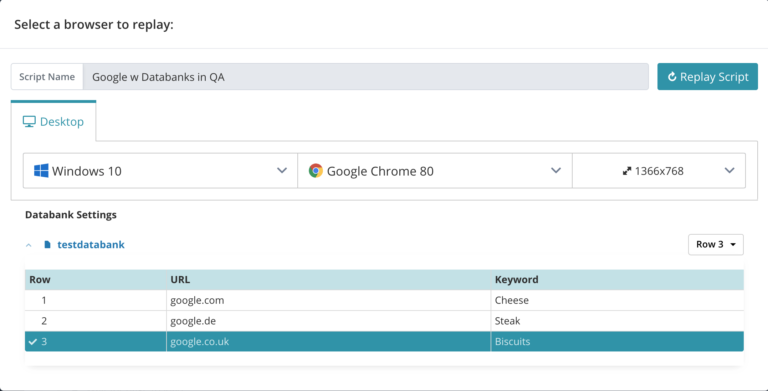
- On the right, you can use the dropdown to select Row. The default value is set to Row 1.
- To select another row, scroll down and click the row of data you’d prefer to use.
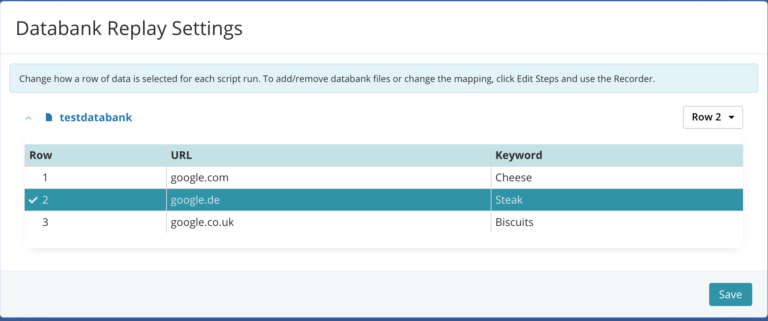
- Save it to accept the changes and exit the dialog.
These settings will only apply to single replays against the script.
You can also select Replay Script and choose your databank setting to use at the time you select the browser for playback (these will be saved to the script):
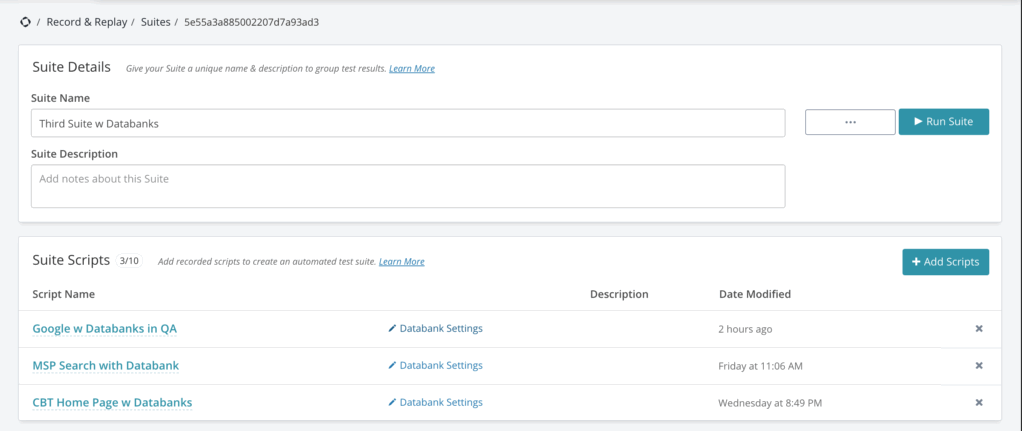
Suites have their own databank settings separate per script or per suite. Meaning, you can have multiple suites that use the same script but use different rows from each databank attached and the system will remember those settings for each suite.
After adding scripts to a suite that have linked databank files, the Databank Settings link will appear next to each. Just as with the script above, click the settings link and a dialog will appear to make changes to the settings for this suite.
Viewing the data used for playback in a script or suite
When looking at the Replay Results for a script, instead of seeing the mapped fields for the script, the actual used values will be displayed:
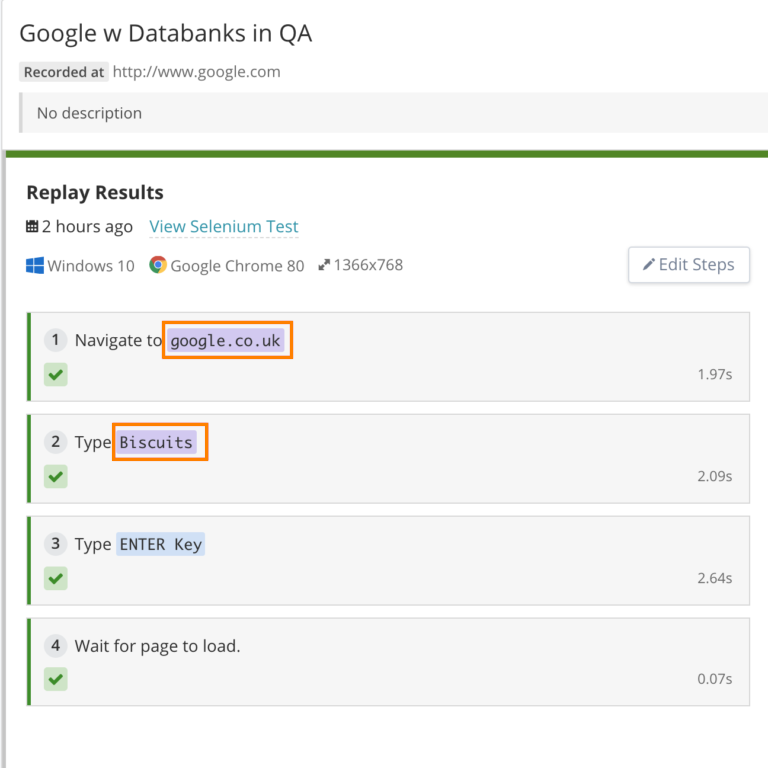
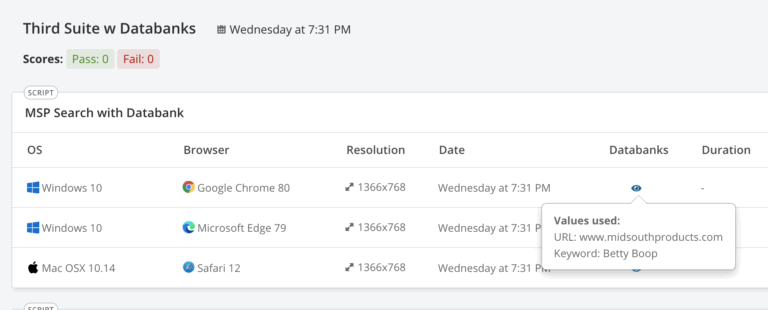
When looking at a suite run, you can have a quick glance at scripts to see what values where used:

