The Participants section lists all participants in the review, their statuses and roles, and allows adding, removing and notifying participants:
| Tip: | In Web Client, the drop-down list at the top left allows you to select the way participants are grouped when displayed in this section. The options are Group by Role, Group by State or Group by None. The Group by None option lists all participants in the review in a single list which is sortable by clicking the headers for each column (name, role, state). |
There are the following states of review participants:
-
Active: participant is going to do some action to move review process forward: creating comments, adding changes to the review materials, etc. For example, when reviewer creates a defect and sends review to rework, author is moved to Active state (because author needs to address the defect).
-
Waiting: participant is waiting for specific activities. For example, when the author sends review into Inspection, author’s state is changed to Waiting (because he/she is waiting for reviewers' feedback).
-
Sent to Rework: participant sent the review to the rework, while other participants still are in Active state (reviewing). When all reviewers move review to the rework, author is in Active state, and reviewers are in Waiting (for some action like ‘File activity occurs’).
-
Approved: participant accepted changes in the uploaded materials.
-
Approved by workflow: participants in completed review, that didn’t complete review explicitly (usually for observers, moderators).
-
Completed: state of authors after completing reviews.
Add or Remove Participants
Web Client
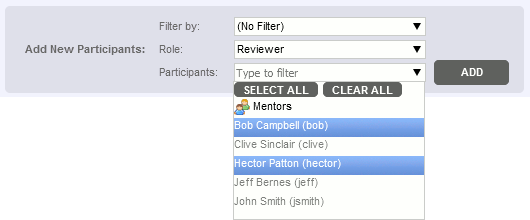
Unless the review is in the Planning stage, the Participants section will be in read-only mode. To add or remove participants or change their roles, click the Edit button. The Participants section will look like this:

To add yourself as a participant in the review, select a role in the Add Myself As area.
To add another user as a participant, select the desired role in the Role drop-down menu, then select one or more users in the Participants drop-down menu, and click Add. (The Participants drop-down menu displays only the first 1000 users.)

|
To filter the user list, start typing the name of the desired user. The list will display only those users that contain all typed characters. To filter multiple users or group you can also search by either username, email_id ,login or groupname simultaneously with comma separated list.
 To select multiple users, just click each desired user in the Participants drop-down list. To select a range of users, click on the first user, hold down the Shift key and then click the last user. To select all users (respecting current filter, if any), click Select All button. To clear previous selection, click Clear All button. |
The Filter by drop-down is used to choose a group whose members are then listed in the Participants drop-down menu. If there are no groups associated with the review, the Filter by drop-down is not displayed. This field displays only the first 1000 groups and it excludes groups which have no members.
User/role combinations you have used recently will also appear under Recent Participants. This makes it easy and fast to select common combinations.
To change a participant's role, select a new role from the drop-down menu in the Role column.
To remove a participant, click the Remove from Review button.
Once you are finished editing the review, click Done Editing.
Visual Studio Extension
To add yourself as a participant in the review, click the Add self as button. In the ensuing dialog, select your role and click OK.
To add another user as a participant, click the Add Participant button. In the Add Participant dialog that appears, select a participant in the Participant drop-down list, select a role in the Role drop-down menu, and click OK.
The Filter by drop-down is used to choose a group whose members are then listed in the Participant drop-down menu. If there are no groups associated with the review, the Filter by drop-down is not displayed. This field does not display groups which have no members.
You can select each user and role individually through the Participant and Role drop-down menus, or start typing the name of the user in the appropriate field to narrow down the user list.
To change the role of a participant, click their role in the Role column. In the ensuing dialog, select a role and click OK.
To remove a participant, click the Remove button.
Eclipse Plug-in
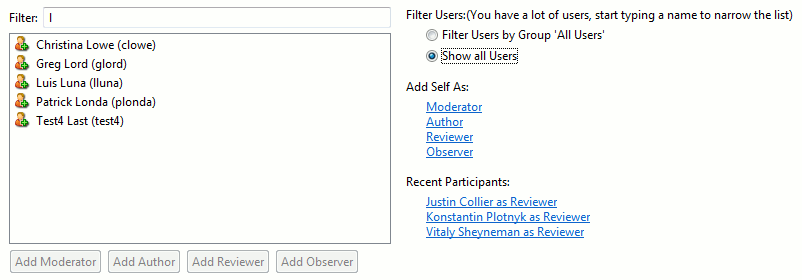
To toggle the section for adding new participants, click the Add Participants icon (![]() ) in the toolbar of the Participants section. The Participants section will look like this:
) in the toolbar of the Participants section. The Participants section will look like this:

To add yourself as a participant, select a role in the Add Self As area.
To add another user as a participant, drag them from the list of users to one of the role lists above, or select them in the list and click one of the Add <Role> buttons below. To narrow down the list, you can start typing the name in the Filter box or select a filtering option in the Filter Users area.
Click the links in the Recent Participants area to quickly assign recent participants to the review.
To change a participant's role, drag them to another role list. Alternatively, you can right-click them and select one of the Change Role to <Role> commands in the context menu.
To remove a participant, right-click them and select Remove in the context menu.
Once you are finished editing the review, select File > Save on the main toolbar of the Eclipse IDE to save changes.
Notify Participants
From the Participants section, you can send different types of notifications to other participants. Collaborator has the following types of notifications:
| Notification | Description |
|---|---|
|
Email (only Web Client and Visual Studio Extension) |
Launches your email client and creates a draft letter which you can edit as you like and then send it. |
|
Sends an email with auto-generated content. Poke notifications may be useful when a certain participant has stalled the review or when you would like to invite a "finished"/"waiting" participant back into the review. |
|
|
Creates an email with a meeting request in iCalendar format. Calendar notifications may be useful for scheduling formal meetings on review. |
Web Client
To send an email notification to a specific participant, click the Email icon (![]() ) next to the desired participant. To send email notifications to all participants, click the Email All button at the top of the Participants section.
) next to the desired participant. To send email notifications to all participants, click the Email All button at the top of the Participants section.
To send poke notification to a specific participant, click the Poke icon (![]() ) next to the desired participant. To send poke notifications to all participants, click the Poke All button at the top of the Participants section. When you press Poke All button, it displays a pop-up suggesting whether to send poke notification to all participants or only to those participants who has not yet approved the review.
) next to the desired participant. To send poke notifications to all participants, click the Poke All button at the top of the Participants section. When you press Poke All button, it displays a pop-up suggesting whether to send poke notification to all participants or only to those participants who has not yet approved the review.
To send Calendar notifications to all participants, click the iCal All button, in the ensuing Collaborator iCal Invite dialog specify proposed date and time and click Send.
To send a JIRA notification to a specific participant, click the Create JIRA ticket link next to the desired participant. To send JIRA notifications to all participants, click the JIRA Ticket All button at the top of the Participants section.
Visual Studio Extension
To send an email notification to a specific participant, click the Email button (![]() ) next to the desired participant.
) next to the desired participant.
To send poke notification to a specific participant, click the Poke button (![]() ) next to the desired participant.
) next to the desired participant.
Eclipse Plug-in
To poke a specific participant, right-click them and select Poke from the context menu.


