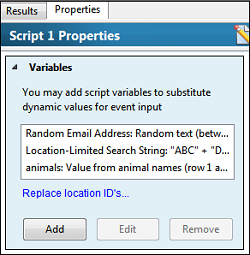
DéjàClick Script Variables are dynamic and can be pinned to a specific monitoring location. Here are several cases of special transaction monitoring requirements that Script Variables could be used to support:
-
Login using a different user_id from each AlertSite monitoring location.
-
Execute a registration transaction that requires a unique email address using “built-in” variables.
-
Use relative date variables to consistently populate reservations searches with future dates.
-
Perform specialized keyword checks; navigate to a different URL depending on the monitoring location.
Script Variables are accessed for the Properties Sidebar at the Script level. Variables are constructed from one or more tokens of the following types:
- Static text
- Random text
- Random number
- Auto-increment
- Relative date/time
- Dataset value
- Replay location
- JavaScript code
The dataset value allows a CSV type file (comma-separated values) to be imported into the script for referencing required input data when replaying on the local desktop. Other field separator characters may also be used in the dataset file.
| Note: |
DéjàClick version 1.3.0.0 or greater is required to use script variables. |
To make our examples simple, we will use www.google.com.
First, record a transaction with DéjàClick. Click  to power on DéjàClick and start recording.
Click in the Google search bar, enter some text and click Google Search. We will use [email protected] for the initial search. When the search completes, click  to stop recording, and then OK in the confirmation dialog. This records a script containing 2 actions and 2 events.
Click  to replay the recording.
Open the Script Results sidebar by  on the DéjàClick toolbar.
The sidebar has 2 parts:
-
DéjàClick step tree at the top.
-
The Results tab and Properties tab at the bottom.
There are 2 ways to add a script variable:
-
Create it at the Script level.
-
Create it or add it at the Event level on the Input event.
Several steps are required to set up a script variable. Once you know what variables you want to use in your recording, it is a simple process.
To illustrate how to create a script variable, we will outline the steps for using a random email address in the Google search bar.
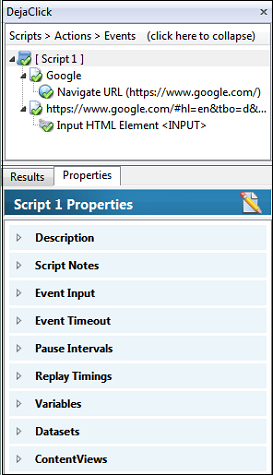
Click the Properties tab in the DéjàClick sidebar and click on the top-level Script name in the tree view at the top.
The sidebar will present the list of properties at the Script level:
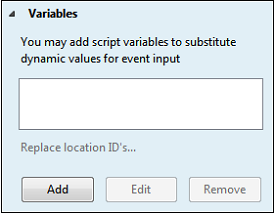
Click Variables to open the Script Variables property panel:
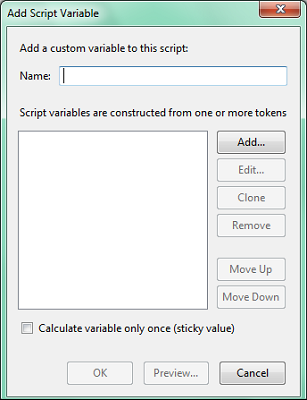
Using this panel, we will construct the script variable from a series of tokens. Click the Add button to display the Add Script Variable dialog:
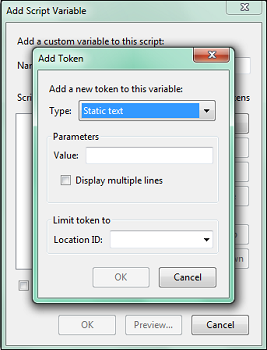
Enter a name for the script variable - for our example, Random Email Address, then click the Add... button to display the Add Token dialog box:
The Add Token dialog's Type drop-down list contains:
- Static Text
- Random Text
- Random Number
- Auto Increment
- Relative Date/Time
- Dataset Value
- Replay Location
Note that the Parameters section changes depending on the Type.
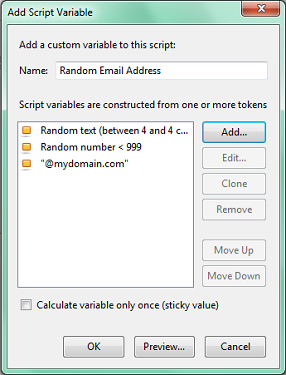
We want to create the random email address script variable using 3 tokens:
Fill in the Add Token dialog as follows:
-
Select Type: Random text.
-
Enter minimum length 4 characters.
-
Enter maximum length of 4 characters.
-
Leave the Location ID blank and click OK.
Add the next token, the 3-digit random number. Click Add... and fill in the Add Token dialog as follows:
-
Select Type: Random number.
-
Enter minimum value 0.
-
Enter maximum value 999.
-
Leave Location ID blank and click OK.
Create the third and final token, a static string @mydomain.com. Click Add... to and fill in the Add Token dialog as follows:
-
Select Type: Static text.
-
Enter @mydomain.com in the Value field.
-
Leave Location ID blank and click OK.
Click OK to save. The Add Script Variable dialog box will now contain:
Click the Preview... button to display a sample of what the variable will look like during replay, for example:
Click OK to close the preview box, then click OK to complete the script variable construction. The Variables panel will now contain the Random Email Address script variable.
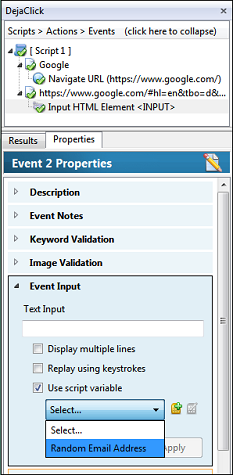
You can now select this script variable in the Event Input panel for the Input HTML Element event, which is the search field text:
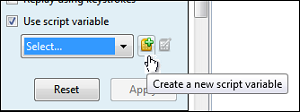
You can also add a Script Variable directly in the Event Input panel of an Input HTML Element event by clicking the icon to the right of the Select... field:
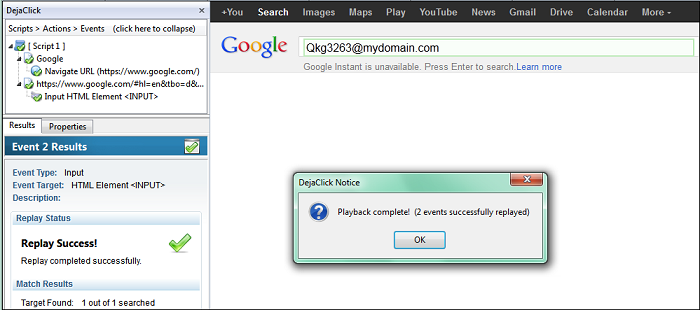
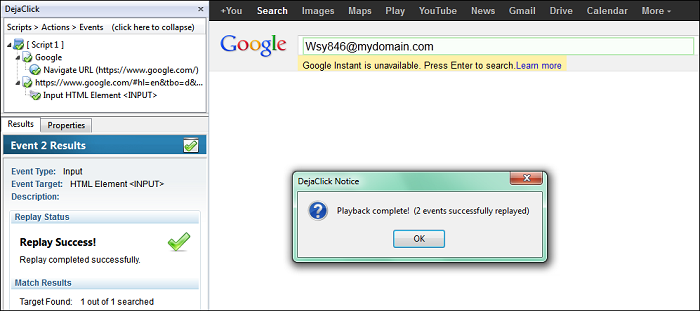
By using the script variable in place of the original search term, each replay will produce a search for a different email address:
|
Replay 1:
 Click the image to enlarge it.
|
Replay 2:
 Click the image to enlarge it.
|
Note the change in email address each time the recording is replayed, created by concatenating the 4-character token, 3-digit token, and static string @mydomain.com.
Below are more examples for using script variables:
 Script Variable as a Keyword
 Script Variable as a Keyword
 Script Variable as a Keyword
Under certain circumstances, your web page may render differently from one location to another. For example, say you monitor from Los Angeles - Level 3, NY - Peer 1, and London - AboveNet, and your page has the title Labor Relations, which you want to use as the keyword phrase.
However, when the page is tested in London, the title becomes Labour Relations because your hosting server detects that it is a UK location and renders the same content but with UK spellings. You can set up a script variable to select a different keyword when it is tested on the London monitoring station.
You will need to fill in the Location ID field in the Add Token dialog box. You can find location IDs on the Monitoring Location IP Addresses page.
After recording your script, do the following:
-
Click on the script name in the sidebar to get to script level.
-
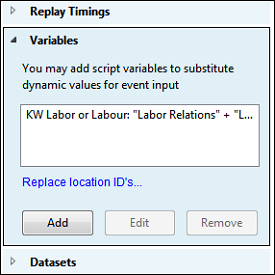
Click Variables in the Properties tab to open the panel.
-
Click Add to open the Add Script Variable dialog box (same as in Example 1).
-
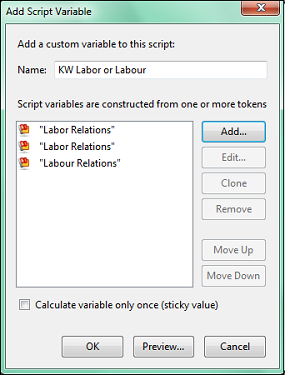
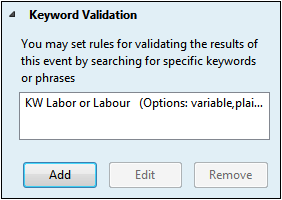
Enter a name for the variable, for example, KW Labor or Labour.
-
Click the Add... button to bring up the Add Token dialog box (same as in Example 1).
-
Leave the default Type Static text.
-
In the Parameters field, enter the keyword Labor Relations.
-
In the Location ID box in the Limit token to field, enter 42 for Los Angeles.
-
Click OK to add the token.
-
Click Add... again in the Add Script Variable dialog and add another Labor Relations static token, but enter 70 in the Location ID box for New York, then click OK to add the token
-
Click Add... one more time to create our third static token, but this time enter Labour Relations in the Parameter field, and 5010 for London in the Location ID box, then click OK.
-
The Add Script Variable dialog will contain:
Note the Calculate variable only once (sticky value) check box in the Add Script Variable dialog. Checking this box will maintain the value of the variable throughout the recording. For example, if you want to use the same value in Steps 2, 5, and 8, check the box and the variable will be calculated in Step 2 and the same value used in Steps 5 and 8 during the same monitoring interval.
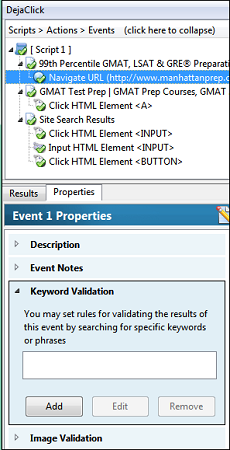
Next, let's create our Keyword Validation. Keywords may be added to either Actions or Events. In this example, let's add our keyword to the first event:
-
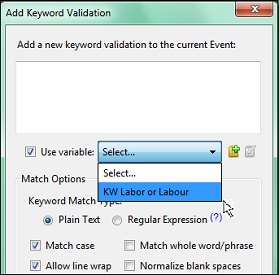
Click Add to open the Add Keyword Validation dialog.
-
Select the box next to Use variable and in the Select... drop-down list, choose KW Labor or Labour.
- Click OK to add the script variable Keyword Validation
Subsequent replay will succeed with keyword Labor Relations when monitored from LA or NY, and with Labour Relations when monitored from London.
 Location-Limited Tokens
 Location-Limited Tokens
 Location-Limited Tokens
One monitoring strategy may be to populate your web form with different strings when monitoring at different locations. For this example, we will use the Google Search script from Example 1. We will construct a script variable using tokens that are limited by our 3 monitoring locations, Los Angeles (Location ID 42), New York (Location ID 70), and London (Location ID 5010).
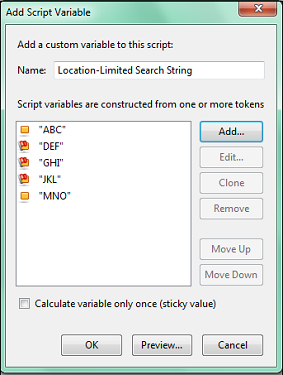
For illustration purposes, our script variable will be created with 5 static string tokens:
ABC
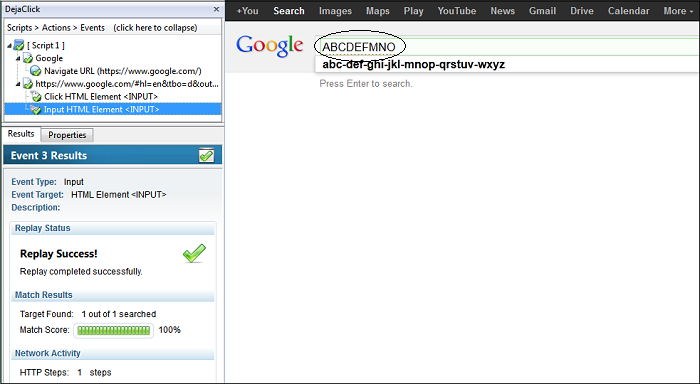
String DEF will be limited to Los Angeles, GHI will be limited to New York, and JKL limited to London. Strings ABC and MNO will not be limited to a specific monitoring station. As such, the search strings you will see in the Google Search box are:
|
Los Angeles (42)
|
ABCDEFMNO
|
|
New York (70)
|
ABCGHIMNO
|
|
London (5010)
|
ABCJKLMNO
|
First, create a Script Variable called Location-Limited Search String and add 5 tokens:
-
From the Script Level, click Variables to expand the property panel, then click Add.
-
In the Add Script Variables dialog, enter the Script Variable name and click Add.
-
Leave Type as Static text.
-
In the Parameters section, enter Value: ABC, leave the Location ID: field blank, then click OK.
-
Click Add again, leave as Static text, enter Value: DEF, enter Location ID: 42, then click OK.
-
Click Add, leave as Static text, enter Value: GHI, enter Location ID: 70, then click OK.
-
Click Add, leave as Static text, enter Value: JKL, enter Location ID: 5010, then click OK.
-
Click Add, leave as Static text, enter Value: MNO, leave Location ID: blank, then click OK.
The Add Script Variable dialog will look like:
Note the icon to the left of each token. The Location Limited token icons have a red "flag" indicator.
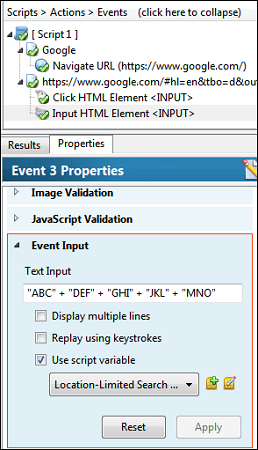
The next step is to set the Event Input to use the script variable:
-
Click on the Input HTML Element event in the Scripts section of the sidebar.
-
In the script Properties tab, click Event Input to expand the property panel.
-
Check the box next to use script variable.
-
Select Location-Limited Search String from the drop-down list and click Apply.
The sidebar will appear as:
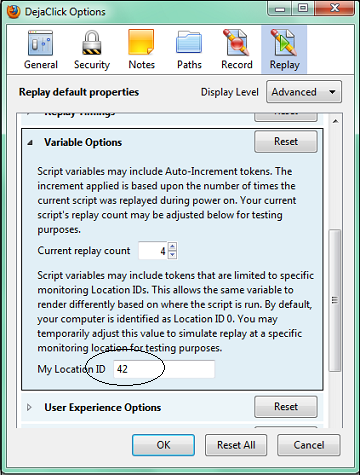
The script will produce different searches using the different search strings based on the monitoring location. We can simulate running from different locations by modifying a configuration option. Set the DéjàClick Display Level to Advanced, then:
-
Click  and select DéjàClick Options.
-
Click on the Replay Properties tab.
-
Click Variable Options to expand the property panel.
-
In the Default Location ID box, enter the desired Location ID (42 for LA, 70 for NY, 5010 for London).
-
Click OK to save.
The DéjàClick Options dialog will look like this:
After changing the Default Location ID to 42, replay the script to produce:
Click the image to enlarge it.
Change the Default Location ID to 70, and the replay will display:
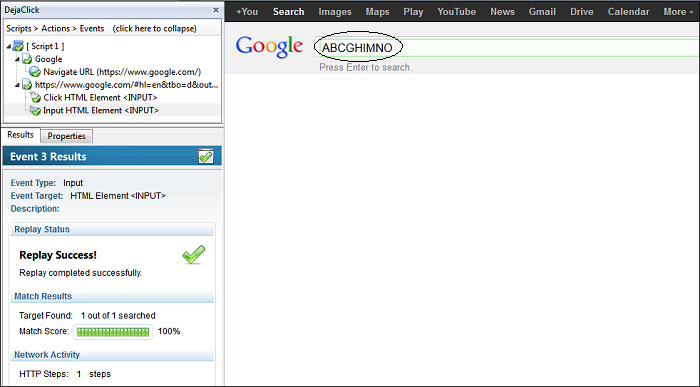
Click the image to enlarge it.
Change the Default Location ID to 5010, and the replay will show:
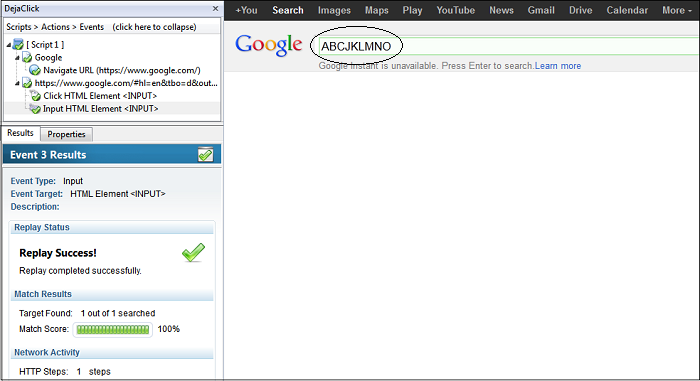
Click the image to enlarge it.
 Dataset Script Variables
 Dataset Script Variables
 Dataset Script Variables
 |
This feature is supported on the Desktop plug-in only. It is not supported in the AlertSite monitoring locations. |
If your recording includes filling in a form, you can create a file, called a dataset, that contains the information for the form. Script variables can be configured to selectively parse the dataset for the data values to use.
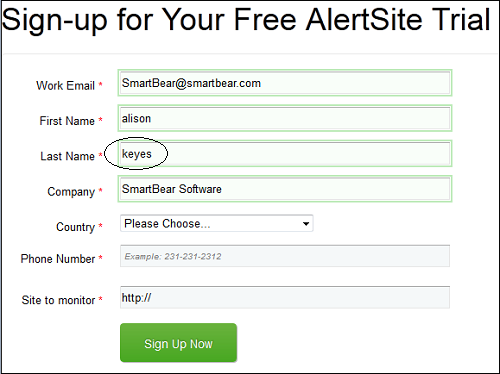
As an example, we will record a few steps that includes filling out a form with multiple fields. We arrive at the page below by recording https://smartbear.com/products/web-monitoring/website-monitoring/alertsite-trial-sign-up and filling in the first 4 fields:
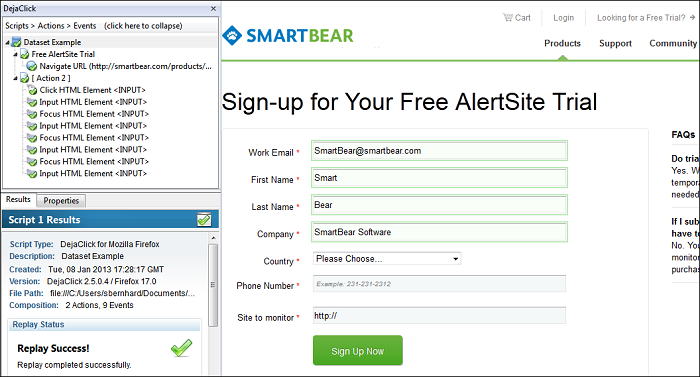
Click the image to enlarge it.
The first Input HTML Element event in Action 3 of the recording corresponds to the "all these words" field, and the second Input HTML Element event corresponds to the field for "this exact wording or phrase". The search strings "name" and "type" are simply placeholders for the recording.
Create a text file with an equal number of comma-separated set of strings on two lines:
horse,tiger,mouse
palomino,white,tiny
| Note: |
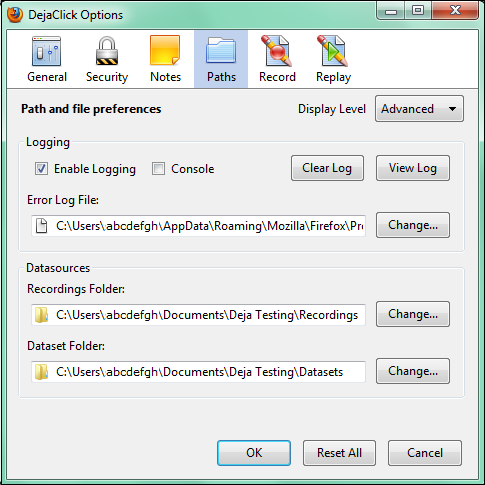
This file must reside in the directory configured for Datasets in the Configuration Options Paths dialog: |
To select a different location for Datasets, click Change... next to the Dataset Folder field and select or create a different directory.
For this example, we will call this text file dataset1.csv. The Dataset Script Variable will be configured to rotate through the first row for the first Input HTML event and the second row for the second Input HTML event.
First, let's import our dataset data into the script:
-
Click on the top step in the Script steps section of the sidebar to get to script level (Script Variable Example 2 in the screenshot above).
-
Click on the Properties tab in the lower section of the sidebar.
-
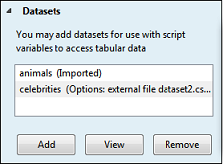
Click on Datasets in the list of Properties to expand the item.
-
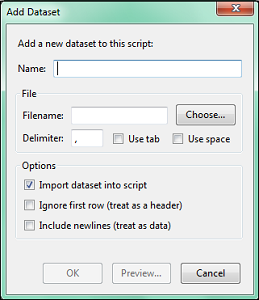
Click the Add button to add dataset information.
-
In the Name field of the Add Dataset dialog, enter a name for your dataset, for example, animals.
-
Click Choose... to select the filename dataset1.csv you created above.
-
Leave the Import dataset into script option checked.
-
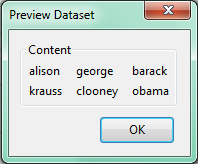
Click Preview... to verify the dataset looks correct.
-
Click OK.
The dataset animals with the values in dataset1.csv is now associated with the script. The next step is to have two of the input fields configured to utilize the data in the dataset. So our next step is to create two script variables and assign them to the two input fields.
-
Click the Input HTML Element line in the script tree window at the top of the sidebar; we will use the First Name field Input Element for this example.
-
Expand the Event Input section of the Properties tab.
-
Click the check box next to Use script variable.
-
Click Create a new script variable to the right of the Select... drop-down list.
-
Enter a name, for example, animal names, in the Name field of the Add Script Variable dialog.
-
Click the Add... button to add a token.
-
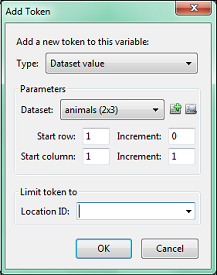
In the Add Token dialog, select Dataset value from the Type drop-down list.
-
Since animals (2x3) was added at the script level, it will populate the Dataset parameter field (2x3 refers to the number of rows and columns in the dataset file).
| Note: |
You may also add new datasets from within the Add Token dialog if you need. |
-
Enter 1 in Start row, since this Input HTML Element uses the first row in the dataset file.
-
Enter 0 in Increment next to Start row, since you want to stay on this row through each replay.
-
Enter 1 in Start column, since this is the column you want to start with.
-
Enter 1 in Increment next to Start column, since you want to move to the next column in this row with each replay.
The Add Token dialog will look like this:
-
Click OK to add the token to the script variable.
-
Click OK to save the script variable within the script.
-
Click Apply in the Event Input properties to apply the script variable to this input field.
To use the dataset input for the Last Name field of Input HTML Element, repeat the steps above with the difference being the name of the script variable and start row.
-
Click on the Last Name Input HTML Element line in the script tree at the top of the sidebar.
-
Click Event Input in the Properties tab at the bottom of the sidebar to expand the item.
-
Click the check-box next to Use script variable.
-
Click the Create a new script variable icon to the right of the Select... drop-down list.
-
Enter a name, for example, attributes, in the Name field of the Add Script Variable dialog.
-
Click the Add... button to add a token.
-
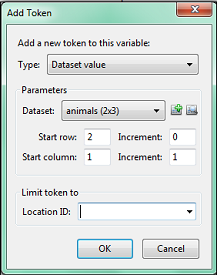
In the Add Token dialog, select Dataset value from the Type drop-down list (animals (2x3) will already appear in the Dataset parameter field).
-
Enter 2 in Start row, since the second HTML Input Element field is for the second row in the dataset file.
-
Enter 0 in Increment next to Start row, since you want to stay on this row through each replay.
-
Enter 1 in Start column, since this is the column you want to start with.
-
Enter 1 in Increment next to Start column, since you want to move to the next column in this row with each replay.
The Add Token dialog will look like:
-
Click OK to add this token to the script variable.
-
Click OK to save the script variable within the script.
-
Click Apply in the Event Input properties to apply the script variable to this input field.
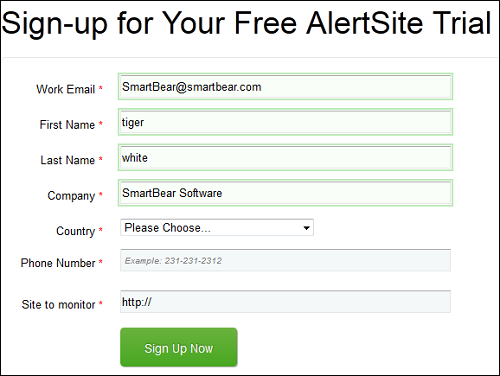
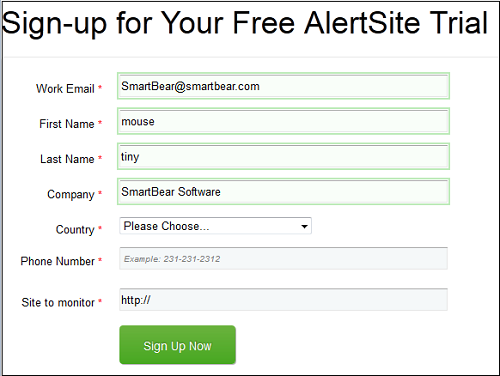
You are now ready to replay the recording using the dataset values as input. Replay the recording 3 times, and you will see the two input fields change tokens automatically, as shown below:
|
First replay:
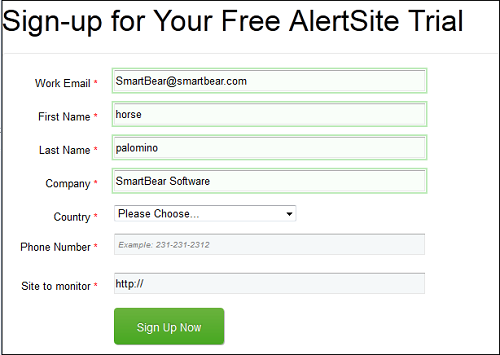 Click the image to enlarge it.
|
Second replay:
 Click the image to enlarge it.
|
Third replay:
 Click the image to enlarge it.
|
To start with the initial set of tokens (horse, palomino), reset the current replay count as follows (this is entirely optional):
-
Click on the Configure Options button  on the DéjàClick toolbar.
-
Select DéjàClick Options.
-
Switch to the Replay tab.
-
Click Reset on the Variable Options line
 Reusability
 Reusability
 Reusability
Script variables and datasets, once created, may be reused in different parts of the recording by assigning them to additional input values or keywords. For example, here is a list of several script variables that were created:
You can select to use a different set of variables for the HTML input in your script by simply clicking on the Input HTML Element you want the variable to appear in and select the new variable from the drop-down list.
 Imported vs. External Datasets
 Imported vs. External Datasets
 Imported vs. External Datasets
There are two flavors of Datasets: Imported and External File. External dataset files must reside in the DéjàClick datasets subfolder prior to replay. By default, the folder is located in your Firefox profile folder under the dejaclick directory, but the path may be changed via the DéjàClick Options >Paths tab.
The dataset is designated as an external file if the Import dataset into script option is deselected in the Add Dataset dialog (see Search using datasets above).
Internal datasets are imported directly into the script. Its referenced values remain static; any changes to the original source file will not affect subsequent script replays. Conversely, the external datasets reference an external file. Thus, if the file is ever modified, any referenced values that are updated will use the new values during subsequent script replays.
Here is the Datasets Properties sidebar at the Script Level with a description of the two different dataset types. The celebrities dataset is external and contains 3 sets of celebrity names:
Setting the First and Last names in the form fields to use the external dataset with the original values displays the following on replay:
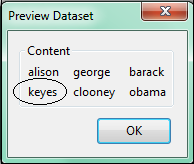
After editing one of the values (last name of the first celebrity), the dataset looks like:
Replay with this new field value shows the modification:
![]() to power on DéjàClick and start recording.
to power on DéjàClick and start recording.![]() to stop recording, and then OK in the confirmation dialog. This records a script containing 2 actions and 2 events.
to stop recording, and then OK in the confirmation dialog. This records a script containing 2 actions and 2 events.![]() to replay the recording.
to replay the recording.![]() on the DéjàClick toolbar.
on the DéjàClick toolbar.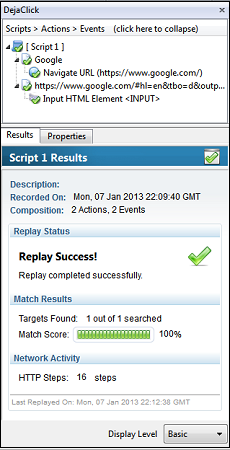



 Script Variable as a Keyword