
| Note: | To use this guide, you need to know how to use AlertSite DéjàClick transaction recording tool. If you do not have the DéjàClick toolbar in your Firefox browser, go to the DéjàClick Downloads page to download the DéjàClick add-on and additional modules (TrueScreen and ImageMagick). If you have never used DéjàClick before, please go to the DéjàClick Quick Start Guide. After you have become comfortable with recording DéjàClick transactions, you will be able to move on to this more advanced feature. |
Overview
Branching Logic is a DéjàClick feature that allows a web transaction script to use conditional tests to branch if specific conditions are met. There are many circumstances under which you may want to navigate to alternate web pages in one transaction, for example:
-
Out-of-inventory condition – When you are monitoring your order processing flow and an item is out of stock, you don't want the transaction to report an error. Instead, you want the script to handle it elegantly and report success. You can set up a branch that will select an alternate item if the first one isn’t available.
-
A/B testing – When your organization performs A/B testing, your monitor won’t be able to predict which page will be served. In that case, you can set up branches that key in on a known object in each of the versions and have your script kick off the appropriate path based on what it has been served.
-
Conditional monitoring – You can monitor your mobile site by first entering the main domain. If there is an issue on the main site, the replay will stop without error notification since it couldn’t execute the mobile test.
-
Maintenance mode – You can set up breakpoints at pages undergoing maintenance or changes, record a new series of steps, and set the branching rule to take that path temporarily. When the changes have been completed, the branching rule can be removed and the added steps will be ignored.
-
Script editing - You want to completely change the last three steps of your script. Instead of having to re-record the script from the changed event on down, now you can add a branch with the new events, or add a branching rule to skip events that need to be deleted.
DéjàClick Script Branching facilitates the handling of these situations and others. Branching lets you specify when certain error conditions on certain events should be ignored, so that when those errors occur, the transaction will not raise an error but will continue on to the next event. Branching also provides the option of skipping events, jumping forward to another event, or stopping replay before the end of the script is reached. Finally, Branching includes the option of recording a new "branch", which is an alternate sequence of events that can be replayed as part of the main script.
The addition of branching in DéjàClick requires the use of some decision logic so that a script could include multiple recorded sequences of events and the conditional logic would decide between them at replay time. This means that DéjàClick could replay a different sequence of events each time the transaction runs.
Tips
-
Looping is not allowed. You cannot jump back to a previous event within the main part of the script or within a branch. You can:
-
Jump forward to a later event in the main part of the script or in a branch.
-
Jump between the main part of the script and a branch.
-
Jump between branches.
-
-
You will not be able to add a branching rule to the last event of a script that does not have at least one branch. Otherwise, the Target section of the Add Branching Rules dialog for that event will be grayed out since there are no valid targets to jump to. You can add a branching rule to any of the previous events in the script as long as it jumps forward to a later event.
Configuration process
It is advised that you spend some time designing the logic flow of your transaction. A flowchart or decision table can help you visualize how you expect to navigate through the website depending on conditions. Once you have a good handle on the process, it will make recording and branching configuration easier.
DéjàClick 2.0
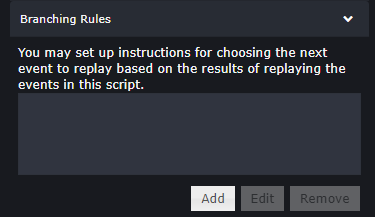
To use Branching, open the script Properties sidebar and select > Display Level > Advanced to show the Branching Rules panel.
DéjàClick 1.x
To use Branching, open the script Properties sidebar and expand the Branching Rules section.
| Tip: | If you do not see the section, select |
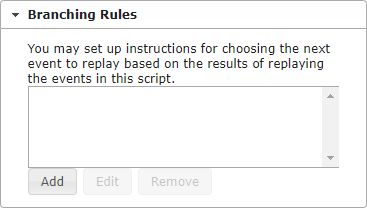
The Branching Rules panel is available for both Actions and Events.
When you pause during script replay, you will be able to insert a target branch that will be taken depending on conditions you select within the Branching Rules.
The general procedure is outlined as follows:
DéjàClick 2.0
-
Record the main part of your transaction.
-
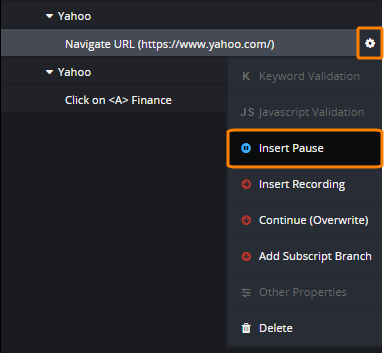
Click the action or event you want to stop at and select > Insert Pause.
Alternatively, click the down arrow next to the Replay button, select Next Action. Then click
 Replay until you arrive at the action you want to branch from.
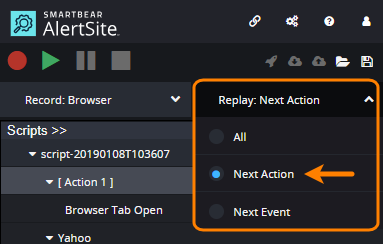
-
When paused, click the action or event you set the pause at, and then click > Add Subscript Branch and continue recording with a new set of steps to execute.
-
Set up Branching Rules based on a specific condition to control which part of the script to play.
-
Repeat the steps for additional branches.
DéjàClick 1.x
-
Record the main part of your transaction.
-
Right-click the action or event you want to stop at and select Pause.
Alternatively, click the down arrow next to the
 Replay button and select Next Action. Then click Replay until you arrive at the action you want to branch from.
 -
When paused, click the down arrow next to the
 Record button and select Add to new branch.
 -
Click
Record again and continue recording with a new set of steps to execute. -
Set up Branching Rules based on a specific condition to control which part of the script to play.
-
Repeat the steps for additional branches.
Example
You want to exercise your web application's Item Search functionality. You want to make sure that the page displays "item is available" if the search term is found; otherwise, it will display "out of stock". The basic flow is:
-
If the item is found, select the item, then proceed to the shopping cart.
-
If the item is not found, select a second-choice alternative.
-
If that item is not found, go to the "Contact Us" page.
The sections below will show how to implement Branching in the transaction to accomplish the desired logic flow. Please note that this example is for illustration only and does not refer to any specific website application.
1. Record the transaction
To set up this scenario, first record the initial transaction.
1.1 Search for the first choice item
DéjàClick 2.0
-
Click
 on the DéjàClick toolbar.
 -
Navigate to the starting URL.
-
Enter the needed item in the Search box and press Enter.
-
When the item page is displayed, click Add Validation > Keyword Validation.
-
Click item is available on the page and click Save in the Add keyword validation panel.
-
Click to select the item and add it to the shopping cart.
-
Click
 .
.
DéjàClick 1.x
-
Click
on the DéjàClick toolbar. -
Navigate to the starting URL.
-
Enter the needed item in the Search box and press Enter.
-
When the item page is displayed, click
 > Add keyword validations.
 -
Click item is available on the page and click OK in the Add Keyword Validation dialog.
-
Click
to exit the keyword validation mode. -
Click to select the item and add it to the shopping cart.
-
Click
 .
.
The main part of your script is now done. To perform a search for the alternate item, you will want to navigate to a different set of steps. You can add a branch to do that search by replaying the main script and stopping at the action where you enter the search item.
1.2 Create a branch for the second choice item search
DéjàClick 2.0
-
Select the action where the initial search was entered and click > Insert Pause.
-
Click
. -
When replay stops at the search action, click the action and select > Add Subscript Branch. [Subscript 1] will appear at the bottom of the script tree.
DéjàClick 1.x
-
Right-click the action where the initial search was entered and select Pause.
-
Click
. -
When the replay stops at the search action, click the down arrow next to
and select Add to new branch. [Branch 1] will appear at the bottom of the script tree in the sidebar.
The branch starts a new section and queues you there. You are now ready to record the steps for the alternate item.
1.3 Search for the second choice item
DéjàClick 2.0
-
Enter the second choice item in the Search box and press Enter.
-
When the item page is displayed, click Add Validation > Keyword Validation.
-
Click item is available on the page and click Save in the Add keyword validation panel.
-
Click to select the item and add it to the shopping cart.
-
Click
.
DéjàClick 1.x
-
Enter the second choice item in the Search box and press Enter.
-
When the item page is displayed, click
> Add keyword validations. -
Click item is available on the page and click OK in the Add keyword validation dialog.
-
Click to select the item and add it to the shopping cart.
-
Click
.
Now you have the second part of your script done. The third part of the transaction, what to do when the second-choice item is out of stock, will go to the Contact Us page. Simply record another branch that navigates to Contact Us.
1.4 Contact customer service - neither item exists
DéjàClick 2.0
-
Click
.Replay will stop at the search action because the pause is still in place from the first branch
-
Click the search action and select > Add Subscript Branch.
-
Click Contact Us.
-
Click
.
DéjàClick 1.x
-
Click
.Replay will stop at the search action because the pause is still in place from the first branch
-
Click
(Add to new branch is still selected). -
Click Contact Us.
-
Click
.
The script has been recorded with the steps that will be taken based on the search results during regular replay. Now add the Branching Rules that the transaction will follow.
2. Add branching rules
Branch 1: First-choice item not found
-
In the script tree, select the action that searches for the first-choice item.
-
Switch to the Properties tab of the DéjàClick sidebar.
-
Expand the Branching Rules section and click Add.
DéjàClick 2.0
Tip: If you do not see the Branching Rules section, select > Display Level > Advanced. DéjàClick 1.x
Tip: If you do not see the Branching Rules section, select  > Display Level > Advanced.
 -
Configure the branching rule:
-
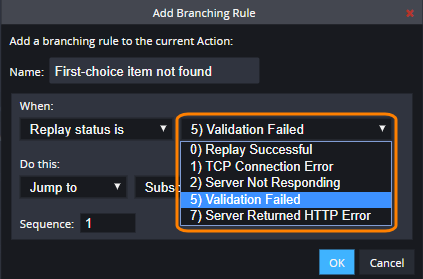
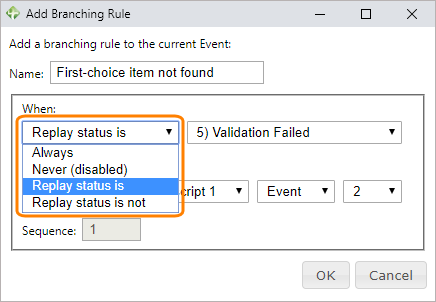
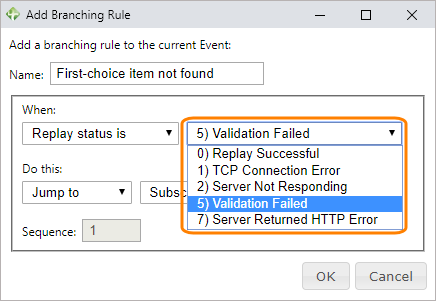
Enter a branch name in the Name field.
-
Select a rule trigger and the status code to trigger on:
Note: The status code selection dropdown is hidden if Always or Never (disabled) is selected. DéjàClick 2.0
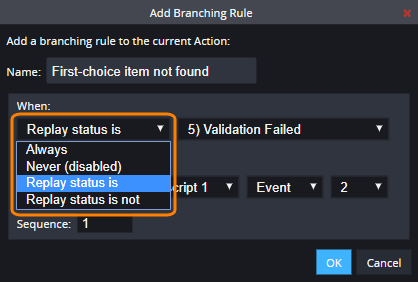
DéjàClick 1.x
-
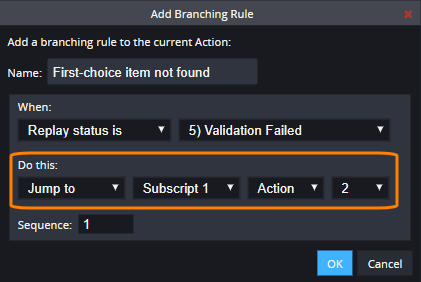
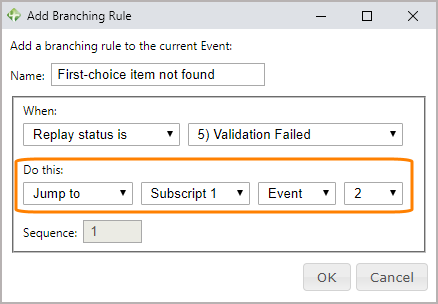
Select the action to perform: Stop Replay or Jump to. If you select Jump to, select a branch, Action or Event to branch to, and the number of that action or event.
DéjàClick 2.0
DéjàClick 1.x
-
Click OK.
-
Branch 2: Second-choice item not found
-
In the script tree, select the first action in Subscript 1.
-
Switch to the Properties tab of the sidebar.
-
Expand the Branching Rules section and click Add.
-
Enter a branch name in the Name field.
-
Select a rule trigger and the status code to trigger on: Replay status is – 5) Validation Failed.
-
In the Do this section, select Jump to – Subscript 2 – Action – 1.
-
Click OK.
Next, test the branching logic for the conditions you have set to make sure it performs as expected. This requires manipulating the script properties, in this example the Event Input, so that the conditions will be met during replay.
3. Test branching logic
First-choice item found
DéjàClick 2.0
-
In the script tree, click the action with the pause and select > Remove Pause.
-
Click
.
DéjàClick 1.x
-
In the script tree, right-click the action with the pause and select Pause.
-
Click
.
First-choice item not found, second-choice item found
-
In the script tree, select the Change on <INPUT> Search event of the action where you made your first selection.
-
Switch to the Properties tab of the sidebar.
-
Expand the Event Input section, change the text in the Text Input field to some random characters, and click Apply.
-
Click
.
The replay will fail at the event with the "item is available" keyword validation because the event input, now random characters, will not be found. This will trigger the first branching rule which says: when keyword validation fails, Jump to Subscript 1, Action 1. This is the section to search for the alternate choice. The steps in this branch will be executed and the script will complete.
Second-choice item not found
-
In Subscript 1 > Action 1, select the Change on <INPUT> Search event.
-
Switch to the Properties tab of the sidebar.
-
Expand the Event Input section, change the text in the Text Input field to some random characters, and click Apply.
-
Click
.
The transaction will fail at the event with the "item is available" keyword validation because the event input, now random characters, will not be found. This will trigger the second branching rule which says: Jump to Subscript 2 Action 1. The steps of the Subscript 2 will be executed and the script will complete.
When the transaction performs all the branches as expected, switch to the Properties tab and restore the correct text string in both Event Input fields.
4. Upload to AlertSite
Now that the transaction is set up to handle the two possible conditions you expect, you can upload it to your AlertSite account for monitoring.
DéjàClick 2.0
-
Select > Sign In and provide your account credentials.
-
Click .
-
Fill in the information in the Upload Recording dialog and click OK.
-
In AlertSite, configure the monitor settings and save them.
DéjàClick 1.x
-
Select
 > AlertSite Login and provide your account credentials.
 -
Click
> Upload Recording. -
Fill in the information in the Upload Recording dialog and click OK.
-
In AlertSite, configure the monitor settings and save them.
The AlertSite Dashboard will be updated shortly with the monitoring data for the new transaction.