 |
Flash Player has reached end of life on December 31, 2020. Support for Flash and Flex applications is now deprecated in TestComplete and will be removed in a future release. |
One of possible testing approaches you can take to make your Flash or Flex application accessible to TestLeft is to use Microsoft Active Accessibility (MSAA).
Limitations
-
If you use the 64-bit version of Firefox, TestLeft may not be able to access your tested application by using the MSAA engine.
-
Using the MSAA approach may not provide the required level of access to applications’ internals.
We recommend that you use the MSAA testing approach only if other testing approaches cannot be used.
Compiling Flash and Flex Applications With Accessibility Information
In order for TestLeft to be able to access your Flash or Flex application’s internals via the MSAA engine, compile your application with accessibility information.
Using Flash Professional IDE
You can enable accessibility for certain graphic elements or groups of these elements using the Accessibility Panel or via the enableAccessibility command of Action Script 3.0. To learn how to create accessible applications in Flash Professional IDE, refer to Adobe documentation:
 http://www.adobe.com/accessibility/products/flash/best_practices.html
 http://www.adobe.com/accessibility/products/flash/author.html
Using Flash Builder or Flex Builder IDE
-
Open your project in Flash Builder (or Flex Builder).
-
Right-click the project node in Flash Builder’s Package Explorer (Flex Navigator in Flex Builder) and select Properties from the context menu, or select Project | Properties from the main menu of the IDE. This will bring up the Properties dialog.
-
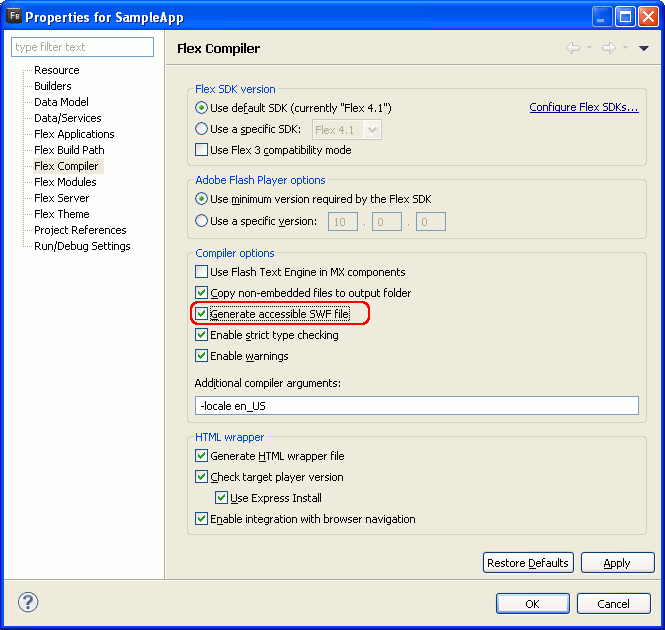
Select the Flex Compiler category and enable the Generate accessible SWF file option:

-
Save the changes and rebuild the project.
Using the Flex compiler’s command line
You can enable the application’s accessibility by using the -compiler.accessible or -accessible configuration variable. For example:
mxmlc -accessible c:/myflexapp/myflexapp.mxml
Using the Flex compiler’s configuration file
You can modify the Flex compiler’s configuration file, <Flex SDK>/frameworks/flex-config.xml, so that it includes Active Accessibility support in all applications compiled. For this purpose, set the value of the accessible property to true:
XML
<flex-config>
<compiler>
...
<accessible>true</accessible>
...
</compiler>
...
</flex-config>
Preparing Web Browser
Preparing Internet Explorer
We recommend that you disable Protected Mode in Internet Explorer:
-
From the Internet Explorer main menu, select Tools | Internet Options.
-
Switch to the Security tab.
-
Clear the Enable Protected Mode check box and click OK.
-
Restart Internet Explorer.
Preparing Mozilla Firefox
Disable Flash Player Protected Mode
Starting from version 11.3, Firefox Flash Player plugin runs in protected mode on Windows 7 and later Windows versions. The protected mode may cause Flash Player to freeze or crash. If you experience these issues, disable Flash Player protected mode:
-
Open Flash Player configuration file mms.cfg in a text editor, for example, in Notepad. The mms.cfg file is in one of the following folders:
-
On 32-bit Windows: %WINDOWS%\System32\Macromed\Flash\
-
On 64-bit Windows: %WINDOWS%\SysWOW64\Macromed\Flash\
If the mms.cfg file does not exist, create it.
-
-
Add the following line at the end of the mms.cfg file and save the changes.
ProtectedMode=0
To enable the protected mode again, remove ProtectedMode=0 from the mms.cfg file.
Disable Asynchronous Plugin Rendering
In Firefox 55 and later, disable asynchronous plugin rendering:
-
Start Firefox and type
about:configin the Address bar. This will open the Firefox settings page. -
Find the dom.ipc.plugins.asyncdrawing.enabled property in the list and set it to false.
Disable Flash Player Sandbox
If you use Firefox version 65 or later, disable the Flash Sandbox security mode:
-
Start Firefox and type
about:configin the Address bar. This will open the Firefox settings page. -
Find the
dom.ipc.plugins.sandbox-level.flashproperty in the list and set it to0.
– or –
-
Open Windows Control Panel. To do this, you can, for example, click Start and then click Control Panel.
-
In the Search box, type environment variables and then click Edit environment variables for your account.
-
In the resulting dialog, create an environment variable named
MOZ_DISABLE_NPAPI_SANDBOXwith any value. -
Save the changes.
Setting Security Permissions
By default, the Flash Player does not allow the local SWF or FLV content to communicate with the Internet. To test Flash and Flex applications that reside on a local computer, allow the communication. To do this, add the folder where the application resides to Flash Player’s list of trusted locations:
-
Open the Control Panel | System and Security | Flash Player applet. You can also right-click somewhere within any Flash or Flex movie open in a web browser (or in the Flash Player standalone) and choose Global Settings from the context menu.
-
In the Flash Player Settings Manager, switch to the Advanced tabbed page and click the Trusted Location Settings button. This will invoke the Trusted Location Settings dialog.
-
In the Trusted Location Settings dialog, select Add and specify the path to your application or the folder where your application resides. The specified file or folder will be added to the list of trusted locations which are allowed to access the Internet.
If you have a Flash Player version earlier than 11, use the online version of the Adobe Flash Player Settings Manager to specify the list of trusted locations. To open the Global Security Settings panel where you can specify the list of trusted locations, navigate to the following URL:
 http://www.macromedia.com/support/documentation/en/flashplayer/help/settings_manager04.html
Creating Wrapper HTML Page
To test a Flash or Flex application, create a wrapper web page to embed the application. You can do this in one of the following ways:
 From Adobe Flash Professional IDE
 From Flash Builder or Flex Builder IDE
From Adobe Flash Professional IDE
To automatically generate a wrapper HTML page for your application from Adobe Flash Professional:
-
Open your application project in Adobe Flash IDE.
-
Select File | Publish Settings from the main menu of IDE or press Ctrl+Shift+F12 to open the Publish Settings dialog.
-
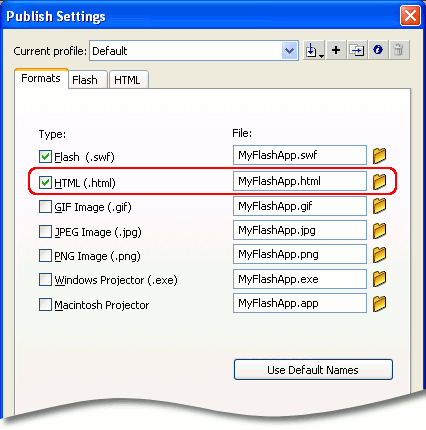
On the Formats tabbed page of the dialog, select the HTML (.html) check box. The HTML tabbed page will appear. On this page, you can configure some parameters of the web page to be created.
-
In the edit box to the right of the HTML (.html) check box, specify the file name of the web page to be created.

-
Click OK to close the Publish Settings dialog and save the changes.
-
Select File | Publish from the main menu or press Shift+F12 to republish your Flash application with the wrapper HTML page.
To improve the test performance, you can modify source code of the created page according to the tips below.
From Flash Builder or Flex Builder IDE
If you use Adobe Flash Builder 4 or Flex Builder 3 to develop your applications, you can generate the wrapper HTML page by modifying the Flash Builder (or Flex Builder) project properties:
-
Open your project in Flash Builder (or Flex Builder).
-
Right-click the project node in Flash Builder’s Package Explorer (Flex Navigator in Flex Builder) and select Properties from the context menu, or select Project | Properties from the main menu of the IDE. This will bring up the Properties dialog.
-
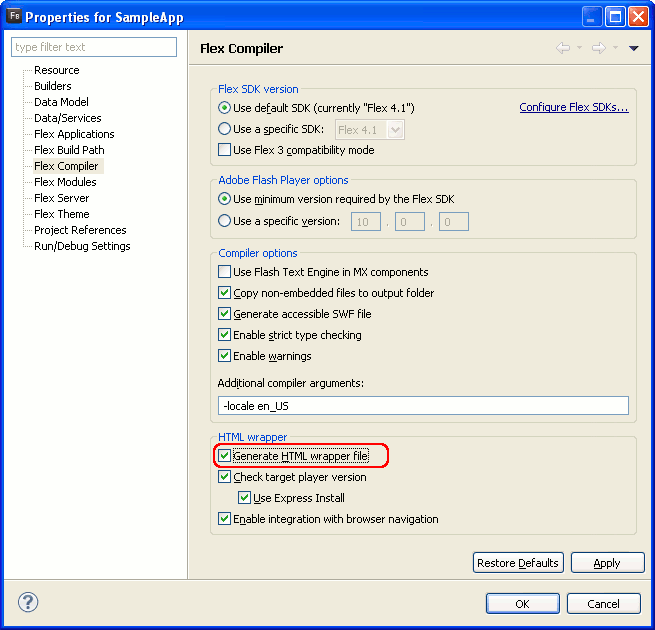
Select the Flex Compiler category and enable the Generate HTML wrapper file option:

-
Save the changes and rebuild the project.
To improve the test performance, you can modify the source code of the created page according to the tips below.
From HTML Templates Included in Flex SDK
Flex SDK includes a set of template HTML pages that you can use to create a wrapper for the tested application. These templates are located in the <Flex SDK>/templates folder. Each template contains tokens (for example, ${swf}) that you will need to replace with values appropriate for your application. For more information about using the templates, see the About the HTML templates topic in Flex documentation (http://livedocs.adobe.com/flex/).
To improve the test performance, you can modify the source code of the created page according to the tips below.
Manually
You can create a wrapper HTML page yourself, using any text or HTML editor. Below you will find the typical code of a wrapper page. Simply copy this code, paste it into the editor and modify the highlighted elements to match the tested Flash and Flex application:
-
Replace MyApp.swf with the name of the tested application’s SWF file.
-
Specify the application’s size (in pixels) in the
widthandheightattributes. -
Specify the
idattribute of theOBJECT(orEMBED) tags that you use to insert your movie into the page. TestLeft uses this attribute to address the movie in tests. Also, this will improve the test performance. The attribute must start with a letter (A..Z, a..z) and contain only letters (A..Z, a..z), digits (0..9) or underscore characters (_).
Save the wrapper file into the same folder where the tested application resides. Note that the wrapper file must have the .htm or .html extension.
HTML
<html>
<body>
<script language="JavaScript">
document.write("<object id='MyAppId' width='500' height='300' classid='clsid:D27CDB6E-AE6D-11cf-96B8-444553540000'");
document.write(" codebase='http://download.macromedia.com/pub/shockwave/cabs/flash/swflash.cab#version=10,0,0,0'>");
document.write("<param name='movie' value='MyApp.swf'/>");
document.write("<param name='quality' value='high'/>");
document.write("<param name='allowscriptaccess' value='always'");
document.write("<embed id='MyAppId_2' width='500' height='300' src='MyApp.swf' quality='high'");
document.write(" allowscriptaccess='always'");
document.write(" type='application/x-shockwave-flash' pluginspage='http://www.adobe.com/go/getflashplayer'/>");
document.write("</object>");
</script>
<noscript>
<object id="MyAppId" width="500" height="300" classid="clsid:D27CDB6E-AE6D-11cf-96B8-444553540000"
codebase="http://fpdownload.macromedia.com/pub/shockwave/cabs/flash/swflash.cab#version=10,0,0,0">
<param name="movie" value="MyApp.swf" />
<param name="quality" value="high" />
<embed id="MyAppId_2" width="500" height="300"
src="MyApp.swf" quality="high"
allowScriptAccess="always"
type="application/x-shockwave-flash"
pluginspage="http://www.adobe.com/go/getflashplayer" />
</object>
</noscript>
</body>
</html>
Tips
-
To insert a Flash movie into a web page, you use the
OBJECTorEMBEDtags. These tags can contain childOBJECTorEMBEDtags. It is recommended that you specify the id attribute for each of theseOBJECTandEMBEDtags to improve the test performance. -
The
OBJECT(orEMBED) tags that you use to insert your Flash movie have the allowScriptAccess attribute. It is recommended that you use the “always” value for this attribute as this will provide better performance. Specifying the “sameDomain” value in the attribute can significantly slow down the test performance.
Configuring Window Mode
To properly test an Adobe Flash or Flex application with the debug version of Flash Player in Mozilla Firefox, the application must be running in the windowed mode. That is, the WMode parameter of the tested Flash of Flex movie embedded into a wrapper web page must be set to window (the default value). If this parameter is set to opaque or transparent, TestLeft will not be able to recognize the objects of the application running in Firefox.
| Note: | This restriction does not apply to applications running in Microsoft Internet Explorer. |
You can change the value of the WMode parameter by modifying the source code of the application’s wrapper web page:
-
Open the wrapper web page of your tested Flash (Flex) application in any text or HTML editor.
-
In the source code of the page, locate the
swfobject.embedSWForAC_FL_RunContentfunction call and/or theobjectandembedtags that embed your Flash (Flex) movie into the page (this depends on the way your application is embedded into the wrapper web page). -
Either remove the
wmodeparameter from the above-mentioned function calls or web page elements, or set its value to window. Below are possible HTML code snippets with thewmodeparameters highlighted:-
Example 1
HTML
<object classid="clsid:D27CDB6E-AE6D-11cf-96B8-444553540000" codebase="http://fpdownload.macromedia.com/get/flashplayer/current/swflash.cab" width="500" height="300">
<param name="movie" value="MyTestedApp.swf">
<param name="quality" value="high">
<param name="wmode" value="window">
<embed src="MyTestedApp.swf" quality="high" wmode="window" pluginspage="http://www.adobe.com/go/getflashplayer" type="application/x-shockwave-flash" width="500" height="300"></embed>
</object> -
Example 2
HTML
<script type="text/javascript">
var flashvars = {};
var params = {};
params.quality = "high";
params.wmode = "window";
params.bgcolor = "#869ca7";
var attributes = {};
attributes.id = "MyTestedApp";
attributes.name = "MyTestedApp";
attributes.align = "middle";
swfobject.embedSWF(
"MyTestedApp.swf", "flashContent",
"100%", "100%",
"10.0.0", "playerProductInstall.swf",
flashvars, params, attributes);
</script> -
Example 3
HTML
<script type="text/javascript">
AC_FL_RunContent(
'codebase', 'http://fpdownload.macromedia.com/pub/shockwave/cabs/flash/swflash.cab',
'width', '500',
'height', '300',
'src', 'MyTestedApp',
'quality', 'high',
'wmode', 'window',
'pluginspage', 'http://www.adobe.com/go/getflashplayer',
'movie', 'MyTestedApp'
);
</script>
-
-
Save the changes made to the web page’s source code.
Preparing TestLeft
Testing Flash and Flex Applications in Internet Explorer
To test Flash and Flex applications in Internet Explorer, you do not need to prepare TestLeft. Just compile your application with accessibility information.
| Note: | TestLeft cannot use MSAA to test Flash and Flex applications running in Microsoft Edge on Windows 10 or in Internet Explorer 11 on Windows 8.1 and later. |
Testing Flash and Flex Applications in Mozilla Firefox
To test Flash and Flex applications in Mozilla Firefox using the MSAA engine, enable MSAA support for Firefox’s Flash Player in your TestLeft test. To do this, add the following classes to the list of supported windows in your test:
-
MozillaWindowClass -
GeckoFPSandboxChildWindow -
GeckoPluginWindow
C#
…
public void Test()
{
Driver.Options.MSAAFilter.AddWindow("MozillaWindowClass");
Driver.Options.MSAAFilter.AddWindow("GeckoFPSandboxChildWindow");
Driver.Options.MSAAFilter.AddWindow("GeckoPluginWindow");
…
}
Visual Basic .NET
…
Public Sub Test()
Driver.Options.MSAAFilter.AddWindow("MozillaWindowClass")
Driver.Options.MSAAFilter.AddWindow("GeckoFPSandboxChildWindow")
Driver.Options.MSAAFilter.AddWindow("GeckoPluginWindow")
…
End Sub
Java
…
public void Test() throws Exceptions{
driver.getOptions.getMSAA().addWindow("MozillaWindowClass");
driver.getOptions.getMSAA().addWindow("GeckoFPSandboxChildWindow");
driver.getOptions.getMSAA().addWindow("GeckoPluginWindow");
…
}
See Also
Preparing Flash and Flex Applications for Testing
Preparing Web Applications for Testing
Preparing Web Browsers for Testing