 |
Flash Player has reached end of life on December 31, 2020. Support for Flash and Flex applications is now deprecated in TestComplete and will be removed in a future release. |
To access the internals of Flash and Flex applications from tests, you can include TestLeft FlexClient helper library in the tested application.
Compiling Flash and Flex Applications with the FlexClient Library Included
The FlexClient helper library is shipped with TestLeft. Include the FlexClient library in your application when compiling the application.
 Compiling Flash and Flex Applications in Adobe Professional IDE
Compiling Flash and Flex Applications in Flash(Flex) Builder IDE
Compiling Flash and Flex Applications in Adobe Professional IDE
-
Open your application project in the Adobe Flash Professional IDE.
-
Select File | Publish Settings from the main menu of the IDE or press Ctrl+Shift+F12 to invoke the Publish Settings dialog.
-
In the dialog, switch to the Flash tabbed page. If it is not displayed, select the Flash (.swf) option on the Formats page of the dialog.
-
On the Flash page, click the Settings button to the right of the Script combo box. Note that ActionScript 3.0 or later version must be chosen in this combo box (that is, your Flash application must be created with the use of ActionScript 3.0 or later), since earlier versions of ActionScript do not allow including external SWC libraries in SWF modules of Flash applications.

-
In the Advanced ActionScript Settings dialog, add the fully-qualified name of the FlexClient.swc file to the list of SWC libraries to be included in the application. For this purpose:
-
Switch to the Library path tabbed page.
-
Click the Browse to SWC file button.
-
Choose the FlexClient.swc file in the subsequent standard Open File dialog.
The fully-qualified name of the chosen file will be added to the list of SWC libraries on the Library path page:

-
-
Click OK in the Advanced ActionScript Settings and Publish Settings dialogs to apply the changes to the application project.
-
Add code for initialization of the FlexClient.swc library to the source code of your Flash application. Depending on whether you store the source code of your application within a Flash document file (.fla) or in a separate ActionScript file (.as), you add the initialization code in one of the following ways:
-
If you store the application source code in a .fla file:
-
Select Window | Actions from the main menu of Flash IDE (or press F9) to display the Actions panel.
-
Select a scene in the Script navigator pane of the Actions panel and type the following code in the Script pane that displays the script code of the selected unit:
ActionScript
import FlexClient.Agent;
FlexClient.Agent.initApplication(stage);Note: Since you need to initialize the library at the application startup, add this initialization code to the beginning of the script. Do not enclose it in a function or class method call. -
Close the Actions panel.
-
-
If you store the application source code in a .as file:
-
Open the ActionScript source code file (.as) with the implementation of the main class of your Flash application.
-
Add the following code snippet to the beginning of the script to import the
FlexClient.Agentclass:ActionScript
import FlexClient.Agent;
-
Call the
FlexClient.Agent.initApplicationmethod from the constructor of your application’s main class. For instance:ActionScript
import FlexClient.Agent;
// The application's main class
public class MyApp extends MovieClip
{
// The class constructor
public function MyApp()
{
...
FlexClient.Agent.initApplication(stage);
...
}
} -
Save the changes and close the source code file.
-
-
-
Save the changes made to your application project.
-
Select File | Publish from the main menu or press Shift+F12 to republish the application with the FlexClient.swc library included.
After you perform the steps above, the resulting SWF file of your Flash application will contain the FlexClient library and be ready for testing.
Compiling Flash and Flex Applications in Flash(Flex) Builder IDE
To include the FlexClient library in your Flash or Flex application using the Adobe Flash(Flex) Builder IDE, do the following:
Compiling Flex Applications With the FlexClient Library
The TestLeft package includes different versions of this library intended for different versions of Flex SDK used for compiling the tested Flex application. All of them reside in the <TestLeft>\Open Apps\Flex folder:
- FlexClient.swc - the automated testing library for Flex SDK v. 3.3 and 3.4.
- FlexClient35.swc - the automated testing library for Flex SDK v. 3.5 - 3.6.
- FlexClient4.swc - the automated testing library for Flex SDK v. 4.0 - 4.6, 4.9 - 4.14.
| Note: | Embedding the Automation libraries increases the size of the compiled application. So, remember to exclude the libraries before the final deployment of your application. |
You can include the FlexClient library in your Flex application in one of the following ways:
Using Flash Builder or Flex Builder IDE
-
Open your project in Flash Builder (or Flex Builder).
-
Right-click the project node in Flash Builder’s Package Explorer (Flex Navigator in Flex Builder) and select Properties from the context menu, or select Project | Properties from the main menu of the IDE. This will bring up the Properties dialog.
-
Select the Flex Compiler category and enter the following command in the Additional compiler arguments box:
On a 32-bit version of Windows:
-include-libraries "C:/Program Files/SmartBear/TestLeft 15/Open Apps/Flex/FlexClient4.swc"
On a 64-bit version of Windows:
-include-libraries "C:/Program Files (x86)/SmartBear/TestLeft 15/Open Apps/Flex/FlexClient4.swc"
Note: This example demonstrates how to include the FlexClient4.swc library used with applications created with Flex SDK v. 4.0 - 4.6. If you use Flex SDK v. 3.5 - 3.6 to compile your application, you should use the FlexClient35.swc library. With Flex SDK v. 3.3 - 3.4, you should use FlexClient.swc. 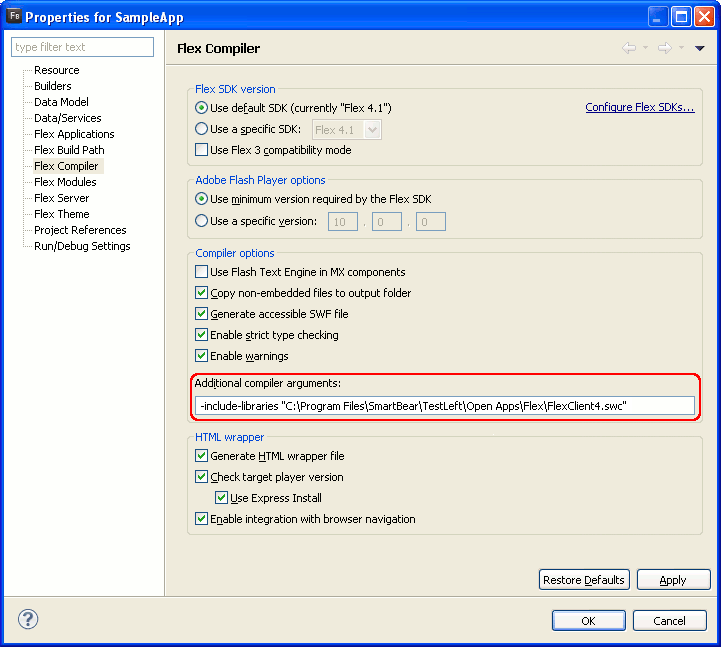
-
Save the changes and rebuild the project.
Using the Flex compiler’s command line
When building a Flex application from the command line, use the -include-libraries+= compiler option. The += postfix denotes that the list of included libraries should be appended rather than overwritten. For example:
On a 32-bit version of Windows:
mxmlc -include-libraries+= "C:/Program Files/SmartBear/TestLeft 15/Open Apps/Flex/FlexClient4.swc" c:/myflexapp/myflexapp.mxml
On a 64-bit version of Windows:
mxmlc -include-libraries+= "C:/Program Files (x86)/SmartBear/TestLeft 15/Open Apps/Flex/FlexClient4.swc" c:/myflexapp/myflexapp.mxml
| Note: | This example demonstrates how to include the FlexClient4.swc library used with applications created with Flex SDK v. 4.0 - 4.6. If you use Flex SDK v. 3.5 - 3.6 to compile your application, you should use the FlexClient35.swc library. With Flex SDK v. 3.3 - 3.4, you should use FlexClient.swc. |
Using the Flex compiler’s configuration file
You can modify the Flex compiler’s configuration file, <Flex SDK>/frameworks/flex-config.xml, so that it will include the specified libraries in all the applications you will compile. For this purpose, uncomment the <include-libraries> node and add the following items:
XML
<flex-config>
<compiler>
...
<include-libraries>
<!-- Use the following path on a 32-bit version of Windows -->
<library>C:/Program Files/SmartBear/TestLeft 15/Open Apps/Flex/FlexClient4.swc</library>
<!-- Use the following path on a 64-bit version of Windows -->
<!--library>C:/Program Files (x86)/SmartBear/TestLeft 15/Open Apps/Flex/FlexClient4.swc</library-->
</include-libraries>
...
</compiler>
...
</flex-config>
| Note: | This example demonstrates how to include the FlexClient4.swc library used with applications created with Flex SDK v. 4.0 - 4.6. If you use Flex SDK v. 3.5 - 3.6 to compile your application, you should use the FlexClient35.swc library. With Flex SDK v. 3.3 - 3.4, you should use FlexClient.swc. |
Including Additional Libraries in the Application
If your Flex application uses the controls listed below, include the following libraries into the application (you need to specify the needed libraries in the compiler’s options in the same way as it is described above for the FlexClient library):
| Control Names | Library | Description |
|---|---|---|
| Data Management and Visualization controls | <Flash Builder>/sdks/4nn/frameworks/libs/automation/automation_dmv.swc -- or -- <Flash Builder>/sdks/3nn/frameworks/libs/automation_dmv.swc-- or -- <Flex 4 SDK>/frameworks/libs/automation/automation_dmv.swc-- or -- <Flex Builder>/sdks/3nn/frameworks/libs/automation_dmv.swc |
Implements automation for Data Management and Visualization controls, like charts and AdvancedDataGrids. Available in Adobe Flash Builder 4, Flex Builder 3 and Flex 4 SDK. |
| Controls created with Adobe Flex Component Kit for Flash CS3 | <Flash Builder>/sdks/4nn/frameworks/libs/automation/automation_flashflexkit.swc -- or -- <Flash Builder>/sdks/3nn/frameworks/libs/automation_flashflexkit.swc-- or -- <Flex 4 SDK>/frameworks/libs/automation/automation_flashflexkit.swc-- or -- <Flex Builder>/sdks/3nn/frameworks/libs/automation_flashflexkit.swc |
Implements automation for controls, containers, skins, and other assets created with Adobe Flex Component Kit for Flash CS3. Available in Adobe Flash Builder 4, Flex Builder 3 and Flex 4 SDK. |
Preparing Web Browser
Preparing Internet Explorer
We recommend that you disable Protected Mode in Internet Explorer:
-
From the Internet Explorer main menu, select Tools | Internet Options.
-
Switch to the Security tab.
-
Clear the Enable Protected Mode check box and click OK.
-
Restart Internet Explorer.
Preparing Mozilla Firefox
Disable Flash Player Protected Mode
Starting from version 11.3, Firefox Flash Player plugin runs in protected mode on Windows 7 and later Windows versions. The protected mode may cause Flash Player to freeze or crash. If you experience these issues, disable Flash Player protected mode:
-
Open Flash Player configuration file mms.cfg in a text editor, for example, in Notepad. The mms.cfg file is in one of the following folders:
-
On 32-bit Windows: %WINDOWS%\System32\Macromed\Flash\
-
On 64-bit Windows: %WINDOWS%\SysWOW64\Macromed\Flash\
If the mms.cfg file does not exist, create it.
-
-
Add the following line at the end of the mms.cfg file and save the changes.
ProtectedMode=0
To enable the protected mode again, remove ProtectedMode=0 from the mms.cfg file.
Disable Flash Player Sandbox
If you use Firefox version 65 or later, disable the Flash Sandbox security mode:
-
Start Firefox and type
about:configin the Address bar. This will open the Firefox settings page. -
Find the
dom.ipc.plugins.sandbox-level.flashproperty in the list and set it to0.
– or –
-
Open Windows Control Panel. To do this, you can, for example, click Start and then click Control Panel.
-
In the Search box, type environment variables and then click Edit environment variables for your account.
-
In the resulting dialog, create an environment variable named
MOZ_DISABLE_NPAPI_SANDBOXwith any value. -
Save the changes.
Setting Security Permissions
By default, the Flash Player does not allow the local SWF or FLV content to communicate with the Internet. To test Flash and Flex applications that reside on a local computer, allow the communication. To do this, add the folder where the application resides to Flash Player’s list of trusted locations:
-
Open the Control Panel | System and Security | Flash Player applet. You can also right-click somewhere within any Flash or Flex movie open in a web browser (or in the Flash Player standalone) and choose Global Settings from the context menu.
-
In the Flash Player Settings Manager, switch to the Advanced tabbed page and click the Trusted Location Settings button. This will invoke the Trusted Location Settings dialog.
-
In the Trusted Location Settings dialog, select Add and specify the path to your application or the folder where your application resides. The specified file or folder will be added to the list of trusted locations which are allowed to access the Internet.
If you have a Flash Player version earlier than 11, use the online version of the Adobe Flash Player Settings Manager to specify the list of trusted locations. To open the Global Security Settings panel where you can specify the list of trusted locations, navigate to the following URL:
http://www.macromedia.com/support/documentation/en/flashplayer/help/settings_manager04.html
Creating Wrapper HTML Page
To test a Flash or Flex application, create a wrapper web page to embed the application. You can do this in one of the following ways:
From Adobe Flash Professional IDE
From Flash Builder or Flex Builder IDE
From Adobe Flash Professional IDE
To automatically generate a wrapper HTML page for your application from Adobe Flash Professional:
-
Open your application project in Adobe Flash IDE.
-
Select File | Publish Settings from the main menu of IDE or press Ctrl+Shift+F12 to open the Publish Settings dialog.
-
On the Formats tabbed page of the dialog, select the HTML (.html) check box. The HTML tabbed page will appear. On this page, you can configure some parameters of the web page to be created.
-
In the edit box to the right of the HTML (.html) check box, specify the file name of the web page to be created.
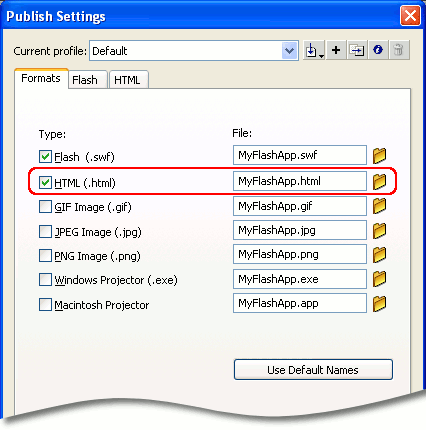
-
Click OK to close the Publish Settings dialog and save the changes.
-
Select File | Publish from the main menu or press Shift+F12 to republish your Flash application with the wrapper HTML page.
To improve the test performance, you can modify source code of the created page according to the tips below.
From Flash Builder or Flex Builder IDE
If you use Adobe Flash Builder 4 or Flex Builder 3 to develop your applications, you can generate the wrapper HTML page by modifying the Flash Builder (or Flex Builder) project properties:
-
Open your project in Flash Builder (or Flex Builder).
-
Right-click the project node in Flash Builder’s Package Explorer (Flex Navigator in Flex Builder) and select Properties from the context menu, or select Project | Properties from the main menu of the IDE. This will bring up the Properties dialog.
-
Select the Flex Compiler category and enable the Generate HTML wrapper file option:
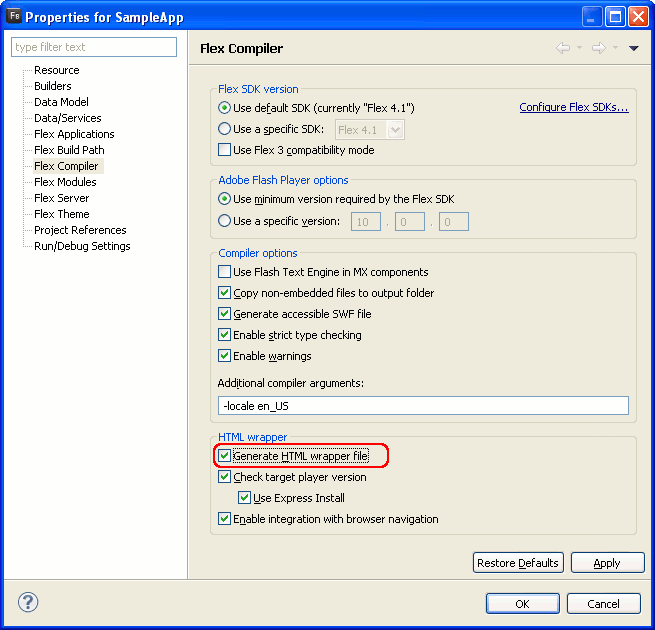
-
Save the changes and rebuild the project.
To improve the test performance, you can modify the source code of the created page according to the tips below.
From HTML Templates Included in Flex SDK
Flex SDK includes a set of template HTML pages that you can use to create a wrapper for the tested application. These templates are located in the <Flex SDK>/templates folder. Each template contains tokens (for example, ${swf}) that you will need to replace with values appropriate for your application. For more information about using the templates, see the About the HTML templates topic in Flex documentation (http://livedocs.adobe.com/flex/).
To improve the test performance, you can modify the source code of the created page according to the tips below.
Manually
You can create a wrapper HTML page yourself, using any text or HTML editor. Below you will find the typical code of a wrapper page. Simply copy this code, paste it into the editor and modify the highlighted elements to match the tested Flash and Flex application:
-
Replace MyApp.swf with the name of the tested application’s SWF file.
-
Specify the application’s size (in pixels) in the
widthandheightattributes. -
Specify the
idattribute of theOBJECT(orEMBED) tags that you use to insert your movie into the page. TestLeft uses this attribute to address the movie in tests. Also, this will improve the test performance. The attribute must start with a letter (A..Z, a..z) and contain only letters (A..Z, a..z), digits (0..9) or underscore characters (_).
Save the wrapper file into the same folder where the tested application resides. Note that the wrapper file must have the .htm or .html extension.
HTML
<html>
<body>
<script language="JavaScript">
document.write("<object id='MyAppId' width='500' height='300' classid='clsid:D27CDB6E-AE6D-11cf-96B8-444553540000'");
document.write(" codebase='http://download.macromedia.com/pub/shockwave/cabs/flash/swflash.cab#version=10,0,0,0'>");
document.write("<param name='movie' value='MyApp.swf'/>");
document.write("<param name='quality' value='high'/>");
document.write("<param name='allowscriptaccess' value='always'");
document.write("<embed id='MyAppId_2' width='500' height='300' src='MyApp.swf' quality='high'");
document.write(" allowscriptaccess='always'");
document.write(" type='application/x-shockwave-flash' pluginspage='http://www.adobe.com/go/getflashplayer'/>");
document.write("</object>");
</script>
<noscript>
<object id="MyAppId" width="500" height="300" classid="clsid:D27CDB6E-AE6D-11cf-96B8-444553540000"
codebase="http://fpdownload.macromedia.com/pub/shockwave/cabs/flash/swflash.cab#version=10,0,0,0">
<param name="movie" value="MyApp.swf" />
<param name="quality" value="high" />
<embed id="MyAppId_2" width="500" height="300"
src="MyApp.swf" quality="high"
allowScriptAccess="always"
type="application/x-shockwave-flash"
pluginspage="http://www.adobe.com/go/getflashplayer" />
</object>
</noscript>
</body>
</html>
Tips
-
To insert a Flash movie into a web page, you use the
OBJECTorEMBEDtags. These tags can contain childOBJECTorEMBEDtags. It is recommended that you specify the id attribute for each of theseOBJECTandEMBEDtags to improve the test performance. -
The
OBJECT(orEMBED) tags that you use to insert your Flash movie have the allowScriptAccess attribute. It is recommended that you use the “always” value for this attribute as this will provide better performance. Specifying the “sameDomain” value in the attribute can significantly slow down the test performance.
See Also
Preparing Flash and Flex Applications for Testing
Preparing Web Applications for Testing
Preparing Web Browsers for Testing