
 Adding information on found issues from test logs to Axosoft OnTime databases is deprecated. The appropriate plugin is disabled in TestExecute by default. This functionality will be removed from the product in one of the future versions.
The Add Defect Info to OnTime Database dialog allows you to add information on found errors to an Axosoft OnTime database directly from TestExecute's context menu (according to Axosoft terms, errors are called defects).
|
TestExecute supports submitting defects to Axosoft OnTime 2009 - 2017.
Also, this feature requires that Internet Explorer 7 or later be installed on your computer. Due to the specifics of using Axosoft OnTime 2010 and Internet Explorer 9, TestComplete is unable to post two defects to Axosoft OnTime 2010 one by one. If you need to post two defects to the OnTime database, you can either close and then reopen TestComplete and post the second defect in a new TestComplete session, or use a later version of the Axosoft OnTime database. |
To send a bug report to the Axosoft OnTime database, do the following:
- Click the Post Defect to OnTime item in TestExecute's context menu.
- Select the desired log item in the ensuing submenu.
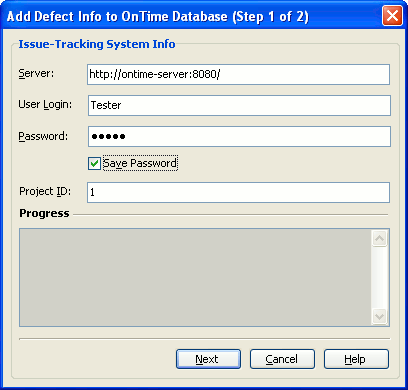
Here is a sample image of the dialog's first page:
In the dialog, you can specify the location of the desired Axosoft OnTime database as well as information about the defect.
-
On the first page of the dialog, you can specify the following parameters:
The Issue-Tracking System Info group contains the options that affect database connection parameters.
The Server edit box specifies the URL of the desired Axosoft OnTime database.
The User Login and Password edit boxes specify the login and password of the account under which you want to connect to the desired database.
Check the Save Password box to save the content of the Password edit box. Otherwise, the password will be lost every time you close the dialog.
The Project ID edit box specifies an identifier of the project stored in the Axosoft OnTime database.
Note: To obtain the desired project's ID, do any of the following: - Log in to your Axosoft OnTime database. Select the desired project in the Project Selection panel and click Edit the currently selected project. After you do this, the specified project's ID will be shown in the address line of your browser.
- Log in to your Axosoft OnTime database. Select the desired project in the Project Selection panel and choose Reports | Project Reports | Project Summary from OnTime's main menu. After you do this, a summary .pdf file will be generated. The specified project's ID will be at the beginning of the generated summary report.
However, you can do this only if you are an administrator of the specified OnTime database. If you are not, please contact your Axosoft OnTime system administrator.
Click Next to connect to the needed database under the specified user account. If the specified URL and user account are available, the dialog's second page is displayed. Otherwise, an exception occurs.
-
On the second page of the dialog, you can specify the following parameters:
The General Defect Info group contains the options that affect the defect’s parameters.
Use the Priority drop-down list to specify the defect’s priority. The following values are available: Low, Medium, High. You can also leave this option blank. The content of the Priority drop-down list will be set as the value of the defect’s Priority column.
Use the Assigned To drop-down list to specify the user to assign the defect to.
Note: When TestExecute connects to the database for the first time, it reads the names of existing users from the database, adds them to the list and refreshes this information every time you click Next on the first page of the dialog. Use the Severity drop-down list to specify the defect’s severity. The following values are available: No Impact, Low Impact, Medium Impact, High Impact and Critical. You can also leave this option blank. The content of the Severity drop-down list will be set as the value of the defect’s Severity column.
The Name edit box specifies a string that will be shown in the Axosoft database as the defect’s name.
The content of the Description field will be set as the value of the defect’s Description tab.
The content of the Replication Procedures field will be set as the value of the defect’s Repro Steps tab.
Select the Attach TestComplete log check box to attach the log of the current project to the defect. By default, this option is enabled. If you do not want to attach the log to a defect, clear the check box.
Select the Attach System Information check box to attach information about your system to the defect. By default, this option is enabled. If you do not want to attach system information to a defect, clear the check box.
The Progress field indicates the connection status.
Click Send to create a new defect with the parameters specified in the General Defect Info section and to add the defect to the OnTime database. Otherwise, click Cancel.
|
If you click Next on the first page of the wizard and TestExecute connects to the OnTime database successfully, the values of the Server, User Login, Password (only if the Save Password option is enabled) and Project ID options will be saved when either the dialog or TestExecute is closed and will be set as the default values next time you open the application. The values of the Description, Replication Procedures, Priority, Severity, Assigned To and Name options are saved only if you click the Send button and are lost every time you close TestExecute. |