
A possible way to make TestEngine start automatically is to run it as an operating system service on Windows or daemon on Linux. This way TestEngine can start even if no user is logged in on the computer where it is installed.
Services (daemons) are a special type of executables. TestEngine is a console application. One possible way to run it as a service (daemon) is to “convert” it to a service with a special utility like nssm. On Windows, a more preferable way is to use a special service executable that is installed as part of the VirtServer installation. On Linux, you can create special configuration files for running VirtServer as a service. See below.
Licensing
If TestEngine is running as a service, you install a license in a normal way. See Licensing TestEngine.
 It is important which user account you use to run TestEngine Service when activating the license because it will not work for other users. To change the user that is used to run the service, see the instruction for your operating system below.
Windows
The TestEngine installation program offers an option to install TestEngine as a Windows service. Simply select it in the installation wizard:
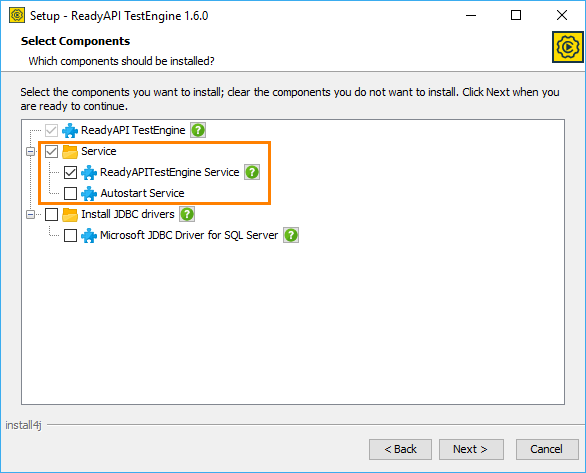
Another option you can select is Autostart Service. If you select it, the operating system will run the service automatically on startup.
After you install TestEngine as a service, it is important to change the user account you use to run this service to the account that will use TestEngine. To do this, open the operating system’s Services list, right-click the ReadyAPITestEngine Service in the list and select Properties from the context menu. In the subsequent dialog, switch to the Log On tab and specify the user account and password there.
Linux
To automate the start of TestEngine, you may use a system configuration. Below is an explanation of how you can do this in RedHat Linux. In other Linux versions the procedure is similar.
-
Open a text editor and create the following file in the /etc/systemd/system folder.
Note: To save the file, you will need write permissions for the /etc/systemd/system directory. So, you may need to start the text editor with the sudocommand./etc/systemd/system/testengine.service
[Unit]
Description=TestEngine Service
After=network.target
[Service]
Type=simple
User=user-name
ExecStart=/home/user-name/SmartBear/ReadyAPITestEngine-1.32.0/bin/testengine.sh
Restart=on-abort
StandardOutput=syslog
StandardError=syslog
SyslogIdentifier=testengine
[Install]
WantedBy=multi-user.targetReplace user-name with your user name. It is important to specify the user name that is used to activate the license.
Also, you may need to correct the TestEngine folder name if you are using a version different from the one we used above.
-
Run the following command to enable the TestEngine daemon to start automatically on the system startup:
sudo systemctl enable testengine.service
-
Restart your computer. The operating system should run TestEngine as a service (daemon).
If you want to run the daemon manually, use a command like this one:
sudo systemctl start testengine.service