
Projects and project suites may include a lot of elements and this may complicate viewing the project contents and navigation in the Project Explorer. To solve the problem, you can organize the project contents into folders and subfolders. That is, you can add one or several folders to an item and then place child elements of this item to these folders. The following images show the contents of a project that have and that does not have folders:
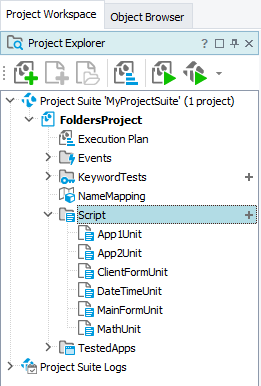 Without folders |
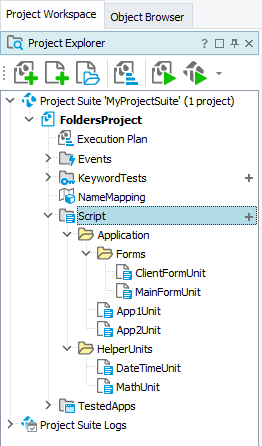 With folders |
As you can see, the project contents displayed on the second image look more organized.
You can add a folder to any item of the Project Explorer panel that may contain child elements, that is, you can add folders to project suites, projects, project items and project items’ elements that may have child items.
Folders can only contain child elements of the item to which the folder belongs. For instance, a folder added to the project suite node may only contain projects, but not project items. Similarly, a folder that was added, for example, to the Stores | Table node may only contain Table elements, but not DBTable or XML collections. This rule also applies to subfolders.
Folders are used to logically organize the project suite contents. They can only be created for projects, project items and their child elements.
To create a folder or subfolder
To add a folder to an item displayed in the Project Explorer panel, right-click this item and choose Add | New Folder from the context menu.
To create a subfolder, right-click the desired folder and then choose Add | New Folder from the context menu. Alternatively, you can make a folder a subfolder by dragging an existing folder to the desired parent folder. Note that this is possible only if folders contain elements of the same type. For instance, it is not allowed to drag a folder that contains script units to a folder containing low-level procedures.
| Note: | Creating a folder in the Project Explorer panel does not lead to creating a folder on a hard drive. The Project Explorer’s folders are used for logical organization of the projects’s contents, not for physical organization. |
To add items to a folder (or subfolder)
After creating a folder (or subfolder), you can add project elements to it. To do this, drag the desired element to the folder node. You can also add project elements to folders the same way as you add project items and their child elements, that is, by right-clicking the folder, selecting Add | New Item from the context menu and using the subsequent Create Project Item dialog. See Adding and Removing Project Items and Their Child Elements.
Addressing from scripts
Folders do not affect the way project items are addressed in scripts. For instance, if you organize elements of the Stores | XML project collection into several folders, you can still address them through the XML object.
To rename a folder
To rename a folder, right-click it in the Project Explorer, choose  Rename from the context menu and then type the desired name in the ensuing in-place editor. To confirm the change, press Enter. To cancel the change, press Esc.
To delete a folder
To delete a folder, right-click it in the Project Explorer panel and choose  Remove from the context menu.
Once you do this, you will be asked whether you want to remove the folder along with its contents from the project (but keep the corresponding files on the disk), or whether you want to completely delete all the elements stored in the folder. Select the action you need by pressing the Remove or Delete button.
| Tip: | If you want to keep some of the elements stored in the folder, drag them to another folder or project item. |